Tenants and management
A tenant is an allotment of users and resources within an organization. Organizations can leverage tenants for distinct purposes, such as development or production, and then share common resources across tenants. Each tenant has its own resources, users, and workloads. SambaStudio allows organizations to allocate resources across multiple tenants.
This document describes:
-
The SambaStudio tenant structure and nomenclature.
-
The switching tenant feature available to all users.
-
The RDUs Available summary feature.
-
The System Health information feature.
-
The tenant management features available to an organization administrator (OrgAdmin).
|
See Users and management for more information on SambaStudio user roles and management. |
Structure and nomenclature
SambaStudio uses the following terminology in describing hardware, tenants, organizational structure, and users.
- Organization
-
Organization describes an entity or customer using SambaStudio.
- User
-
A user is part of an organization and can be assigned a predefined role. A user can be part of and assigned to multiple tenants. All users within the same tenant can view or manage projects and workloads present in the tenant.
- Tenant
-
A tenant is an allotment of users and resources within an organization. Each tenant has its own resources, users, and workloads.
- Default tenant
-
The default tenant is where all resources are allocated initially. During the SambaStudio installation, the default tenant (Default Tenant) is created and an organization administrator (OrgAdmin) is assigned to it.
When updating tenant RDUs and reallocation of resources is performed, resources will get removed from the selected tenant and assigned to the default tenant. The resources then can be added from the default tenant to another tenant.
- Project
-
A project is a logical grouping of workloads and artifacts within a tenant.
- Nodes and RDUs
-
A node describes the collection of SambaNova Systems' Reconfigurable Dataflow Units™ (RDUs) available per SambaNova hardware generation.
-
For SambaNova hardware generations SN10, SN30, or SN40L-8, a total of eight RDUs are available per node.
-
For SambaNova hardware generation SN40L-16, a total of sixteen RDUs are available per node.
-
If a job or endpoint requires more than one RDU to start, the RDUs must be available on the same node of the SambaNova hardware generation (SN10, SN30, SN40L-8, or SN40L-16).
-
Switching tenants
SambaStudio allows users to switch the active tenant they are using from any window in the platform. By switching tenants, users can view or manage projects and workloads that are present in multiple tenants.
|
A user must be assigned to more than one tenant by an organization administrator or tenant administrator in order to switch tenants. |
-
Click the tenant selection drop-down in the top menu bar. A list of your assigned tenants will display with the current tenant highlighted in blue and a checkmark. Only tenants assigned to you by your organization administrator or tenant administrator will be displayed.
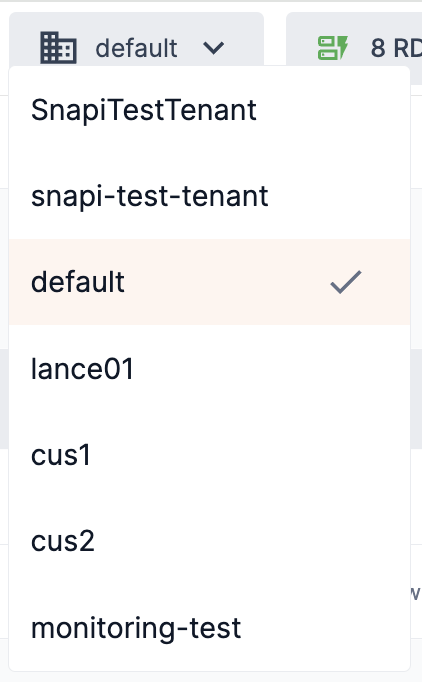 Figure 1. Tenant selection drop-down
 -
Select and click the destination tenant to switch. That will now be the active tenant.
RDUs Available
RDUs Available provides a summary of the RDUs for the selected tenant (displayed immediately to the left). It can be viewed from any window in the platform. Click RDUs Available in the top menu bar to view the RDUs Available summary.
|
The RDUs Available summary interface displays information for each tenant and configured hardware generations, as described in the table below.
| Description | Example Image |
|---|---|
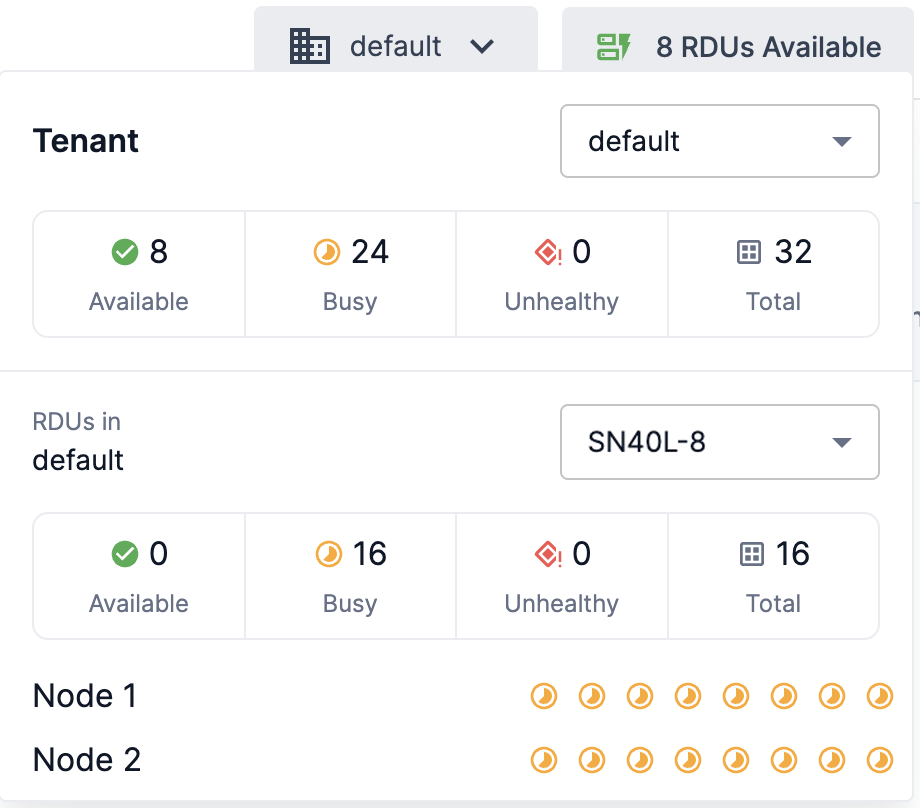
This example image displays information for the default tenant. The default tenant has been created with 2 SN40L-8 and 2 SN10 nodes allocated to it (only SN40L-8 is displayed in the example image). Each node has 8 RDUs for a total of 32 RDUs in the tenant.
|
|
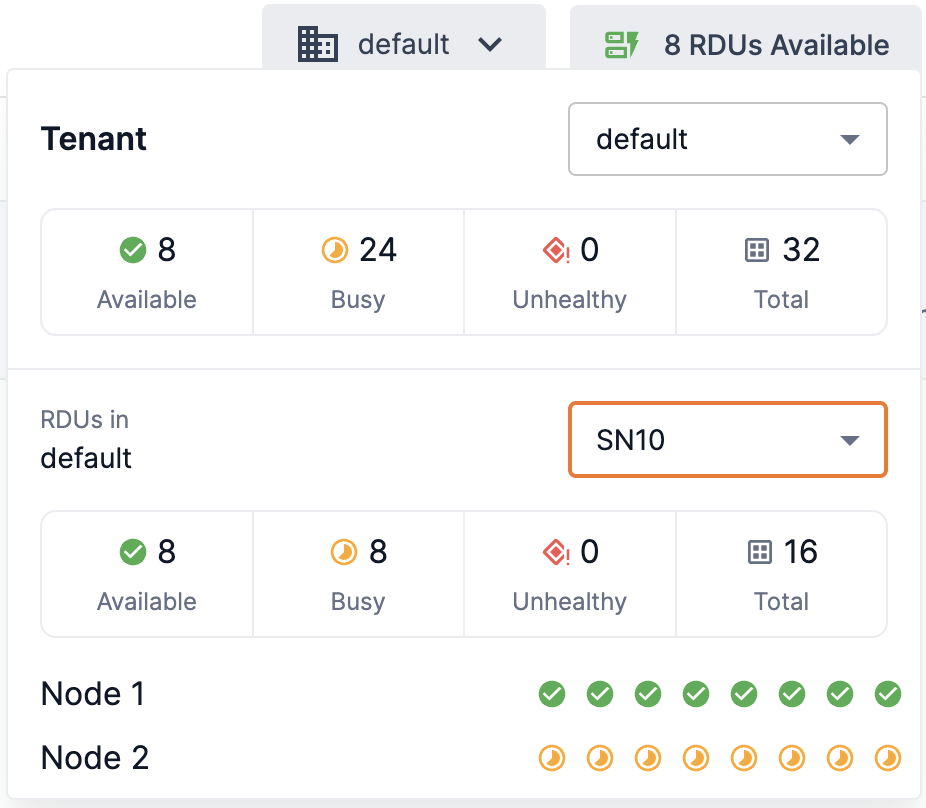
This example image displays information for the same default tenant (with the same total 32 nodes allocated) as the above example. However, the SN10 hardware generation is selected from the drop-down displaying its information.
|
|
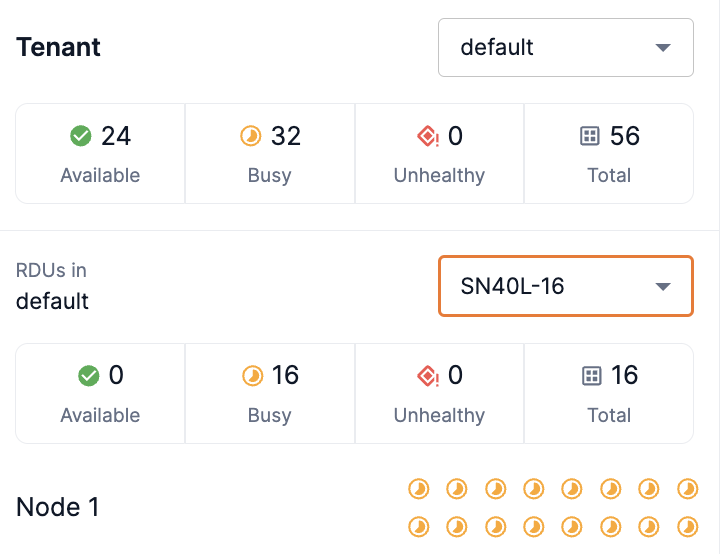
This example image displays a default tenant configured with an SN40L-16 hardware generation. You can see the 16 busy RDUs in the one node of the SN40L-16. |
|
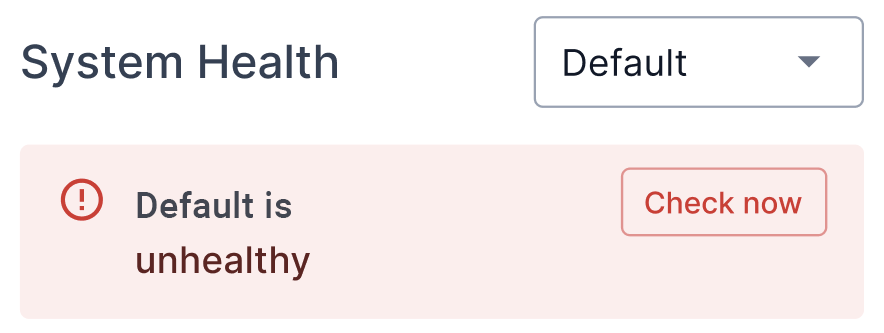
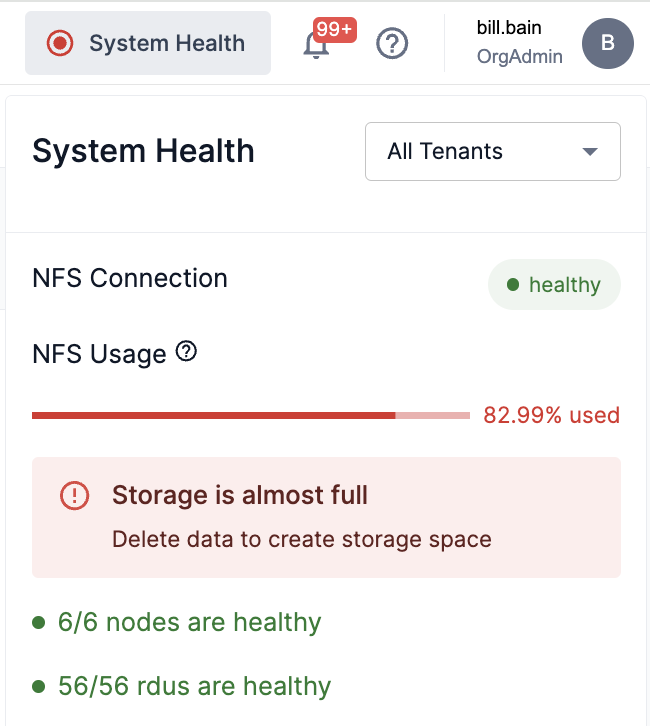
System Health
System Health provides information about your SambaStudio environment and its ability to function. Click System Health in the top menu bar to view the information.
The System Health box displays the following information.
| Description | Example Image |
|---|---|
|
|
|
|
Tenant management using the GUI
An organization administrator (OrgAdmin) can click Tenant management from the left menu. The Tenant management window displays resource and allocation information available to an organization administrator (OrgAdmin).
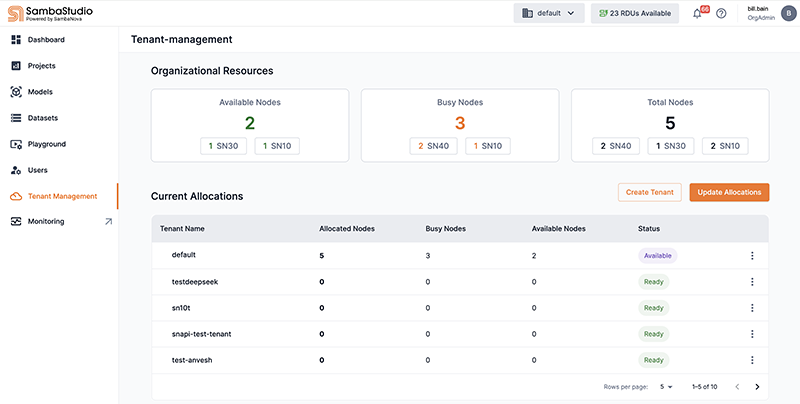
Organizational resources
The Organizational resources section displays platform specific information.
Current allocations
The Current allocations section displays the current tenant configurations of the platform in a table and allows organization administrators (OrgAdmin) to manage tenant resources.
-
Click Create tenant to create a tenant using the GUI.
-
Click Update allocations to update the tenant allocations for a tenant using the GUI.
-
The Tenant name column displays the tenant name of each tenant.
-
The Allocated nodes column displays the number of nodes allocated to each tenant.
-
The Busy nodes column displays the number of nodes that are currently busy performing tasks of each tenant.
-
The Available nodes column displays the number of nodes of each tenant that are available to perform new tasks.
-
The Status column displays the current status of each tenant.
-
Creating displays when a new tenant is being created.
-
Updating displays when a tenant allocation is being updated.
-
Ready displays when a tenant has been setup, but has no nodes allocated to it.
-
Available displays when a tenant has been setup and has at least one node allocated to it.
-
Deleting displays when the tenant has been confirmed by an organization administrator (OrgAdmin) to be permanently deleted.
-
Failed displays when the process of creating, deleting, or updating a tenant fails.
-
-
The three dots open a drop-down menu that allows you to update allocations of the tenant in that row, or delete the tenant.
RDU allocation
Admins can allocate and monitor Resource Distribution Units (RDUs) for each tenant using the SambaStudio interface. This enables fair distribution of compute resources across multiple tenants and supports resource governance in multi-tenant environments.
Storage management (Beta)
|
Storage Management is currently released as a Beta feature. |
The Storage Management interface provides administrators with the ability to allocate, monitor, and manage shared NFS storage at a tenant level. This ensures fair usage and prevents any single tenant from consuming excessive storage, which could affect others in the system.
Key capabilities
-
Quota allocation during tenant creation: When creating a tenant, Admins can choose to allocate a specific storage quota. The interface provides visibility into available storage, existing allocations, and allows updates during tenant creation.
-
Update storage allocation: Admins can update storage allocations at any time for existing tenants, including the Default and Common tenants. A visual indicator helps track available space, used storage, and provides warnings if allocation exceeds available capacity.
-
Minimum storage thresholds and constraints: The system enforces a minimum threshold (e.g., Common storage must be ≥10 TB). Admins are guided by system recommendations and are restricted from setting values below the enforced minimum or the required buffer if storage is already consumed.
-
Monitoring usage: Admins and Tenant Admins can view tenant-specific storage usage via the System Health section. Usage is displayed with progress bars and usage summaries (e.g., GB/TB used, free space).
-
Notifications: When storage allocations are updated, the corresponding Tenant Admins are notified automatically.
-
Quota enforcement for users: Users are prevented from adding datasets, running jobs, or generating checkpoints if the tenant exceeds its allocated storage quota. Warning messages are shown in the interface to alert users of insufficient space.
-
Reclaiming storage: When a tenant is deleted, all associated entities and data are removed, and the previously allocated storage is returned to the unallocated pool.
Tenant management using the CLI
Similar to the GUI, the SambaNova API (snapi) provides tenant management capabilities via the CLI.
List the available tenants using the CLI
The example below demonstrates how to view the available tenants using the snapi tenant list command.
|
This command is available to all user roles. |
$ snapi tenant list
NAME                    CREATED AT                                  LAST UPDATED                                STATUS
default                 2023-04-28 13:23:58.872154 +0000 UTC        2024-01-19 14:40:20.706376 +0000 UTC        Available
tenant1                 2023-04-28 13:37:10.398432 +0000 UTC        2024-01-20 07:44:07.661575 +0000 UTC        Ready
tenant3                 2023-05-02 09:40:33.767691 +0000 UTC        2023-11-10 13:18:41.811529 +0000 UTC        Ready
Tenant information using the CLI
You can use the snapi tenant info command to display information of a specific tenant.
|
This command is available to all user roles. |
You will need to specify the tenant you wish to view for the --tenant input. The example command below displays information for the default tenant, including:
-
The assigned ID of the tenant.
-
The Name of the tenant.
-
Allocated nodes displays the number and generation version of nodes allocated to the tenant. In the example below, the default tenant has two SN10 nodes.
-
Busy nodes displays the number of nodes that are currently busy performing tasks of the tenant. In the example below, one of the two allocated SN10 nodes is busy.
-
Available nodes displays the number of nodes of the tenant that are available to perform new tasks. In the example below, one of the two allocated SN10 nodes is available.
-
Status displays the current status of the tenant.
-
Creating displays when the tenant is being created.
-
Updating displays when the allocation of the tenant is being updated.
-
Ready displays when the tenant has been setup, but has no nodes allocated to it.
-
Available displays when the tenant has been setup and has at least one node allocated to it.
-
Deleting displays when the tenant has been confirmed by an organization administrator (OrgAdmin) to be permanently deleted.
-
Failed displays when the process of creating, deleting, or updating a tenant fails.
-
$ snapi tenant info \
    --tenant default

         Tenant Info
         ============
ID                      : 0e6890c5-973c-4024-ac43-1c302aa81950
Name                    : default
Display Name            : default
Allocated Nodes          : {"SN10": 2}
Busy Nodes               : {"SN10": 1}
Available Nodes          : {"SN10": 1}
Created at              : 2023-04-28 13:23:58.872154 +0000 UTC
Last Updated            : 2024-01-19 14:40:20.706376 +0000 UTC
Status                  : Available
Create a tenant using the GUI
Organization administrators (OrgAdmin) can create a new tenant using the GUI by following the steps below.
-
Click the Create tenant button. The Create new tenant box will open.
-
Enter a name for the tenant in the Add tenant name field. Note that spaces are not accepted in this field.
-
Click Create to complete the process. Click Cancel to stop the process and return to the Tenant management window.
Create a tenant using the CLI
The example below demonstrates how organization administrators (OrgAdmin) can create a tenant using the snapi tenant create command. You will need to specify a name for the tenant.
$ snapi tenant create \
	--name <name-for-new-tenant>
Update tenant resource allocations using the GUI
Organization administrators (OrgAdmin) can change the number of nodes allocated to a tenant using the GUI by following the steps below.
|
Resource allocations cannot be changed for the default tenant. |
-
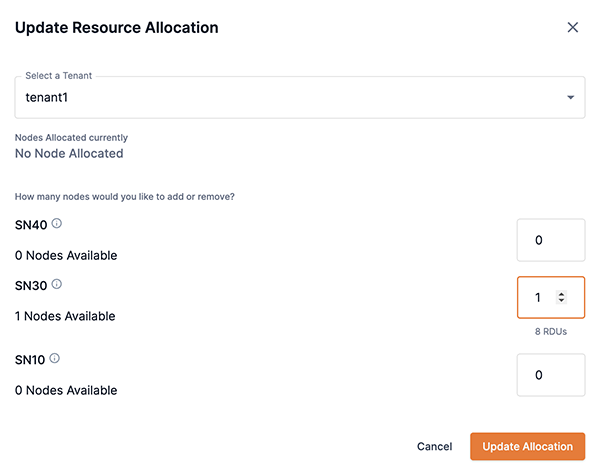
Click the Update allocations button. The Update resource allocation box will open.
-
Select the tenant you wish to manage from the Select a tenant drop-down.
-
Change the number of nodes per SambaNova hardware generation version assigned to the tenant by inputting the number or clicking the up or down arrows.
-
Click Update to complete the process. Click Cancel to stop the process and return to the Tenant management window.
Update tenant RDUs using the CLI
The example snapi tenant update command below demonstrates how organization administrators (OrgAdmin) can update an existing tenant allocation using the CLI.
|
You will need to specify the following for the snapi tenant update command:
-
The tenant that will be updated for the --tenant input.
-
tenant1 is used in the example below.
-
-
The number of nodes to add or remove for the --rdu-nodes input.
-
We specified 1 node to be added in the example below.
-
To remove a node, precede the number with a minus (-1).
-
-
The SambaNova hardware generation (SN10, SN30, SN40L) that contains the
--rdu-nodesfor the --arch input.-
We specified SN10 in the example below.
-
|
The snapi tenant update command below adds one SN10 node to tenant1. |
$ snapi tenant update \
	--tenant tenant1 \
	--rdu-nodes 1 \
	--arch SN10
Delete a tenant using the GUI
Organization administrators (OrgAdmin) can delete a tenant using the GUI by following the steps below. Please be aware of the following considerations when deleting a tenant:
-
The default tenant cannot be deleted.
-
All jobs, endpoints, datasets, and models created in the tenant will be deleted.
-
Associated users will no longer have access to the tenant.
-
RDUs allocated to the tenant will be added to the default tenant.
-
Tenant deletion is irreversible.
|
Tenant deletion times vary and are dependent on the number of resources associated with the tenant. |
-
In the Current allocations table, click Delete tenant from the three dots drop-down in the row of the tenant you wish to delete.
-
The Permanently delete this tenant box will open describing the associated actions of deleting the tenant.
-
-
Click the acknowledgement statement checkbox and Confirm to proceed.
-
The Deleting tenant panel will display describing the steps of the tenant deletion process. The blue numerical circle indicates the step progress of the tenant deletion. Click anywhere in the SambaStudio screen to close the panel.
-
The tenant status will change to Deleting. Click View to open the Deleting tenant panel and monitor the progress of the tenant deletion.
-
The tenant will be removed from the Current allocations table when the deletion process is complete.
Delete a tenant using the CLI
The example commands below demonstrate how organization administrators (OrgAdmin) can delete a tenant using the snapi tenant delete command. Please be aware of the following considerations when deleting a tenant:
-
The default tenant cannot be deleted.
-
All jobs, endpoints, datasets, and models created in the tenant will be deleted.
-
Associated users will no longer have access to the tenant.
-
RDUs allocated to the tenant will be added to the default tenant.
-
Tenant deletion is irreversible.
|
Tenant deletion times vary and are dependent on the number of resources associated with the tenant. |
The example snapi tenant delete command illustrates the following:
-
The command specifies user-workflows as the tenant to be deleted.
-
Similar to the GUI, the associated actions of deleting the tenant are described.
-
Additionally, the command prompts you to confirm that you want to proceed with deleting the tenant by entering
yes.
$ snapi tenant delete \
	--name user-workflows

Deleting a tenant entails four steps:
    • Step1: Unsharing Datasets and Models (Revoking access to all datasets and models shared with other
tenants)
    • Step2: Delete Jobs and Endpoints (Terminating all running jobs, live endpoints, and deleting them)
    • Step3: Delete Datasets and Models (Deleting all datasets and models associated with this tenant)
    • Step4: Tenant Deletion (Returning RDUs to the default tenant and deleting all traces of this tenant)

Are you sure you want to proceed? (yes/no):: yes

To return to the CLI prompt, press Ctrl+C
The tenant deletion process will continue in the background. You can view the status using the command: snapi
tenant deletion-progress <tenant-name>

--------------------------------
Tenant Deletion in Progress...
--------------------------------

[Progress] Steps: 1 -  Done  | 2 - Done | 3 - Done | 4 - Done

-------------------------------------------------------
Deletion of user-workflows Tenant Succesful
-------------------------------------------------------|
Run snapi tenant delete --help for command options and information. |
View tenant deletion progress using the CLI
Organization administrators (OrgAdmin) can view the deletion progress of a tenant by running the snapi tenant deletion-progress command. The example command below specifies user-workflows for the tenant.
$ snapi tenant deletion-progress \
	--name user-workflows

Deleting a tenant entails four steps:
    • Step1: Unsharing Datasets and Models (Revoking access to all datasets and models shared with other
tenants)
    • Step2: Delete Jobs and Endpoints (Terminating all running jobs, live endpoints, and deleting them)
    • Step3: Delete Datasets and Models (Deleting all datasets and models associated with this tenant)
    • Step4: Tenant Deletion (Returning RDUs to the default tenant and deleting all traces of this tenant)

[Progress] Steps: 1 -  Done  | 2 - Done | 3 - In Progress | 4 - Not Started