Create and use endpoints
With the SambaStudio platform, you can generate predictions from your models on your data by deploying it to an endpoint. This document describes how to:
Create an endpoint
You can create endpoints to be used for prediction using the GUI or the CLI. Follow the instructions described in the corresponding sections to learn how.
Create an endpoint using the GUI
Follow the steps below to create an endpoint using the GUI to be used for prediction. After saving your endpoint, adjust the endpoint share settings to share your endpoint with other users and tenants.
|
Base models do not support inference and cannot be deployed for endpoints. It is recommended to use Base models for training and not inference. |
-
Create a new project or use an existing one.
-
From a project window, click New endpoint. The Create endpoint window (Figure 1) will open.
-
In the Create endpoint window, enter a name for the endpoint into the Endpoint name field, as shown in Figure 1.
-
Select the version of the model to use in the Select model drop-down, as shown in Figure 1.
-
From the Select model drop-down, choose My models, Shared models, SambaNova models, or Select from Model Hub.
-
My models displays a list of models that you have previously added to the Model Hub.
-
Shared models displays a list of models that have been shared with the selected active tenant.
-
SambaNova models displays a list of models provided by SambaNova.
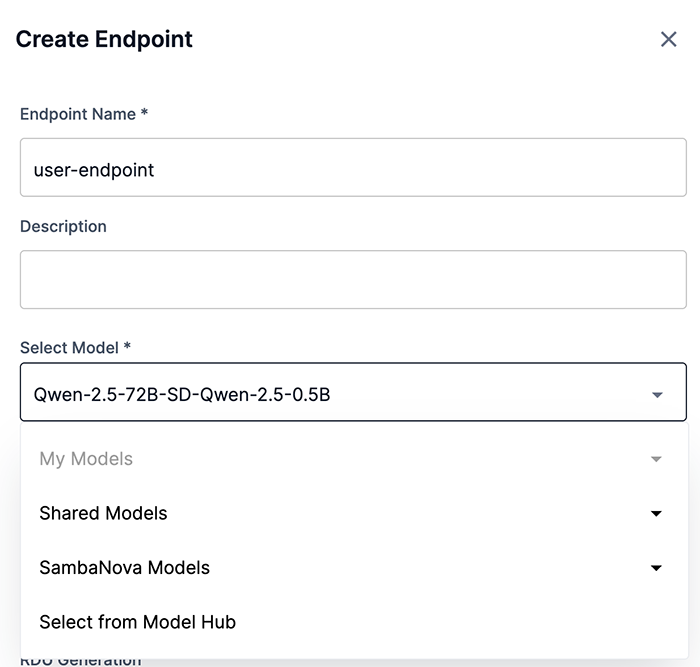 Figure 1. Create endpoint window
 -
Select from Model Hub displays a window with a list of downloaded models, as shown in Figure 2..
-
The list can be filtered by selecting options under Architecture, Field of application, Model type, ML App, and Owner. Additionally, you can enter a term or value into the Search field to refine the model list by that input. The Filters box allows you to enter custom values to filter the list.
-
Choose the model you wish to use and confirm your choice by clicking Use model.
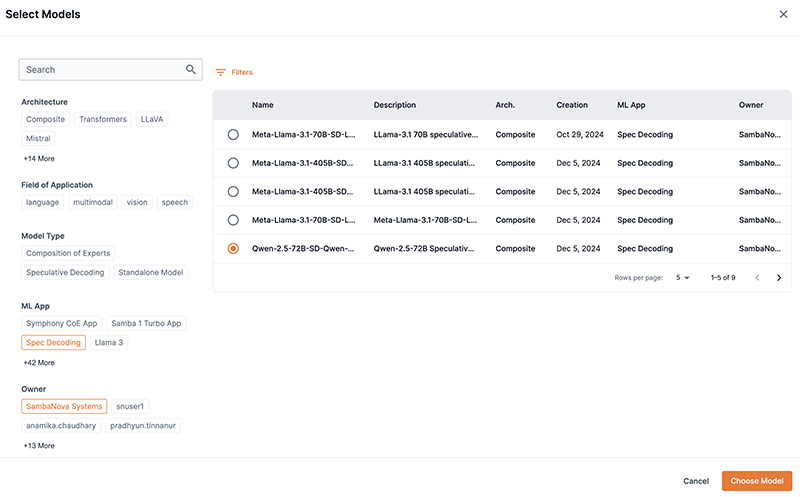 Figure 2. Select from Model Hub
-
-
-
-
If your selected model is capable of using our OpenAI compatible API, the Inference API drop-down will display with OpenAI compatible selected (Figure 3), allowing you to deploy your endpoint using our latest and fastest API.
-
If your application relies on our legacy V1/V2 APIs or SNSDK/SNAPI, select Legacy SambaStudio APIS (V1, V2) from the drop-down to deploy your endpoint using our legacy APIs.
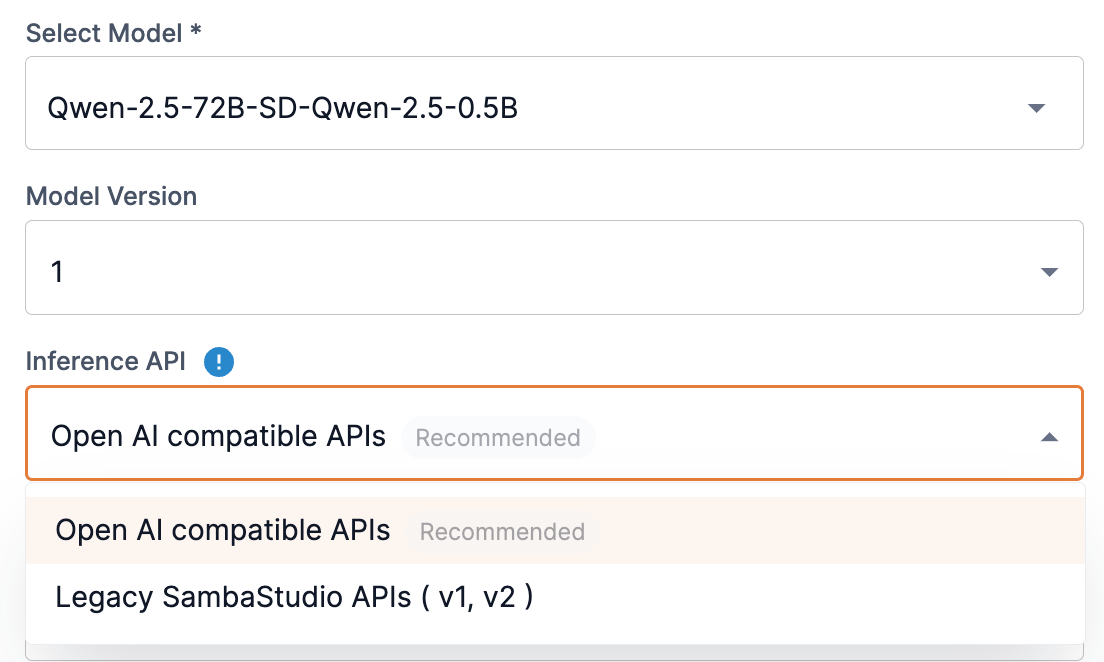 Figure 3. Inference API drop-down
-
-
Enter a value for the Number of instances to designate how many instances will be deployed, as shown in Figure 4. The Number of instances setting helps the endpoint scale to accommodate a high volume number of requests. You can adjust the value based on the expected volume number of requests and available resources.
-
The RDU generation drop-down allows users to select an available RDU generation version to use for creating an endpoint, as shown in Figure 4. If more than one option is available, the SambaStudio platform will default to the recommended RDU generation version to use based on your platform’s configuration and the selected model. You can select a different RDU generation version to use, if available, than the recommended option from the drop-down. Contact your administrator for more information on RDU configurations specific to your SambaStudio platform.
-
Click Add an endpoint, as shown in Figure 4, to queue the endpoint for deployment. Once the endpoint is created, it can take several minutes for the endpoint to be deployed.
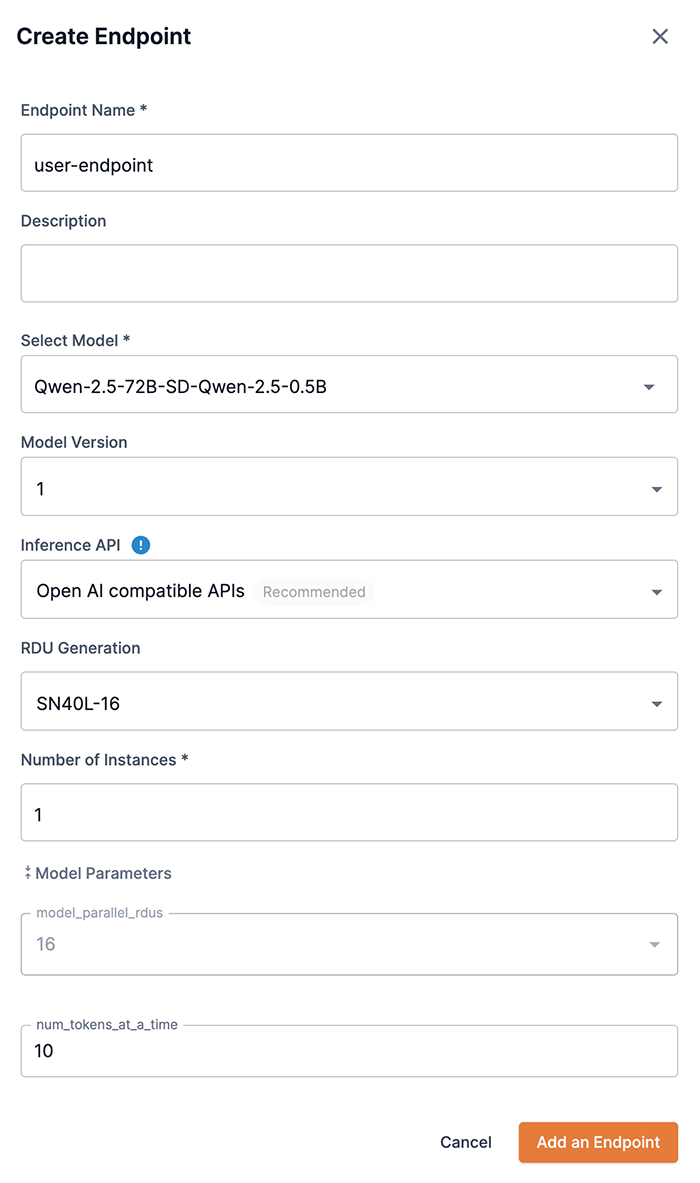 Figure 4. Completed create endpoint window
Your endpoint is deployed and will be available to generate predictions when the endpoint status displays Live.
Insufficient RDUs in a single node
If the required number of RDUs are not available in a single node, you will receive a warning message stating that your endpoint will be in Awaiting RDU status until the RDUs become available in a single node. Contact your administrator for more information on RDU configurations specific to your SambaStudio platform.

Create an endpoint using the CLI
The example below demonstrates how to create an endpoint using the snapi endpoint create command. You can provide the following:
-
A project to assign the endpoint. Create a new project or use an existing one.
-
A new endpoint name for the --endpoint_name input.
-
The model to be used for the --model-checkpoint input.
-
Provide the model version number for the --model-version input.
-
The RDU architecture generation version to use of your SambaStudio platform configuration for the --arch input.
-
Run the snapi tenant info command to view the available RDU generation version(s) specific to your SambaStudio platform. Contact your administrator for more information on RDU configurations specific to your SambaStudio platform.
-
Run the snapi model info command to obtain the --arch input compatible for the selected model.
-
-
Include --inference-api-openai-compatible to specify that the model should deploy using our latest and fastest OpenAI compatible API.
-
The model will need to be capable of using the OpenAI API. Run the snapi model info command.
-
If your model relies on our legacy V1/V2 APIs or SNSDK/SNAPI, do not include this flag.
-
-
The number of instances to be used for the --instances input.
$ snapi endpoint create \
   --project <project-name> \
   --endpoint_name <endpoint-name> \
   --model-checkpoint <model-name> \
   --model-version <version-number> \
   --arch SN40L-16 \
   --inference-api-openai-compatible \
--instances <number-of-instances>|
Run snapi endpoint create --help to display additional usage and options. |
Example snapi model info command
The example snapi model info command below demonstrates where to find model compatibility information, such as:
-
The -arch input, which is found in the Hyperparameters section after deploy.
-
If the model is --inference-api-openai-compatible.
To run the command you will need to specify:
-
The model name or ID for the --model input.
-
The job type. We used deploy for the --job-type input in our example.
Click to view the example snapi model info command.
$ snapi model info \
--model Qwen-2.5-72B-SD-Qwen-2.5-0.5B \
--job-type deploy
Model Info
============
ID : 8ca4b0c6-6d47-4c99-ac43-cd75fd5e1e4e
Name : Qwen-2.5-72B-SD-Qwen-2.5-0.5B
Architecture : Composite
Field of Application : language
Validation Loss : -
Validation Accuracy : -
App : e580a1b7-0f23-4644-8959-98eba2dae86e
Dataset : {'info': '', 'url': ''}
SambaNova Provided : True
Version : 1
Description : Qwen-2.5-72B Speculative Decoding
Created Time : 2025-02-03 00:33:19.036627 +0000 UTC
Status : Available
Steps : 0
Config
Target Model : Qwen2.5-72B-Instruct
Draft Model : Qwen2.5-0.5B-Instruct
Hyperparameters :
{ 'batch_predict': {},
'deploy': { 'SN40L-16': { 'display_name': 'SN40L-16',
'imageVariants': [ { 'name': 'sn40-16.m=16',
'resources': { 'minCpuMem': '32G',
'minCpus': '1',
'minHugepageMem': '263Gi',
'minRduMem': '32G',
'minSharedMem': '',
'modelParallelRdus': '16',
'rduArch': 'sn40-16',
'supportedRduArchs': [ ],
'supportsDataParallel': False},
'variantSelection': { 'model_parallel_rdus': { 'eq': '16'}}}],
'imageVersion': '2.2.0-20250218',
'jobTypes': ['deploy'],
'runtimeVersion': '5.1.0',
'sockets': 16,
'supports_data_parallel': False,
'supports_speculative_decoding': False,
'user_params': [ { 'CONSTRAINTS': { 'ge': '',
'gt': '',
'le': '',
'lt': '',
'values': [ '8']},
'DATATYPE': 'int',
'DESCRIPTION': 'The '
'number '
'of '
'RDUs '
'to '
'run '
'in '
'model '
'parallel.',
'FIELD_NAME': 'model_parallel_rdus',
'MESSAGE': '',
'TASK_TYPE': [ 'compile',
'endpoint',
'serve'],
'TYPE_SPECIFIC_SETTINGS': { 'serve': { 'DEFAULT': '16',
'USER_MODIFIABLE': False}},
'VARIANT_SELECTION': True},
{ 'CONSTRAINTS': { 'ge': '1',
'gt': '',
'le': '',
'lt': '',
'values': [ ]},
'DATATYPE': 'int',
'DESCRIPTION': 'Number '
'of '
'tokens '
'to '
'include '
'in '
'each '
'streaming '
'response.',
'FIELD_NAME': 'num_tokens_at_a_time',
'MESSAGE': '',
'TASK_TYPE': [ 'endpoint',
'serve'],
'TYPE_SPECIFIC_SETTINGS': { 'serve': { 'DEFAULT': '10',
'USER_MODIFIABLE': True}},
'VARIANT_SELECTION': False}],
'variantSetVersion': '33e203c00a8d4583ff592f255f385b5d'}},
'deploy_with_inference_engine': { 'SN40L-16': { 'display_name': 'SN40L-16',
'imageVariants': [ { 'name': 'sn40-16.m=16',
'resources': { 'minCpuMem': '32G',
'minCpus': '1',
'minHugepageMem': '263Gi',
'minRduMem': '32G',
'minSharedMem': '',
'modelParallelRdus': '16',
'rduArch': 'sn40-16',
'supportedRduArchs': [ ],
'supportsDataParallel': False},
'variantSelection': { 'model_parallel_rdus': { 'eq': '16'}}}],
'imageVersion': '2.2.21',
'jobTypes': ['deploy'],
'runtimeVersion': '5.1.0',
'sockets': 16,
'supports_data_parallel': False,
'supports_speculative_decoding': False,
'user_params': [ { 'CONSTRAINTS': { 'ge': '',
'gt': '',
'le': '',
'lt': '',
'values': [ '8']},
'DATATYPE': 'int',
'DESCRIPTION': 'The '
'number '
'of '
'RDUs '
'to '
'run '
'in '
'model '
'parallel.',
'FIELD_NAME': 'model_parallel_rdus',
'MESSAGE': '',
'TASK_TYPE': [ 'compile',
'endpoint',
'serve'],
'TYPE_SPECIFIC_SETTINGS': { 'serve': { 'DEFAULT': '16',
'USER_MODIFIABLE': False}},
'VARIANT_SELECTION': True},
{ 'CONSTRAINTS': { 'ge': '1',
'gt': '',
'le': '',
'lt': '',
'values': [ ]},
'DATATYPE': 'int',
'DESCRIPTION': 'Number '
'of '
'tokens '
'to '
'include '
'in '
'each '
'streaming '
'response.',
'FIELD_NAME': 'num_tokens_at_a_time',
'MESSAGE': '',
'TASK_TYPE': [ 'endpoint',
'serve'],
'TYPE_SPECIFIC_SETTINGS': { 'serve': { 'DEFAULT': '10',
'USER_MODIFIABLE': True}},
'VARIANT_SELECTION': False}],
'variantSetVersion': '33e203c00a8d4583ff592f255f385b5d'}},
'train': {}}
Size In GB : 281.30304
Checkpoint Type : finetuned
Model IO : { 'infer': { 'input': {'description': '', 'example': ''},
'output': {'description': '', 'example': ''}},
'serve': { 'input': {'description': '', 'example': ''},
'output': {'description': '', 'example': ''}},
'train': { 'input': {'description': '', 'example': ''},
'output': {'description': '', 'example': ''}}}
Evaluation : {}
Params : {'invalidates_checkpoint': {'model_parallel_rdus': 16}, 'modifiable': None}
rdu
Dependencies : [ { 'app_name': 'Samba1 Qwen2.5 Experts',
'description': 'Qwen2.5 is the latest series of Qwen large language '
'models. For Qwen2.5, we release a number of base '
'language models and instruction-tuned language models '
'ranging from 0.5 to 72 billion parameters. Qwen2.5 '
'brings the following improvements upon Qwen2:\n'
'\n'
'- Significantly more knowledge and has greatly '
'improved capabilities in coding and mathematics, '
'thanks to our specialized expert models in these '
'domains.\n'
'- Significant improvements in instruction following, '
'generating long texts (over 8K tokens), understanding '
'structured data (e.g, tables), and generating '
'structured outputs especially JSON. More resilient to '
'the diversity of system prompts, enhancing role-play '
'implementation and condition-setting for chatbots.\n'
'- Long-context Support up to 128K tokens and can '
'generate up to 8K tokens.\n'
'- Multilingual support for over 29 languages, '
'including Chinese, English, French, Spanish, '
'Portuguese, German, Italian, Russian, Japanese, '
'Korean, Vietnamese, Thai, Arabic, and more.\n'
'\n'
'https://huggingface.co/Qwen/Qwen2.5-72B-Instruct\n',
'id': 'f0a6fff2-36ee-4549-978e-2de9e5502119',
'inference_engine_only': False,
'model_size_gb': 279.30417,
'name': 'Qwen2.5-72B-Instruct',
'parameter_overrides': [ { 'CONSTRAINTS': None,
'DATATYPE': '',
'DESCRIPTION': '',
'FIELD_NAME': 'spec_decoding',
'MESSAGE': '',
'TASK_TYPE': ['compile'],
'TYPE_SPECIFIC_SETTINGS': { 'compile': { 'DEFAULT': 'true',
'USER_MODIFIABLE': False}},
'VARIANT_SELECTION': False}],
'status': 'Available',
'supported_config': [ { 'job_types': { 'coe-infer': { 'archs': [ 'sn40-16']}},
'parameter_count': '72b',
'sequence_length': 4096,
'spec_decoding': True,
'vocab_size': 152064}],
'tags': [],
'unsupported_config': [],
'version': 1},
{ 'app_name': 'Samba1 Qwen2.5 Experts',
'description': 'Qwen2.5 is the latest series of Qwen large language '
'models. For Qwen2.5, we release a number of base '
'language models and instruction-tuned language models '
'ranging from 0.5 to 72 billion parameters. Qwen2.5 '
'brings the following improvements upon Qwen2:\n'
'\n'
'- Significantly more knowledge and has greatly '
'improved capabilities in coding and mathematics, '
'thanks to our specialized expert models in these '
'domains.\n'
'- Significant improvements in instruction following, '
'generating long texts (over 8K tokens), understanding '
'structured data (e.g, tables), and generating '
'structured outputs especially JSON. More resilient to '
'the diversity of system prompts, enhancing role-play '
'implementation and condition-setting for chatbots.\n'
'- Long-context Support up to 128K tokens and can '
'generate up to 8K tokens.\n'
'- Multilingual support for over 29 languages, '
'including Chinese, English, French, Spanish, '
'Portuguese, German, Italian, Russian, Japanese, '
'Korean, Vietnamese, Thai, Arabic, and more.\n'
'\n'
'https://huggingface.co/Qwen/Qwen2.5-0.5B-Instruct\n',
'id': '5c872232-7a56-407d-b886-8ce7584feeac',
'inference_engine_only': False,
'model_size_gb': 1.99887,
'name': 'Qwen2.5-0.5B-Instruct',
'parameter_overrides': [],
'status': 'Available',
'supported_config': [ { 'job_types': { 'coe-infer': { 'archs': [ 'sn40-16']}},
'parameter_count': '0.5b',
'sequence_length': 16384,
'spec_decoding': False,
'vocab_size': 151936},
{ 'job_types': { 'coe-infer': { 'archs': [ 'sn40-16']}},
'parameter_count': '0.5b',
'sequence_length': 8192,
'spec_decoding': False,
'vocab_size': 151936},
{ 'job_types': { 'coe-infer': { 'archs': [ 'sn40-16']}},
'parameter_count': '0.5b',
'sequence_length': 4096,
'spec_decoding': False,
'vocab_size': 151936}],
'tags': [],
'unsupported_config': [],
'version': 1}]View endpoint information
Once your endpoint has been deployed, you can view detailed information about it using the GUI or CLI.
View an endpoint using the GUI
The Endpoint window displays detailed information about your endpoint, as well as providing access to common functions.
-
Open any Endpoint window by selecting the endpoint you wish to view from its associated Project, as shown in Figure 6
-
The Monitoring column provides a link to the Grafana monitoring dashboard. Click the corresponding icon to open the dashboard for that endpoint.
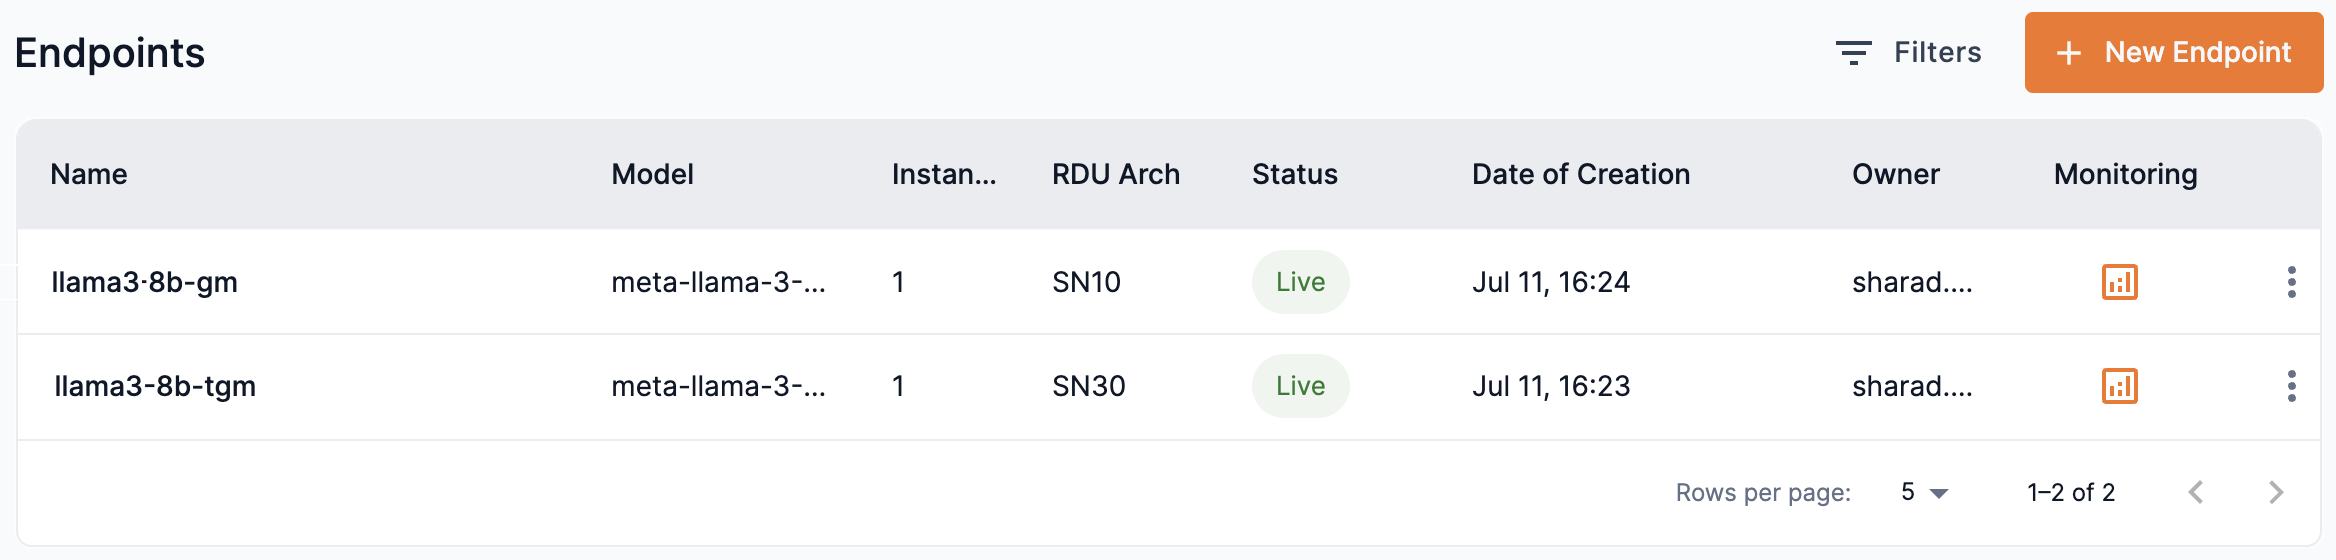 Figure 6. Endpoints displayed in its associated Project
-
-
Additionally, you can view a list of Live endpoints from the SambaStudio Dashboard.
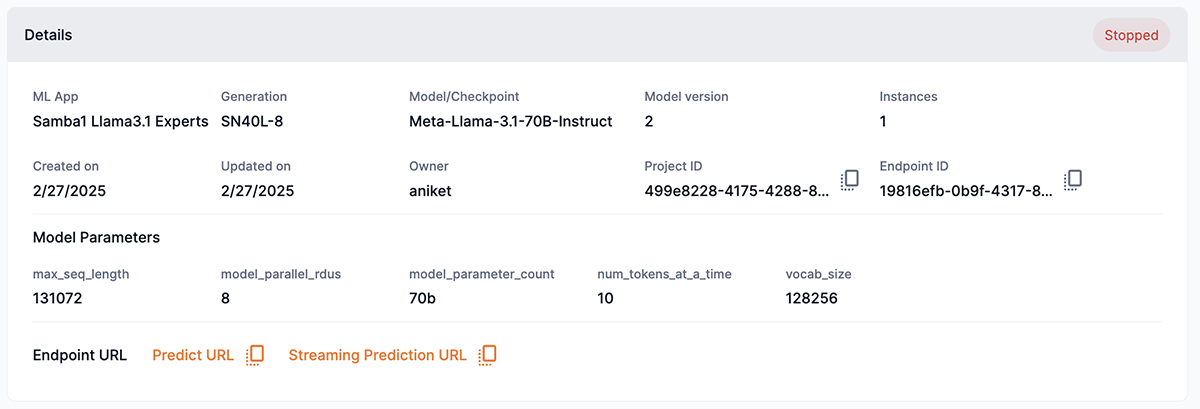
- Details
-
-
The status of the endpoint is displayed in the Details panel top bar.
-
ML App displays the corresponding ML App.
-
Generation displays the RDU generation version used when the endpoint was created.
-
Model/Checkpoint displays the endpoint’s associated model/checkpoint.
-
Model Version displays the current model version associated with the endpoint.
-
Instances displays the number of instances used by the endpoint.
-
Created on displays the date the endpoint was created.
-
Updated on displays the date the endpoint was last updated.
-
Owner displays the owner of the endpoint.
-
Project ID allows you to copy the endpoint’s associated Project ID to your clipboard. Use the Project ID to make requests programmatically.
-
Endpoint ID allows you to copy the Endpoint ID to your clipboard. Use the Endpoint ID to make requests programmatically.
-
Model parameters displays the parameters used during endpoint creation.
-
Endpoint URL displays the complete URL of an endpoint that uses our latest and fastest OpenAI compatible API (Figure 7) to use programmatically to make requests. Use the copy icon to temporarily store the URL (copy) to your computer’s clipboard. See API reference documents for more information.
-
Predict URL provides the URL link of a predict endpoint that uses our legacy V1, V2 APIs (Figure 8) to use programmatically to make requests. Use the copy icon to temporarily store the URL (copy) to your computer’s clipboard. See API reference documents for more information.
-
Streaming prediction URL provides the URL link of a stream endpoint that uses our legacy V1, V2 APIs (Figure 8) to use programmatically to make requests. Use the copy icon to temporarily store the URL (copy) to your computer’s clipboard. See API reference documents for more information.
-
- Logs and monitoring
-
-
Logs allows you to visualize and analyze an endpoint’s logs in the OpenSearch Dashboard. Click Logs (Figure 9) to open the OpenSearch Dashboard in a new browser window.
-
Monitoring allows you to view metric information in the Grafana monitoring dashboard for an endpoint. Click Monitoring (Figure 9) to open the Grafana monitoring dashboard in a new browser window.
-

- API keys
-
-
The API Keys table displays a list of API keys that can be used to make authenticated requests of the endpoint URL. See Figure 10 for information on generating and using API keys. The API Keys table (Figure 10) displays the following information:
-
KeyID displays the endpoint’s API key to be used for authenticated requests. Use the copy icon to temporarily store the API key (copy) to your computer’s clipboard.
-
Description displays the API key’s unique description so that it can be easily identified.
-
Created on displays the date the API key was created.
-
Owner displays the owner of the API key.
-
Status displays the current status of the API key.
-
-

View endpoint info using the CLI
Use the snapi endpoint info command to view specific information about your endpoint, including:
-
The assigned ID of the endpoint.
-
The corresponding ML App.
-
The Model used when the endpoint was created.
-
The number of Instances used when the endpoint was created.
-
The URL path to the endpoint location.
Please use the GUI to get an endpoint’s Stream URL path.
-
The initial API Key (First Key) created for the endpoint. See Figure 10 for information on generating and using API keys.
-
The current Status of the endpoint.
-
The associated API Keys of the endpoint that can be used to make authenticated requests of the endpoint URL. See Figure 10 for information on generating and using API keys.
-
The Arch RDU generation version used when the endpoint was created.
The example below demonstrates how to use the snapi endpoint info command to view the info of an endpoint. You will need to provide the following:
-
The project name or ID the endpoint is assigned.
-
The endpoint name or ID.
$ snapi endpoint info \
    --project <project-name> \
    --endpoint <endpoint-name>
          Endpoint Info
         =============
ID             : 4eba9aaa-543f-4f8b-bbc1-30182252f85a
Name           : hav2
Description    :
Project ID     : 87deae92-570e-443f-8ae8-4521fb43ad09
ML App         : Generative Tuning 13B
Model          : GPT_13B_Human_Aligned_Instruction_Tuned_V2
Instances      : 0
URL            : <path-to-endpoint>>
API Key        : 6fbc8f9d-34e2-47e4-983f-19a1845326b4
Status         : Stopped
Created at     : 2023-09-07T21:47:27.581072+00:00
Last Updated   : 2023-11-07T17:02:07.939675+00:00
API Keys       : [{'user_id': 'billb', 'time_created': '2023-11-07T16:51:04.896235+00:00', 'description': 'hav2-shared-key', 'status': 'Live', 'id': '1205d9db-250a-4e71-b1a8-33fa3ffa05cc', 'endpoint_id': '4eba9aaa-543f-4f8b-bbc1-30182252f85a', 'time_updated': '2023-11-07T16:51:04.896235+00:00', 'api_key': 'a0e8e81f-697a-401a-b7c5-688788e0bb8a'}, {'user_id': 'billb', 'time_created': '2023-11-07T13:06:50.209626+00:00', 'description': 'First Key', 'status': 'Live', 'id': '12fffa5a-c615-4271-a920-f4bb1b3da303', 'endpoint_id': '4eba9aaa-543f-4f8b-bbc1-30182252f85a', 'time_updated': '2023-11-07T13:06:50.209626+00:00', 'api_key': '6fbc8f9d-34e2-47e4-983f-19a1845326b4'}]
Hyperparams    : None
Arch           : SN10
Update an endpoint
SambaStudio allows you to update an endpoint while still keeping the endpoint active for use during the update process. For example, if you’re endpoint was created with a version 1 model, you can update the model to version 2 while the endpoint remains active and in use during the update process.
-
In the Endpoint window, click Update Available or View Updates to start the update process.
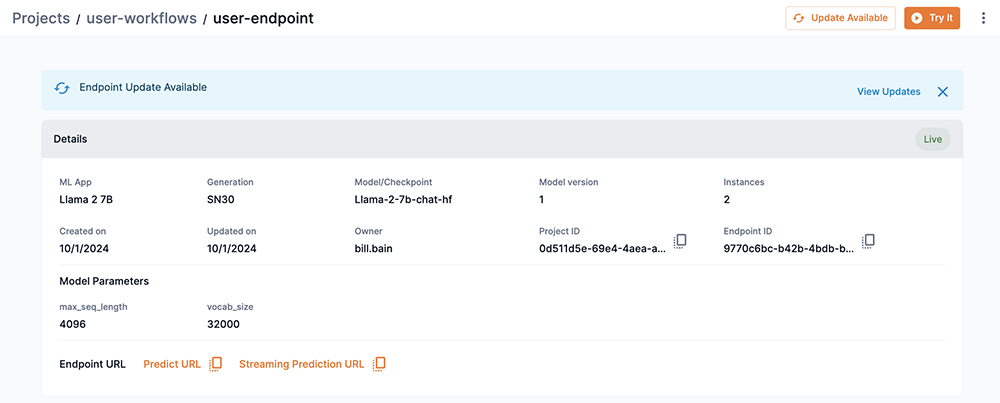 Figure 11. Endpoint window with updates available
 -
The Update Available box will open displaying the available updates for the endpoint as well as the Start switch at drop-down.
-
In our example, a Version 2 model update is available for the endpoint.
-
The Start switch at drop-down defines when the new updated endpoint will be used to serve requests by setting the number of RDU instances to be used for the updated endpoint. In our example, we selected 2, indicating that we want our endpoint to switch to use the updated model Version 2 once the 2 RDU instances are in set up and live.
-
Click Update to start the update process.
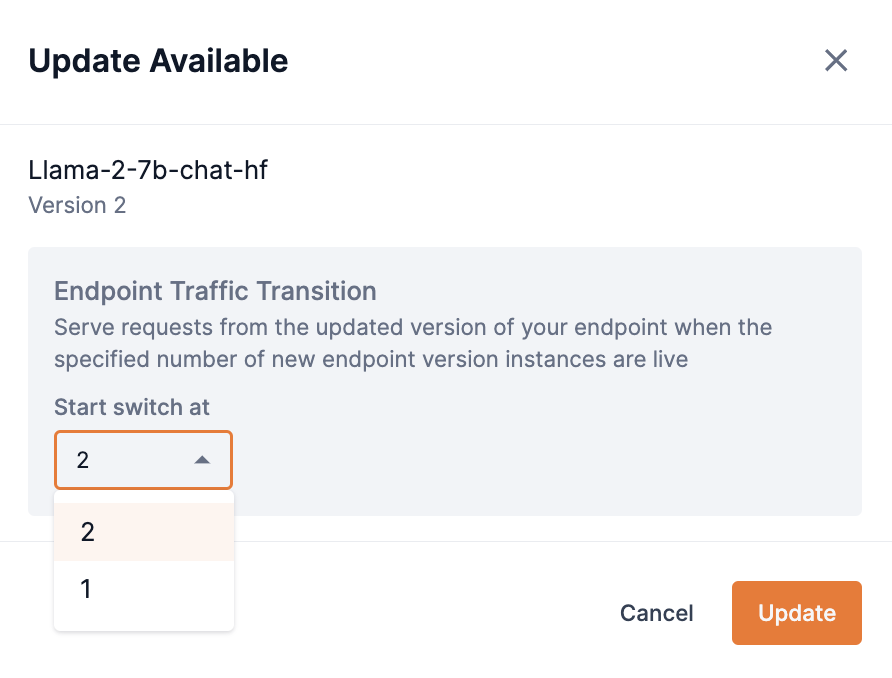 Figure 12. Update Available box
-
-
Once your endpoint starts the update process, click View Details in the Update in progress bar to see the status of the update.
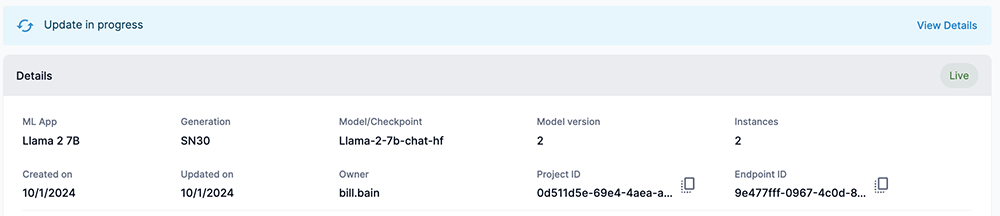 Figure 13. View Details in Update in progress bar
 -
The Update Endpoint box will open and display the status of the endpoint update. In our example, we selected that our endpoint should switch to the updated endpoint once 2 RDU instances are set up and live.
-
In our example Update Endpoint box, we can see the following:
-
None of the Version 2 Instances are Live.
-
None of the Version 2 Instances have started setting up.
-
We are waiting on 2/2 RDUs, meaning no RDUs have been assigned yet.
-
Version 1 of our endpoint is currently serving requests, and as such no RDUs are setting up and we are not waiting on RDUs.
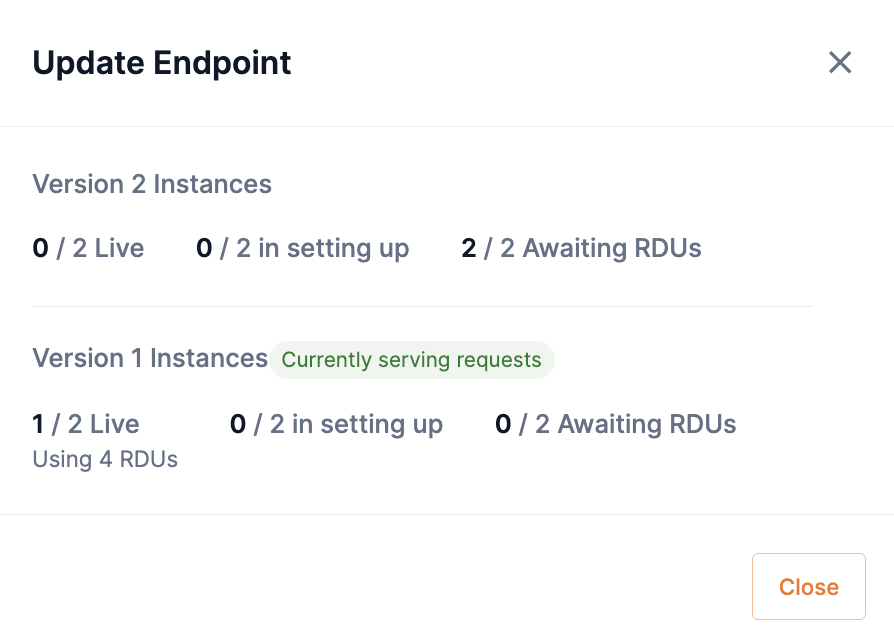 Figure 14. Update Endpoint box
-
-
Endpoint API keys
An endpoint API key allows you to make authenticated requests of the endpoint URL, such as generating predictions. SambaStudio provides the ability to create multiple API keys for an endpoint. This allows organizations to easily distribute and manage endpoints to different entities and users.
API keys can be added, edited, and revoked using the GUI or the CLI. Follow the instructions described in the corresponding sections to learn how.
|
The endpoint API key and the platform API key have two distinct implementations.
|
Add an endpoint API key using the GUI
You can add additional API keys to an endpoint. Please be aware of the following when adding a new API key to an endpoint.
-
Endpoint API keys can be added by:
-
The owner of the endpoint.
-
An organization administrator (OrgAdmin) across all tenants.
-
A tenant administrator (TenantAdmin) within their assigned tenant.
-
-
The platform creates an initial API key for each endpoint with the description of First Key.
Follow the steps below to add an API key to an endpoint.
-
From the API keys section of an endpoint window, click Add new.
Figure 15. API keys sectionThe Add new API key box will appear.
-
Enter a description into the Add description field for the endpoint’s new API key.
-
Click Add to complete the process and add the endpoint’s new API key.
 Figure 16. Add new API key
 -
The API keys table will display the new API key and the description you created for your endpoint.
 Figure 17. API keys table with new API key
Edit an endpoint API key description using the GUI
An endpoint’s API key existing description can be edited. Please be aware of the following when editing an endpoint API key description.
-
The description of an endpoint API key can be edited by:
-
The owner of the endpoint.
-
An organization administrator (OrgAdmin) across all tenants.
-
A tenant administrator (TenantAdmin) within their assigned tenant.
-
-
The initial API key, and its description of First Key, created for an endpoint by the platform, cannot be edited.
Follow the steps below to edit an endpoint API key description.
-
From the API keys section of an endpoint window, click the kebob icon (three dots) in the API key you wish to edit and select Edit from the drop-down.
 Figure 18. API key drop-down
The Edit key description box will open.
-
Enter a new description into the Key description field.
-
Click Save to complete the operation and update the API key description.
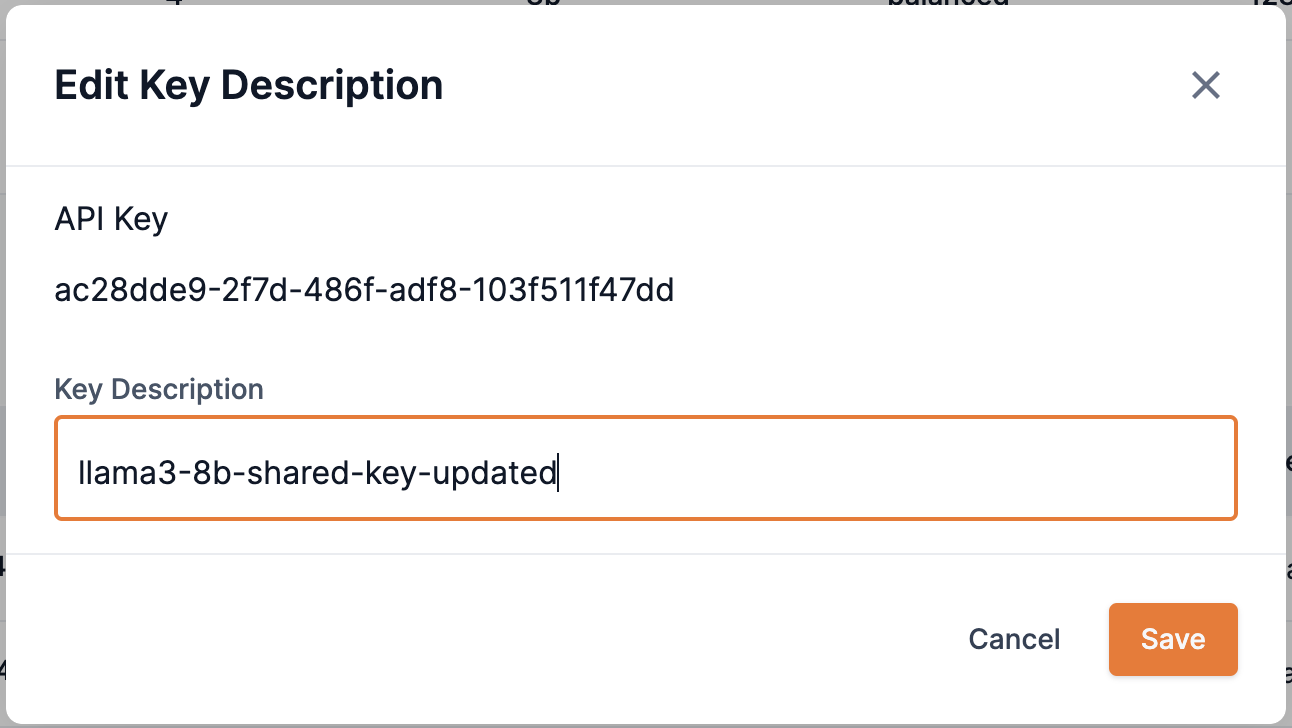 Figure 19. Endpoint edit key description box
Revoke an endpoint API key using the GUI
Endpoint API keys can be revoked to prevent further usage. Please be aware of the following when revoking an endpoint API key.
-
Endpoint API keys can be revoked by:
-
The owner of the endpoint.
-
An organization administrator (OrgAdmin) across all tenants.
-
A tenant administrator (TenantAdmin) within their assigned tenant.
-
-
The initial API key (First Key) created for an endpoint by the platform, cannot be revoked.
-
Once an endpoint API key is revoked it cannot be reactivated.
-
The API keys table will display the revoked API key with the status Revoked.
-
All users will lose access to a revoked API key.
Follow the steps below to revoke an endpoint API key.
-
From the API keys section of an endpoint window, click the kebob icon (three dots) in the API key you wish to edit and select Revoke from the drop-down.
Figure 20. API key drop-downThe confirmation box will open with a statement describing the consequences of revoking the API key.
-
Click Revoke to confirm that you want to revoke the endpoint API key.
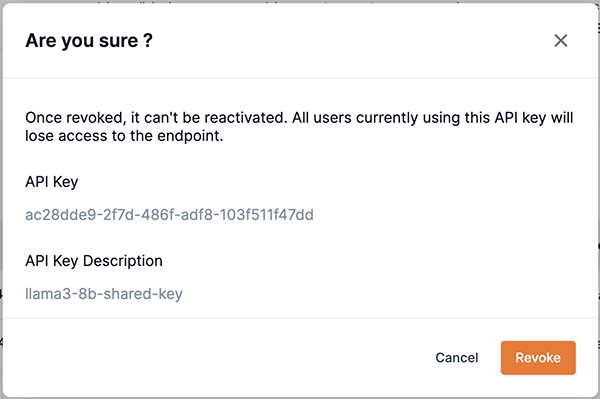 Figure 21. Endpoint revoke key confirmation box
List all endpoint API keys using the CLI
Similar to the endpoint API keys table of the GUI, the SambaStudio command-line interface (CLI) can display a list of API keys for an endpoint.
The example below demonstrates how to list all API keys for an endpoint using the snapi endpoint list-apikeys command. You will need to provide the endpoint name or ID.
$ snapi endpoint list-apikeys \
   --endpoint <endpoint-name>

   ------------------------------------------------------------------------
    List of API Keys for Endpoint <endpoint-name>
------------------------------------------------------------------------

+--------------------------------------+--------------------------------------+----------------------+----------------------+----------------------+
|               API Key                |             Description              |      Created On      |        Owner         |        Status        |
+======================================+======================================+======================+======================+======================+
| a0e8e81f-697a-401a-b7c5-688788e0bb8a | hav2-shared-key                      | 07 Nov, 2023         | billb                | Active               |
+--------------------------------------+--------------------------------------+----------------------+----------------------+----------------------+
| 6fbc8f9d-34e2-47e4-983f-19a1845326b4 | First Key                            | 07 Nov, 2023         | billb                | Active               |
+--------------------------------------+--------------------------------------+----------------------+----------------------+----------------------+
Add an endpoint API key using the CLI
Similar to the GUI, the SambaStudio command-line interface (CLI) can be used to add an API key to an endpoint. Please be aware of the following when adding a new API key to an endpoint.
-
Endpoint API keys can be added by:
-
The owner of the endpoint.
-
An organization administrator (OrgAdmin) across all tenants.
-
A tenant administrator (TenantAdmin) within their assigned tenant.
-
-
The platform creates an initial API key for each endpoint with the description of First Key.
The example below demonstrates how to add an API key to an endpoint using the snapi endpoint add-apikey command. You will need to provide the following:
-
The endpoint name or ID.
-
A description to identify the new API key is recommended.
$ snapi endpoint add-apikey \
    --endpoint <endpoint-name> \
    --description <endpoint-description>
Edit an endpoint API key description using the CLI
An endpoint’s API key existing description can be edited using the SambaStudio command-line interface (CLI). Please be aware of the following when editing an endpoint API key description.
-
The description of an endpoint API key can be edited by:
-
The owner of the endpoint.
-
An organization administrator (OrgAdmin) across all tenants.
-
A tenant administrator (TenantAdmin) within their assigned tenant.
-
-
The initial API key, and its description of First Key, created for an endpoint by the platform, cannot be edited.
The example below demonstrates how to edit an endpoint’s API key description using the snapi endpoint edit-apikey command. You will need to provide the following:
-
The endpoint name or ID.
-
The API key ID.
-
A new description for the API key.
$ snapi endpoint edit-apikey \
    --endpoint <endpoint-name> \
    --apikey <API-key-ID> \
    --description <new-description>
Revoke an endpoint API key using the CLI
An endpoint’s API key can be revoked using the SambaStudio command-line interface (CLI). Please be aware of the following when revoking an endpoint API key.
-
Endpoint API keys can be revoked by:
-
The owner of the endpoint.
-
An organization administrator (OrgAdmin) across all tenants.
-
A tenant administrator (TenantAdmin) within their assigned tenant.
-
-
The initial API key (First Key) created for an endpoint by the platform, cannot be revoked.
-
Once an endpoint API key is revoked it cannot be reactivated.
-
The API key info will display the revoked API key with the status Revoked.
-
All users will lose access to a revoked API key.
The example below demonstrates how to revoke an endpoint’s API key using the snapi endpoint revoke-apikey command. You will need to provide the following:
-
The endpoint name or ID.
-
The API key ID.
$ snapi endpoint revoke-apikey \
    --endpoint <endpoint-name> \
    --apikey <API-key>
View endpoint API key info using the CLI
You can view detailed information about the API key of an endpoint using the SambaStudio command-line interface (CLI). This is useful to check the endpoint’s API key status (after revoking an API key) or confirm any changes you might have made to an endpoint API key (such as the description).
The example below demonstrates how to view an endpoint’s API key info using the snapi endpoint info-apikey command. You will need to provide the following:
-
The endpoint name or ID.
-
The API key ID.
$ snapi endpoint info-apikey \
    --endpoint <endpoint-name> \
    --apikey <API-key>
Edit an endpoint
You can edit an existing endpoint using the GUI or the CLI. Follow the instructions described in the corresponding sections to learn how.
Edit an endpoint using the GUI
Follow the steps below to edit an existing endpoint using the GUI.
|
If the required number of RDUs are not available in a single node are not available when editing your endpoint, you will receive a warning message stating that your endpoint will be in Awaiting RDU status until the RDUs become available in a single node. Contact your administrator for more information on RDU configurations specific to your SambaStudio platform. |
-
From an Endpoint window, click the kebob icon (three dots) and select Edit from the drop-down, as shown in Figure 22. Or, from the Endpoints table, click the kebob icon (three dots) for the endpoint you wish to edit and select Edit from the drop-down., as shown in Figure 23. The Edit endpoint window will open.
 Figure 22. Edit an endpoint from the endpoint window
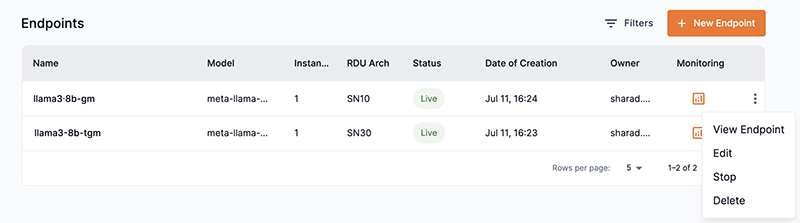 Figure 23. Edit an endpoint from the endpoints table
 -
As shown in Figure 24, from the Edit endpoint window you can:
-
Enter a new description into the Description field.
-
Choose a different model from the Select Model drop-down.
-
Choose a different model version from the Model Version drop-down.
-
If the selected model is capable of using our latest and fastest OpenAI compatible API, the Inference API drop-down will display with OpenAI compatible selected.
-
If your application relies on our legacy V1/V2 APIs or SNSDK/SNAPI, you can select Legacy SambaStudio APIS (V1, V2) from the drop-down to use the legacy APIs for deployment.
-
-
Select an available RDU generation version to use. If more than one option is available, the SambaStudio platform will default to the recommended RDU generation version to use based on your platform’s configuration and the selected model. You can select a different RDU generation version to use, if available, than the recommended option from the drop-down. Contact your administrator for more information on RDU configurations specific to your SambaStudio platform.
-
Update the Number of instances.
-
-
Click Edit endpoint to complete process and send the endpoint to the queue.
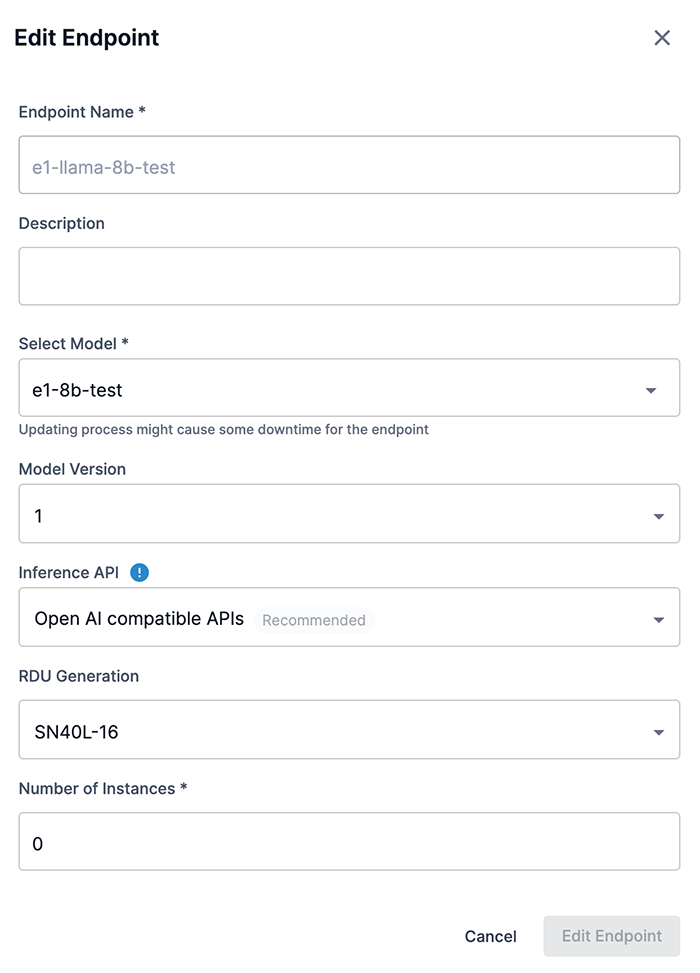 Figure 24. Update the endpoint
|
The endpoint’s updated information will be reflected in the endpoints table. |
Edit an endpoint using the CLI
The example below demonstrates how to use the snapi endpoint update command to edit and update an endpoint. You will need to provide the following:
-
The project the endpoint is assigned.
-
The endpoint name or ID.
-
The RDU generation version of the endpoint for the --arch input.
Similar to the GUI, you can:
-
Change the number of instances by using the --instances option.
-
Change the description by using the --description option.
-
Change the model version by using the --model-version option.
$  snapi endpoint update \
   --project <project-name> \
   --description <new-description> \
   --endpoint <endpoint-name> \
   --model-version <version-number> \
   --arch SN40L-16 \
--instances <number-of-instances>|
Run the snapi endpoint update --help command to see all available options. |
Stop and restart an endpoint
To free up Reconfigurable Dataflow Unit™ (RDU) resources in the platform, you may wish to stop an endpoint from running.
Stop an endpoint using the GUI
Do the following to stop an existing endpoint from running using the GUI.
-
From an Endpoint window, click the kebob icon (three dots) and select Stop from the drop-down, as shown in Figure 25. An alert box will open.
Figure 25. Stop endpoint -
The alert box (Figure 26) displays a warning statement that the models in the endpoint will stop running.
-
As shown in Figure 26, click Continue to confirm that you want to stop the endpoint from running. Click Cancel to return the Endpoint window.
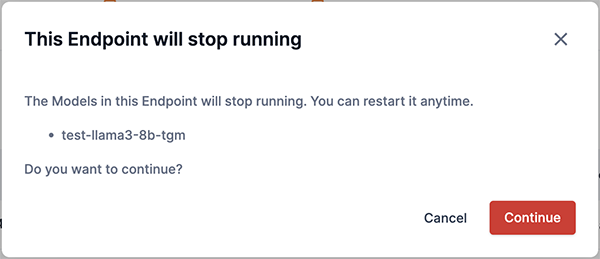 Figure 26. This endpoint will stop running box
Restart an endpoint using the GUI
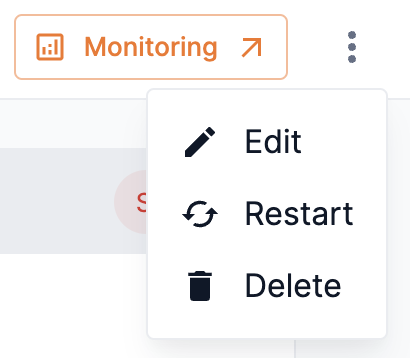
From an Endpoint window, click the kebob icon (three dots) and select Restart from the drop-down, as shown in Figure 27. The platform will restart the endpoint and will notify you that the endpoint is restarting.
|
The status of a restarted endpoint is displayed in the endpoint’s top Details bar. |
Stop an endpoint using the CLI
The example below demonstrates how to use the snapi endpoint stop command to stop an endpoint from running. You will need to provide the following:
-
The project the endpoint is assigned.
-
The endpoint name or ID.
$  snapi endpoint stop \
   --project <project-name> \
   --endpoint <endpoint-name>
Delete an endpoint
You can delete an existing endpoint using the GUI or the CLI. Follow the instructions described in the corresponding sections to learn how.
Delete an endpoint using the GUI
Do the following to delete an existing endpoint using the GUI.
-
From an Endpoint window, click the kebob icon (three dots) and select Delete from the drop-down, as shown in Figure 28. An alert window box open.
Figure 28. Delete endpointThe alert box (Figure 29) displays a message that the endpoint will be deleted and no longer available. The alert also lists the endpoint that will be deleted.
-
Click Yes to finalize deleting the endpoint, as shown in Figure 29. Click Cancel to return the Endpoint window.
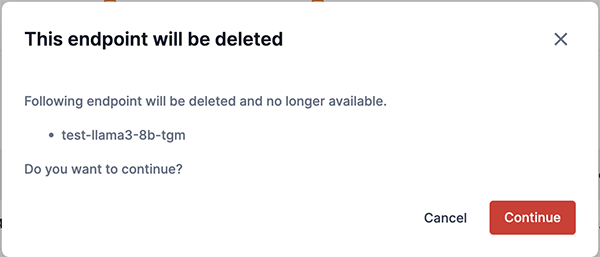 Figure 29. Delete alert window
Delete an endpoint using the CLI
The example below demonstrates how to use the snapi endpoint delete command to delete an endpoint. You will need to provide the following:
-
The project the endpoint is assigned.
-
The endpoint name or ID.
$  snapi endpoint delete \
   --project <project-name> \
   --endpoint <endpoint-name> \
Endpoint new-endpoint-snapi successfully marked delete.