Model Hub
The SambaStudio platform provides a repository of models available to be used for a variety of applications. You can access the repository from either the GUI (the Model Hub) or the CLI (the model list).
|
Base models do not support inference and cannot be deployed for endpoints. It is recommended to use Base models for training and not inference. |
This document describes how to:
Additional Model Hub documentation provides descriptions for the following workflows and actions:
View the Model Hub using the GUI
Click Models from the left menu to navigate to the Model Hub. The Model Hub provides a two-panel interface for viewing the SambaStudio repository of models.
|
See Create your own CoE model to learn how to create your own Composition of Experts model. 
Figure 1. Create CoE model
|
- Model Hub filters
-
The Model Hub filters in the left panel host a robust set of options that refine the display of the model cards panel. In addition to the selectable filter options, you can enter a term or value into the Search field to refine the model card list by that input.
- Model cards
-
In the right panel, model card previews are displayed in a three column grid layout. The tabs above the grid filter the displayed models by status:
-
All models displays every model in the Model Hub, including downloaded models, upcoming models, and models that are ready to be downloaded. These models can be viewed by all users of the organization.
-
Upcoming displays future models that will soon be available in the Model Hub for download and can be viewed by all users of the organization.
-
All users of the organization will receive a notification that a new model is ready to be downloaded.
-
Only organization administrators (OrgAdmin) can download models to the Model Hub. Once downloaded, models will be available in all tenants.
-
-
Available displays models that have been downloaded by organization administrators (OrgAdmin) to the Model Hub. These models can be viewed by all users of the organization.
-

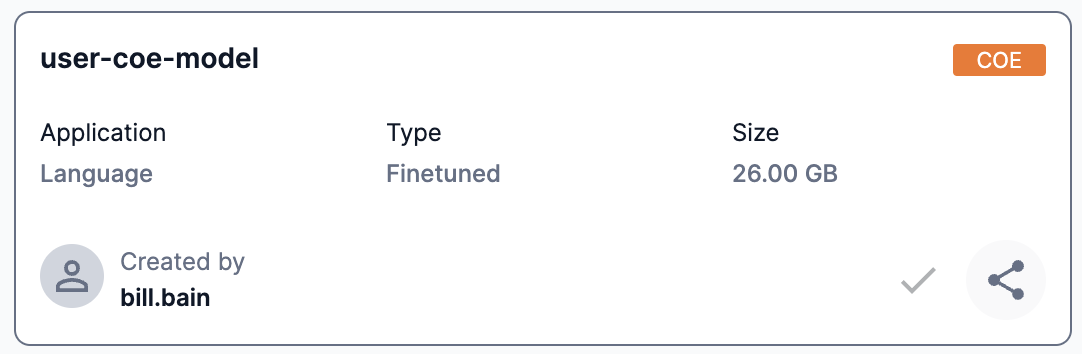
View a CoE model card
SambaStudio SN40L ![]() users can use Composition of Experts (CoE) models. CoE models are indicated by a CoE badge in their previews and model cards.
users can use Composition of Experts (CoE) models. CoE models are indicated by a CoE badge in their previews and model cards.
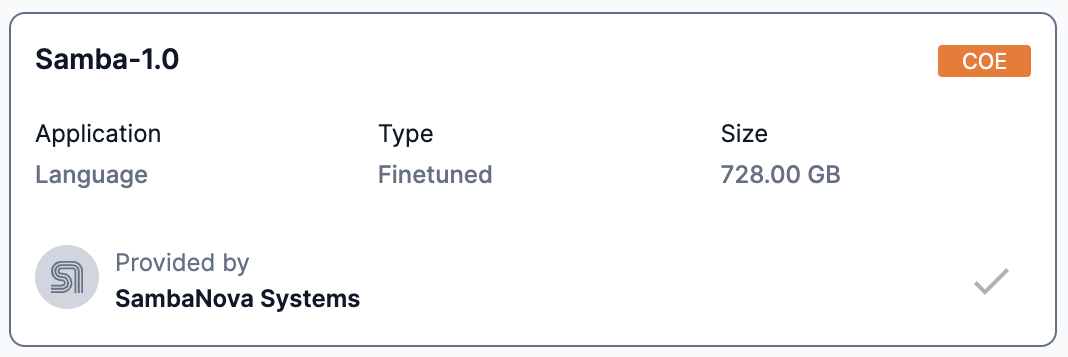
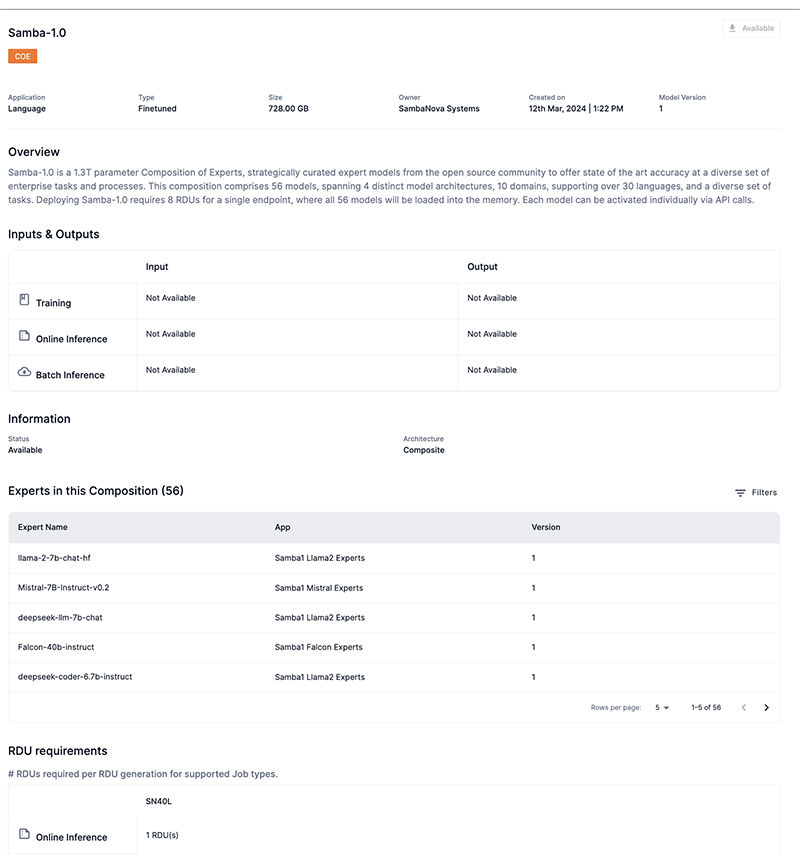
Click a CoE model card preview to view detailed information about that model including:
-
The status of the model.
-
Available designates that the model has been downloaded by organization administrators (OrgAdmin) and is ready to use.
-
Download designates that the model can be downloaded by organization administrators (OrgAdmin) to be used.
-
-
Application denotes the model’s application type of Language.
-
Type displays the CoE model type.
-
Size displays the storage size of the model.
-
Model version denotes the version of the model.
-
Owner denotes the CoE model owner.
-
Overview provides useful information about the model.
-
Experts in this Composition lists the expert models used to create the Samba-1 CoE model.
-
You can adjust the number of rows displayed and page through the list.
-
Hover over each expert to view its description.
-
-
-
The supported SambaNova hardware generation (SN40L) for each job type.
-
The minimum number of RDUs required for each job type.
-
View a model card
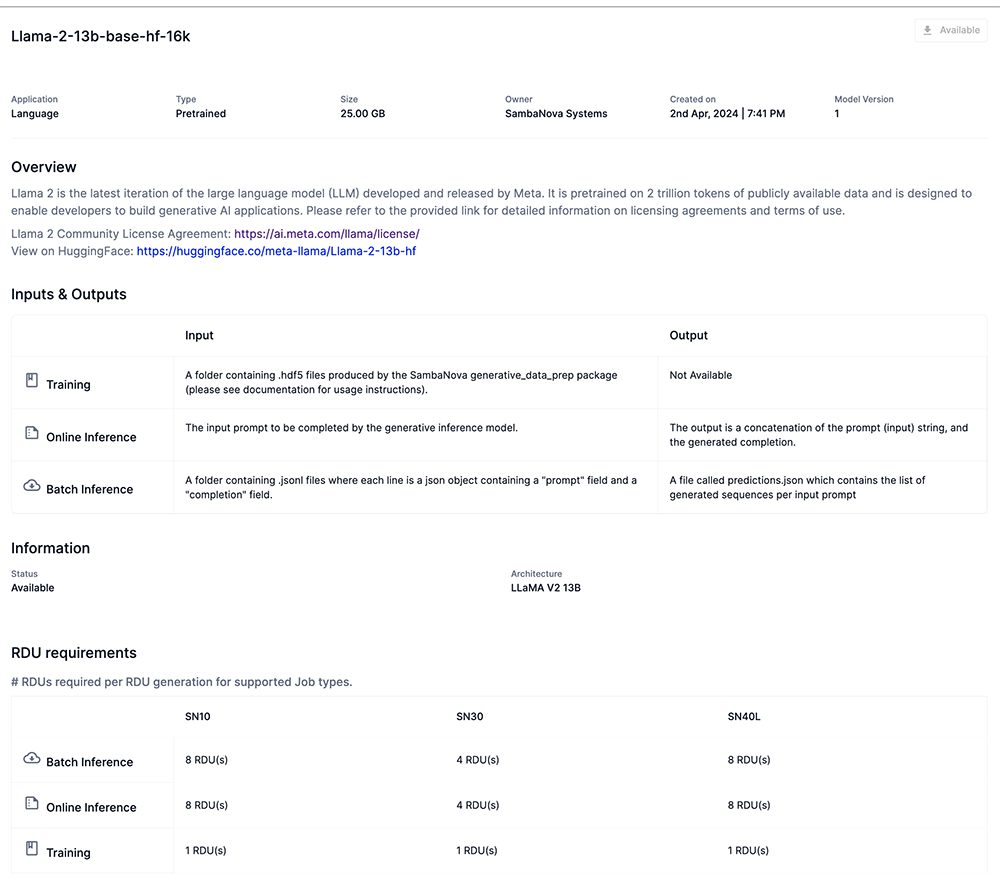
Click a model card preview to view detailed information about that model including:
-
The status of the model.
-
Available designates that the model has been downloaded by organization administrators (OrgAdmin) and is ready to use.
-
Download designates that the model can be downloaded by organization administrators (OrgAdmin) to be used.
-
-
Application denotes the model’s application type of Speech, Language, or Vision.
-
Languages displays the languages supported by Speech or Language models.
-
Type displays the model type including Base, Finetuned, and Pretrained.
-
Size displays the storage size of the model.
-
Owner denotes the model owner.
-
Overview provides useful information about the model.
-
Dataset provides information about the training and dataset(s) used for the model.
-
Inputs & Outputs provides input/output specifics for supported tasks.
-
Information displays the status and architecture of the model.
-
-
The supported SambaNova hardware generation (SN10, SN30, SN40L) for each job type.
-
The minimum number of RDUs required for each job type.
-
View the model list using the CLI
Similar to the GUI, the SambaNova API (snapi) provides the ability to view the repository of models (the model list) via the CLI. The example below demonstrates the snapi model list command. You can include the --verbose option to provide additional model information such as the assigned model ID.
|
Our examples only display the information for one model of the complete list. |
The following information is displayed for each model in the list:
-
The Name of the model.
-
The App ID of the model.
-
The Dataset information of the model.
-
The Status of the model.
-
Available designates that the model has been downloaded by organization administrators (OrgAdmin) and is ready to use.
-
AvailableToDownload designates that the model can be downloaded by organization administrators (OrgAdmin) to be used.
-
$ snapi model list

GPT13B 2k SS HAv3
============
Name                  : GPT13B 2k SS HAv3
App                   : 57f6a3c8-1f04-488a-bb39-3cfc5b4a5d7a
Dataset               : {   'info': '\n'
            'The starting point for this checkpoint was the GPT 13B 8k SS '
            'checkpoint which had been trained on 550B pretraining tokens,\n'
            'and further instruction-tuned on 39.3B tokens of instruction '
            'data. We then trained this checkpoint on the following datasets:\n'
            '\n'
            '1. databricks-dolly-15k\n'
            '2. oasst1\n'
            '\n'
            'We trained on this mixture for 16 epochs.\n',
    'url': ''}
Status                : Available
Click to view the example snapi model list --verbose command.
$ snapi model list \
--verbose

GPT13B 2k SS HAv3
============
ID                    : c7be342b-208b-4393-b5c2-496aa54eb917
Name                  : GPT13B 2k SS HAv3
Architecture          : GPT 13B
Field of Application  : language
Validation Loss       : -
Validation Accuracy   : -
App                   : 57f6a3c8-1f04-488a-bb39-3cfc5b4a5d7a
Dataset               : {   'info': '\n'
            'The starting point for this checkpoint was the GPT 13B 8k SS '
            'checkpoint which had been trained on 550B pretraining tokens,\n'
            'and further instruction-tuned on 39.3B tokens of instruction '
            'data. We then trained this checkpoint on the following datasets:\n'
            '\n'
            '1. databricks-dolly-15k\n'
            '2. oasst1\n'
            '\n'
            'We trained on this mixture for 16 epochs.\n',
    'url': ''}
SambaNova Provided    : True
Version               : 1
Description           : Pre-trained large language models excel in predicting the next word in sentences, but are not aligned for generating the correct responses for many of the common use cases, such as summarization or question answering. Human-facing applications in particular, such as for a chatbot, are a pain point. This checkpoint has been trained on human alignment data to optimize it for such applications. This checkpoint can serve two primary use cases:
1. It can be directly used for human-facing applications.
2. It can be used as a starting checkpoint for further alignment to instill further human-aligned qualities, such as politeness, helpfulness, or harmlessness. Some of its instruction-following capabilities may have been lost in the human alignment process, but it is still usable for instruction following applications.

This checkpoint is the same as the 8k SS HAv3 checkpoint, but has its positional embeddings truncated to 2048. If you expect to work with shorter sequences, 2k SS HAv3 will have slightly faster inference latency.

Please run inference with do_sample=True and a sampling temperature >= 0.7 for best results.

Created Time          : 2024-01-19 14:35:42.274822 +0000 UTC
Status                : Available
Steps                 : 0
Hyperparameters              :
 {'batch_predict': {}, 'deploy': {}, 'train': {}}
Size In GB            : 49
Checkpoint Type       : finetuned
Model IO              : {   'infer': {   'input': {'description': '', 'example': ''},
                 'output': {'description': '', 'example': ''}},
    'serve': {   'input': {'description': '', 'example': ''},
                 'output': {   'description': 'The output is a concatenation '
                                              'of the prompt (input) string, '
                                              'and the generated completion.',
                               'example': ''}},
    'train': {   'input': {'description': '', 'example': ''},
                 'output': {'description': '', 'example': ''}}}
Evaluation       : {}
Params                : {   'invalidates_checkpoint': {'max_seq_length': 2048, 'vocab_size': 50260},
    'modifiable': None}
rdu|
Run snapi model list --help to display additional usage and options. |
View model information using the CLI
The example below demonstrates how to view detailed information for a specific model using the snapi model info command. You will need to specify the following:
-
The model name or ID for the --model input.
-
Run the snapi model list command and include the --verbose option to view the model IDs for each model.
-
-
The type of job to get detailed information for the --job-type input.
-
Input train for training jobs, batch_predict for batch inference jobs, or deploy for endpoints.
-
Click to view the example snapi model info command.
$ snapi model info \
--model c7be342b-208b-4393-b5c2-496aa54eb917 \
--job-type train
Model Info
============
ID : c7be342b-208b-4393-b5c2-496aa54eb917
Name : GPT13B 2k SS HAv3
Architecture : GPT 13B
Field of Application : language
Validation Loss : -
Validation Accuracy : -
App : 57f6a3c8-1f04-488a-bb39-3cfc5b4a5d7a
Dataset : { 'info': '\n'
'The starting point for this checkpoint was the GPT 13B 8k SS '
'checkpoint which had been trained on 550B pretraining tokens,\n'
'and further instruction-tuned on 39.3B tokens of instruction '
'data. We then trained this checkpoint on the following datasets:\n'
'\n'
'1. databricks-dolly-15k\n'
'2. oasst1\n'
'\n'
'We trained on this mixture for 16 epochs.\n',
'url': ''}
SambaNova Provided : True
Version : 1
Description : Pre-trained large language models excel in predicting the next word in sentences, but are not aligned for generating the correct responses for many of the common use cases, such as summarization or question answering. Human-facing applications in particular, such as for a chatbot, are a pain point. This checkpoint has been trained on human alignment data to optimize it for such applications. This checkpoint can serve two primary use cases:
1. It can be directly used for human-facing applications.
2. It can be used as a starting checkpoint for further alignment to instill further human-aligned qualities, such as politeness, helpfulness, or harmlessness. Some of its instruction-following capabilities may have been lost in the human alignment process, but it is still usable for instruction following applications.
This checkpoint is the same as the 8k SS HAv3 checkpoint, but has its positional embeddings truncated to 2048. If you expect to work with shorter sequences, 2k SS HAv3 will have slightly faster inference latency.
Please run inference with do_sample=True and a sampling temperature >= 0.7 for best results.
Created Time : 2024-01-19 14:35:42.274822 +0000 UTC
Status : Available
Steps : 0
Hyperparameters :
{ 'batch_predict': {},
'deploy': {},
'train': { 'sn10': { 'imageVariants': [],
'imageVersion': '3.0.0-20231218',
'jobTypes': ['compile', 'train'],
'runtimeVersion': '5.3.0',
'sockets': 2,
'supports_data_parallel': True,
'user_params': [ { 'CONSTRAINTS': { 'ge': '',
'gt': '',
'le': '',
'lt': '',
'values': [ 'true',
'false']},
'DATATYPE': 'bool',
'DESCRIPTION': 'whether or '
'not to do '
'final '
'evaluation',
'FIELD_NAME': 'do_eval',
'MESSAGE': '',
'TASK_TYPE': ['train'],
'TYPE_SPECIFIC_SETTINGS': { 'train': { 'DEFAULT': 'true',
'USER_MODIFIABLE': True}},
'VARIANT_SELECTION': False},
{ 'CONSTRAINTS': { 'ge': '1',
'gt': '',
'le': '',
'lt': '',
'values': [ ]},
'DATATYPE': 'int',
'DESCRIPTION': 'Period of '
'evaluating '
'the model '
'in number '
'of '
'training '
'steps. '
'This '
'parameter '
'is only '
'effective '
'when '
'evaluation_strategy '
'is set to '
"'steps'.",
'FIELD_NAME': 'eval_steps',
'MESSAGE': '',
'TASK_TYPE': ['train'],
'TYPE_SPECIFIC_SETTINGS': { 'train': { 'DEFAULT': '50',
'USER_MODIFIABLE': True}},
'VARIANT_SELECTION': False},
{ 'CONSTRAINTS': { 'ge': '',
'gt': '',
'le': '',
'lt': '',
'values': [ 'no',
'steps',
'epoch']},
'DATATYPE': 'str',
'DESCRIPTION': 'Strategy '
'to '
'validate '
'the model '
'during '
'training',
'FIELD_NAME': 'evaluation_strategy',
'MESSAGE': '',
'TASK_TYPE': ['train'],
'TYPE_SPECIFIC_SETTINGS': { 'train': { 'DEFAULT': 'steps',
'USER_MODIFIABLE': True}},
'VARIANT_SELECTION': False},
{ 'CONSTRAINTS': { 'ge': '0',
'gt': '',
'le': '',
'lt': '',
'values': [ ]},
'DATATYPE': 'float',
'DESCRIPTION': 'learning '
'rate to '
'use in '
'optimizer',
'FIELD_NAME': 'learning_rate',
'MESSAGE': '',
'TASK_TYPE': ['train'],
'TYPE_SPECIFIC_SETTINGS': { 'train': { 'DEFAULT': '7.5e-06',
'USER_MODIFIABLE': True}},
'VARIANT_SELECTION': False},
{ 'CONSTRAINTS': { 'ge': '1',
'gt': '',
'le': '',
'lt': '',
'values': [ ]},
'DATATYPE': 'int',
'DESCRIPTION': 'Period of '
'logging '
'training '
'loss in '
'number of '
'training '
'steps',
'FIELD_NAME': 'logging_steps',
'MESSAGE': '',
'TASK_TYPE': ['train'],
'TYPE_SPECIFIC_SETTINGS': { 'train': { 'DEFAULT': '10',
'USER_MODIFIABLE': True}},
'VARIANT_SELECTION': False},
{ 'CONSTRAINTS': { 'ge': '',
'gt': '',
'le': '',
'lt': '',
'values': [ 'polynomial_decay_schedule_with_warmup',
'cosine_schedule_with_warmup',
'fixed_lr']},
'DATATYPE': 'str',
'DESCRIPTION': 'Type of '
'learning '
'rate '
'scheduler '
'to use',
'FIELD_NAME': 'lr_schedule',
'MESSAGE': '',
'TASK_TYPE': ['train'],
'TYPE_SPECIFIC_SETTINGS': { 'train': { 'DEFAULT': 'cosine_schedule_with_warmup',
'USER_MODIFIABLE': True}},
'VARIANT_SELECTION': False},
{ 'CONSTRAINTS': { 'ge': '',
'gt': '',
'le': '',
'lt': '',
'values': [ '2048',
'8192']},
'DATATYPE': 'int',
'DESCRIPTION': 'Sequence '
'length to '
'pad or '
'truncate '
'the '
'dataset',
'FIELD_NAME': 'max_seq_length',
'MESSAGE': '',
'TASK_TYPE': [ 'compile',
'infer',
'serve',
'train'],
'TYPE_SPECIFIC_SETTINGS': { 'train': { 'DEFAULT': '2048',
'USER_MODIFIABLE': False}},
'VARIANT_SELECTION': False},
{ 'CONSTRAINTS': { 'ge': '1',
'gt': '',
'le': '',
'lt': '',
'values': [ ]},
'DATATYPE': 'int',
'DESCRIPTION': 'number of '
'iterations '
'to run',
'FIELD_NAME': 'num_iterations',
'MESSAGE': '',
'TASK_TYPE': ['train'],
'TYPE_SPECIFIC_SETTINGS': { 'train': { 'DEFAULT': '100',
'USER_MODIFIABLE': True}},
'VARIANT_SELECTION': False},
{ 'CONSTRAINTS': { 'ge': '0',
'gt': '',
'le': '',
'lt': '',
'values': [ ]},
'DATATYPE': 'float',
'DESCRIPTION': 'Loss scale '
'for prompt '
'tokens',
'FIELD_NAME': 'prompt_loss_weight',
'MESSAGE': '',
'TASK_TYPE': ['train'],
'TYPE_SPECIFIC_SETTINGS': { 'train': { 'DEFAULT': '0.1',
'USER_MODIFIABLE': True}},
'VARIANT_SELECTION': False},
{ 'CONSTRAINTS': { 'ge': '',
'gt': '',
'le': '',
'lt': '',
'values': [ 'true',
'false']},
'DATATYPE': 'bool',
'DESCRIPTION': 'Whether to '
'save the '
'optimizer '
'state when '
'saving a '
'checkpoint',
'FIELD_NAME': 'save_optimizer_state',
'MESSAGE': '',
'TASK_TYPE': ['train'],
'TYPE_SPECIFIC_SETTINGS': { 'train': { 'DEFAULT': 'true',
'USER_MODIFIABLE': True}},
'VARIANT_SELECTION': False},
{ 'CONSTRAINTS': { 'ge': '1',
'gt': '',
'le': '',
'lt': '',
'values': [ ]},
'DATATYPE': 'int',
'DESCRIPTION': 'Period of '
'saving the '
'model '
'checkpoints '
'in number '
'of '
'training '
'steps',
'FIELD_NAME': 'save_steps',
'MESSAGE': '',
'TASK_TYPE': ['train'],
'TYPE_SPECIFIC_SETTINGS': { 'train': { 'DEFAULT': '50',
'USER_MODIFIABLE': True}},
'VARIANT_SELECTION': False},
{ 'CONSTRAINTS': { 'ge': '',
'gt': '',
'le': '',
'lt': '',
'values': [ 'true',
'false']},
'DATATYPE': 'bool',
'DESCRIPTION': 'whether or '
'not to '
'skip the '
'checkpoint',
'FIELD_NAME': 'skip_checkpoint',
'MESSAGE': '',
'TASK_TYPE': ['train'],
'TYPE_SPECIFIC_SETTINGS': { 'train': { 'DEFAULT': 'false',
'USER_MODIFIABLE': True}},
'VARIANT_SELECTION': False},
{ 'CONSTRAINTS': { 'ge': '0',
'gt': '',
'le': '',
'lt': '',
'values': [ ]},
'DATATYPE': 'float',
'DESCRIPTION': 'Subsample '
'for the '
'evaluation '
'dataset',
'FIELD_NAME': 'subsample_eval',
'MESSAGE': '',
'TASK_TYPE': ['train'],
'TYPE_SPECIFIC_SETTINGS': { 'train': { 'DEFAULT': '0.01',
'USER_MODIFIABLE': True}},
'VARIANT_SELECTION': False},
{ 'CONSTRAINTS': { 'ge': '1',
'gt': '',
'le': '',
'lt': '',
'values': [ ]},
'DATATYPE': 'int',
'DESCRIPTION': 'Random '
'seed to '
'use for '
'the '
'subsample '
'evaluation',
'FIELD_NAME': 'subsample_eval_seed',
'MESSAGE': '',
'TASK_TYPE': ['train'],
'TYPE_SPECIFIC_SETTINGS': { 'train': { 'DEFAULT': '123',
'USER_MODIFIABLE': True}},
'VARIANT_SELECTION': False},
{ 'CONSTRAINTS': { 'ge': '',
'gt': '',
'le': '',
'lt': '',
'values': [ 'true',
'false']},
'DATATYPE': 'bool',
'DESCRIPTION': 'Whether to '
'use '
'token_type_ids '
'to compute '
'loss',
'FIELD_NAME': 'use_token_type_ids',
'MESSAGE': '',
'TASK_TYPE': ['train'],
'TYPE_SPECIFIC_SETTINGS': { 'train': { 'DEFAULT': 'true',
'USER_MODIFIABLE': True}},
'VARIANT_SELECTION': False},
{ 'CONSTRAINTS': { 'ge': '',
'gt': '',
'le': '',
'lt': '',
'values': [ '50260',
'307200']},
'DATATYPE': 'int',
'DESCRIPTION': 'Maximum '
'size of '
'vocabulary',
'FIELD_NAME': 'vocab_size',
'MESSAGE': '',
'TASK_TYPE': [ 'compile',
'infer',
'serve',
'train'],
'TYPE_SPECIFIC_SETTINGS': { 'train': { 'DEFAULT': '50260',
'USER_MODIFIABLE': False}},
'VARIANT_SELECTION': False},
{ 'CONSTRAINTS': { 'ge': '0',
'gt': '',
'le': '',
'lt': '',
'values': [ ]},
'DATATYPE': 'int',
'DESCRIPTION': 'warmup '
'steps to '
'use in '
'learning '
'rate '
'scheduler '
'in '
'optimizer',
'FIELD_NAME': 'warmup_steps',
'MESSAGE': '',
'TASK_TYPE': ['train'],
'TYPE_SPECIFIC_SETTINGS': { 'train': { 'DEFAULT': '0',
'USER_MODIFIABLE': True}},
'VARIANT_SELECTION': False},
{ 'CONSTRAINTS': { 'ge': '0',
'gt': '',
'le': '',
'lt': '',
'values': [ ]},
'DATATYPE': 'float',
'DESCRIPTION': 'weight '
'decay rate '
'to use in '
'optimizer',
'FIELD_NAME': 'weight_decay',
'MESSAGE': '',
'TASK_TYPE': [ 'infer',
'serve',
'train'],
'TYPE_SPECIFIC_SETTINGS': { 'train': { 'DEFAULT': '0.1',
'USER_MODIFIABLE': True}},
'VARIANT_SELECTION': False}],
'variantSetVersion': ''}}}
Size In GB : 49
Checkpoint Type : finetuned
Model IO : { 'infer': { 'input': {'description': '', 'example': ''},
'output': {'description': '', 'example': ''}},
'serve': { 'input': {'description': '', 'example': ''},
'output': { 'description': 'The output is a concatenation '
'of the prompt (input) string, '
'and the generated completion.',
'example': ''}},
'train': { 'input': {'description': '', 'example': ''},
'output': {'description': '', 'example': ''}}}
Evaluation : {}
Params : { 'invalidates_checkpoint': {'max_seq_length': 2048, 'vocab_size': 50260},
'modifiable': None}
rduDownload models using the GUI
SambaStudio provides the ability for organization administrators (OrgAdmin) to download models to the Model Hub. This allows SambaNova created models to be downloaded and used when new models are released. A model available for download will display a download icon in the associated model cards panel and its model card.

Model share settings
Providing access to models within SambaStudio is accomplished by assigning a share role in the Share settings window. Access to models can be assigned by the owner/creator of the model (a User), tenant administrators (TenantAdmin) to models within their tenant, and organization administrators (OrgAdmin) to models across all tenants.
|
SambaNova owned models cannot have their share settings assigned. |
Click the share icon in the model preview or Share in the top of the model card to access the Share settings window.

The Share settings window is divided into two sections, General access and Share with specific users. Slide the toggle to the right to enable and define share settings for either section. This allows model access to be defined and regulated based on the criteria described below.
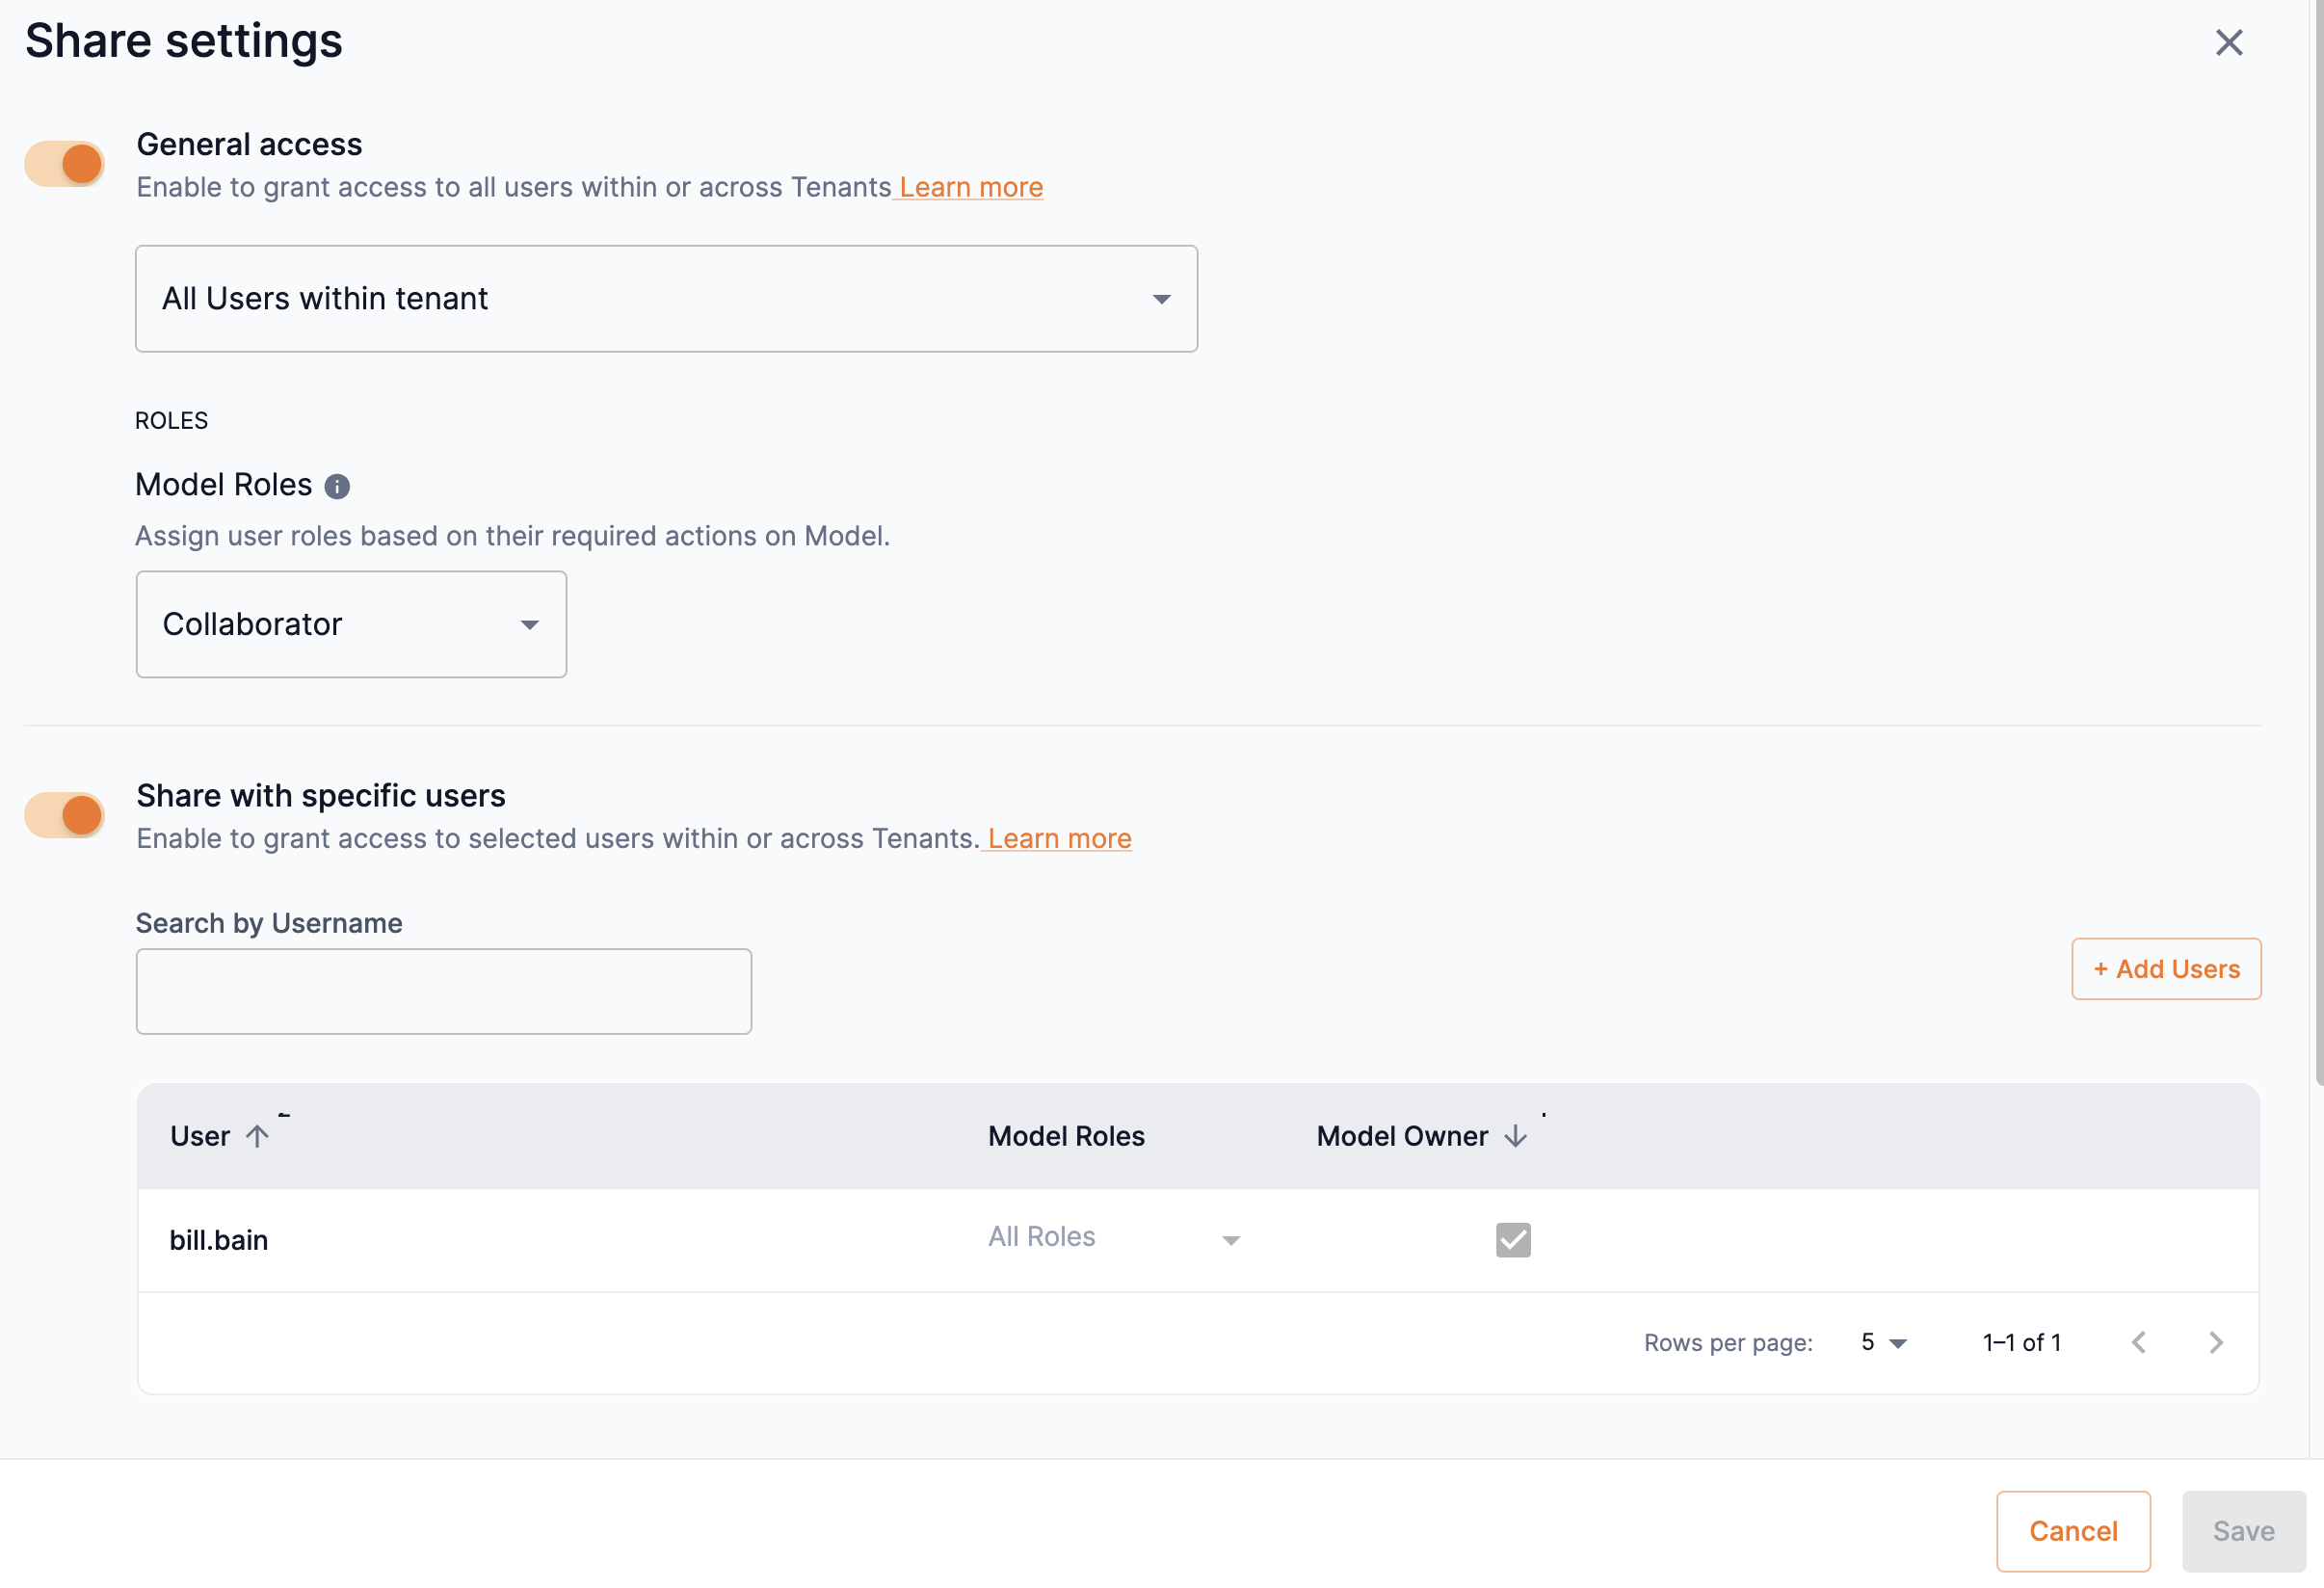
General access
You can provide access to a model based on the users in tenants. Once you have defined the general access to your model based on tenants, you can set access to a model based on the share roles of Viewer or Collaborator.
- Viewer
-
A Viewer has the most restrictive access to SambaStudio artifacts. Viewers are only able to consume and view artifacts assigned to them. Viewers cannot take actions that affect the functioning of an artifact assigned to them.
- Collaborator
-
Collaborators have more access to artifacts than Viewers. A Collaborator can edit and manipulate the information of artifacts assigned to them. As such, a Collaborator can affect the functioning of an artifact assigned to them.
|
Hover over the info icon to view the actions available for Viewer and Collaborator share roles of models. 
Figure 11. Model share roles actions
|
-
Slide the toggle to the right to enable and define access to the model based on tenants and their defined users.
-
From the drop-down, select one of the following options:
-
All users within tenant: This allows all users in the same tenant as the model to access it.
-
All users across tenants: This allows all users across all tenants in the platform to access the model.
 Figure 12. Model tenant access drop-down
-
-
Select an option of Viewer or Collaborator from the Model roles drop-down to set the access to it.
-
You cannot set the option of No access to models. An information warning will appear stating that at least one role (Viewer or Collaborator) is required.
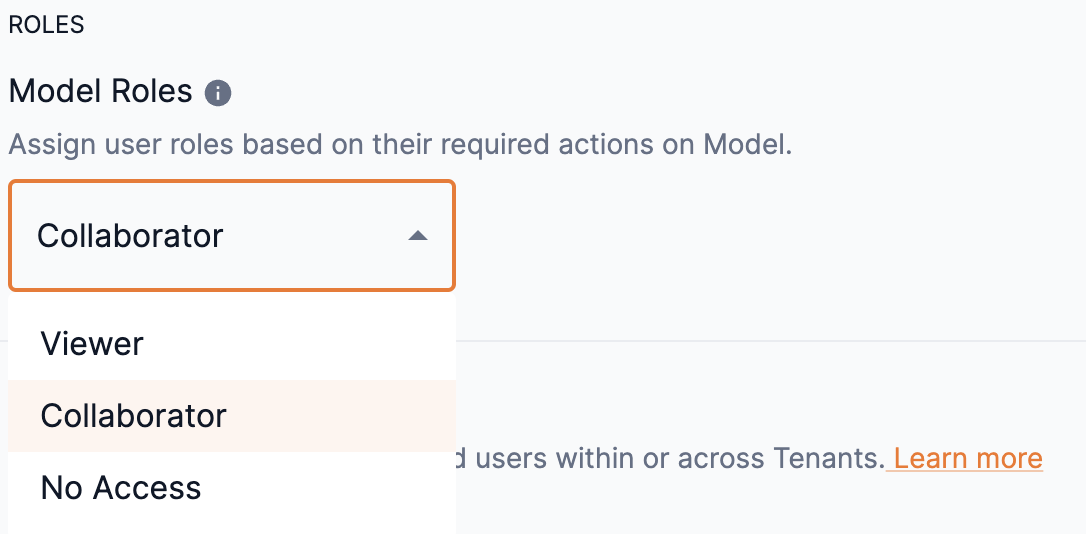 Figure 13. Model roles drop-down
-
-
Click Save at the bottom of the Share settings window to update your General access share settings.
 Figure 14. Share settings save
Disable general access
-
To disable general access to a model in all tenants throughout the platform, slide the General access toggle to the left.
 Figure 15. Disable general access
 -
Click Save at the bottom of the Share settings window to update your General access share settings.
Figure 16. Share settings save
Share with specific users
Specific users can be set as Viewer or Collaborator and allowed access to a model based on the rights of each share role. Follow the steps below to send an invitation to users and set their share role access.
|
OrgAdmin and TenantAdmin user roles have access to models based on their rights and cannot be assigned a different share role. |
-
Slide the Share with specific users toggle to the right to enable and define user access for the model.
-
Click Add users to open the Add new users box.
-
From the Usernames drop-down, select the user(s) for which you wish to share your model. You can type an input to locate the user. Multiple usernames can be selected.
-
You can remove a user added to the drop-down by clicking the X next to their name or by setting the cursor and pressing delete.
-
-
Select an option of Viewer or Collaborator from the Model roles drop-down to set the user’s access to it.
-
Hover over the info icon to view the actions available for Viewer and Collaborator share roles of models.
-
You cannot set the option of No access to models.
-
-
Click Add users to close the Add new users box.
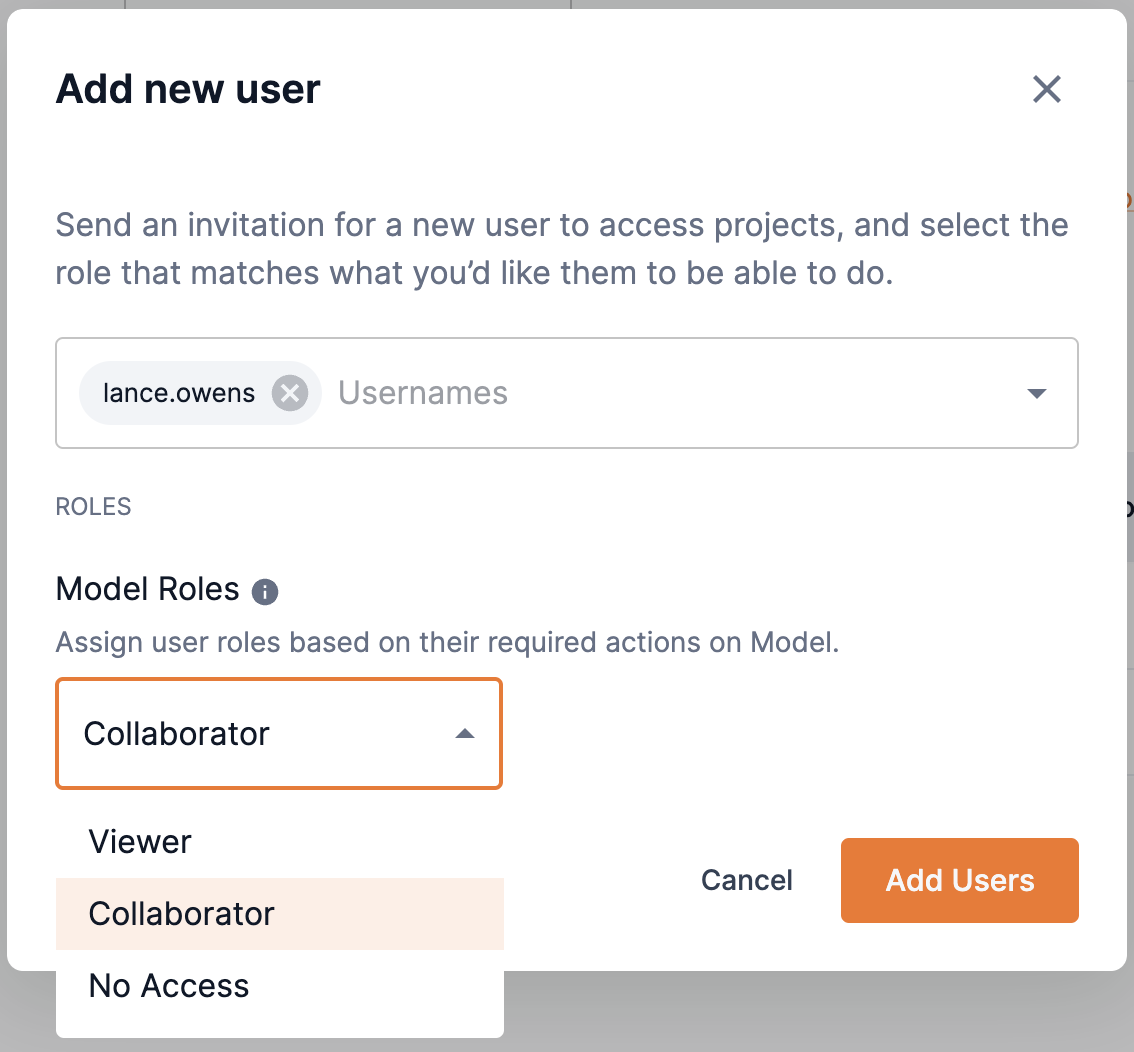 Figure 17. Add new user
 -
You can assign a user as an owner of the model by selecting the box in the Model owner column.
-
An owner inherits the actions of all roles. Setting a user as an owner overrides previous role settings.
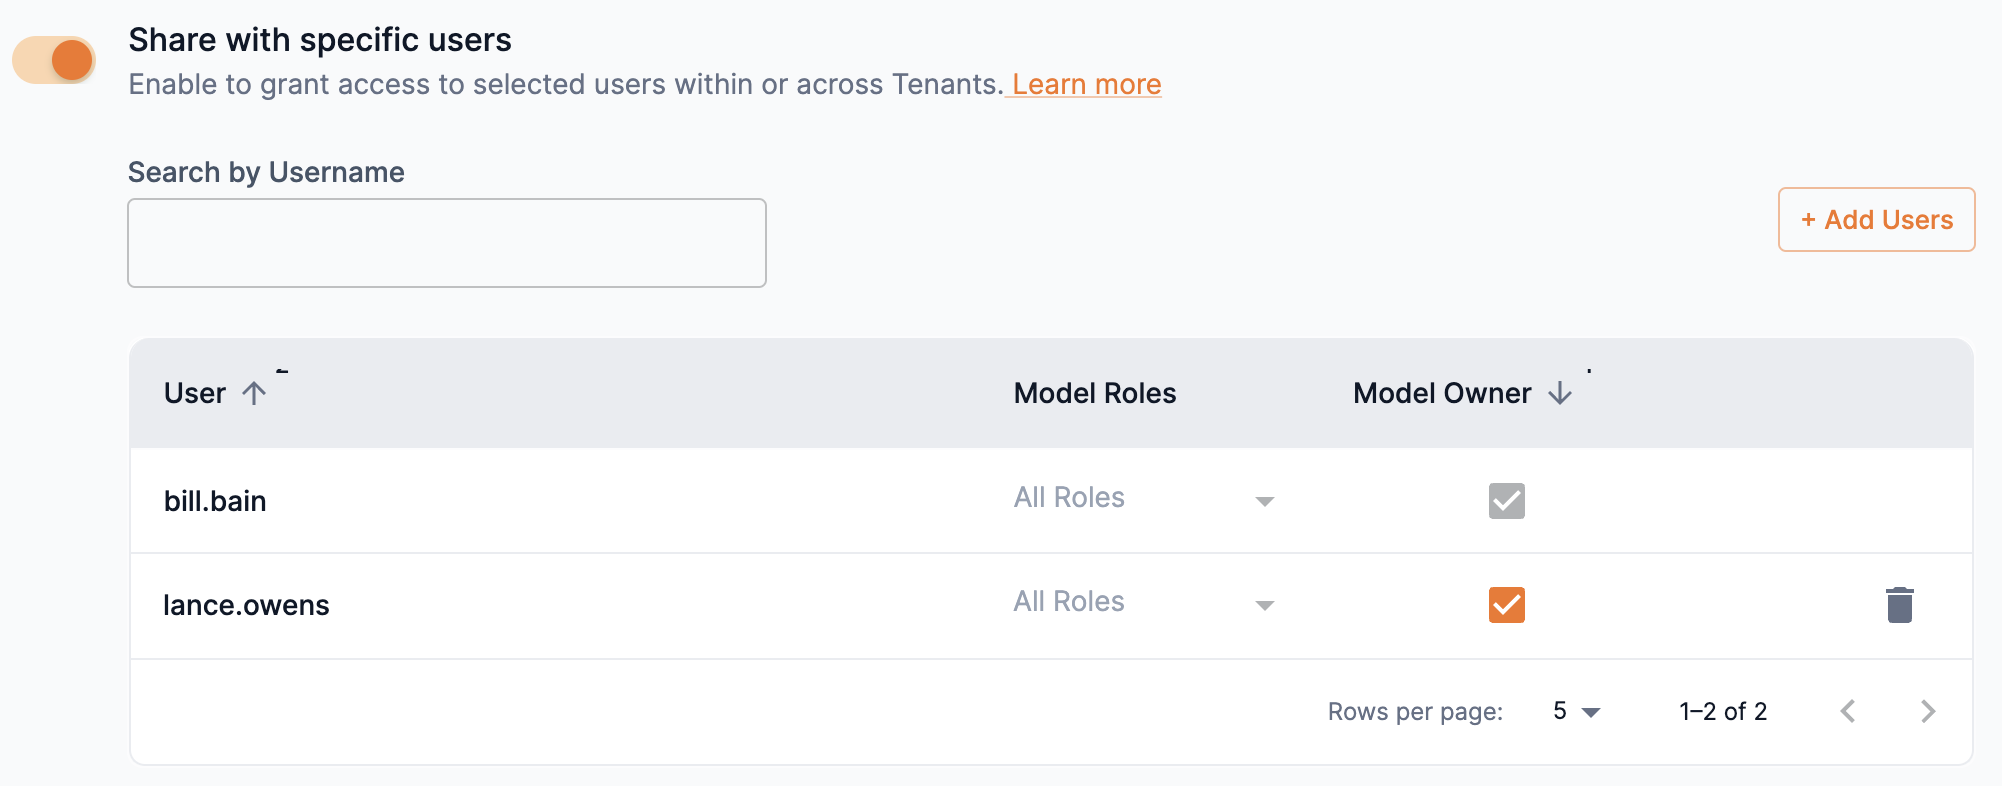 Figure 18. Assign user as model owner
-
-
Click Save at the bottom of the Share settings window to send the invitation to your selected users and update your share settings.
Figure 19. Share settings save
Remove users
You can remove a user that you have shared your model with for all users or for specific users.
- Remove sharing for all users
-
-
To remove share access to your model for all users, slide the Share with specific users toggle to the left to disable sharing.
 Figure 20. Disable share with specific users toggle
 -
Click Save at the bottom of the Share settings window to update your share settings.
Figure 21. Share settings save
-
- Remove sharing for a specific user
-
-
From the Share with specific users list, click the trash icon next to the user you wish to stop sharing your model.
Figure 22. Remove user from share list -
Click Save at the bottom of the Share settings window to update your share settings.
Figure 23. Share settings save
-