Image classification tutorial
Image classification is the task of categorizing an image into one or multiple predefined classes by assigning it to a specific label. In this exercise, we describe a general approach to image classification in the SambaStudio platform.
Data preparation
In an image classification task, the classification data typically consists of a set of images along with corresponding labels. The images can be in any standard format, such as JPEG (Joint Photographic Experts Group) or PNG (Portable Network Graphic).
Training dataset requirements
An uploaded dataset is expected to have the following components:
-
A directory of images.
-
A
labels.csvfile, responsible for mapping the image location to the image label and identifier oftrain,test, andvalidationsplit. -
A
class_to_idx.jsonfile[Optional]. This file is responsible for mapping the class’s verbose name to the class index. It provides a way to retrieve the human-readable interpretation from the index number that corresponds to a specific class label.
The uploaded data should have a directory structure similar to the below example.
.
└── data_root/
    ├── images/
    ├── labels.csv
└── class_to_idx.json # Optional|
The directory name For example, the following directory is also valid assuming |
Image formats
JPEG (.jpg extension) and PNG (.png extension) are allowed formats. All images should be three channel RGB, with uint8 encoding. For example, if initial images have a fourth alpha channel, this will need to be removed during the dataset processing step.
Labels CSV
You are required to provide a .csv file specifying the appropriate image-label pair in addition to an indicator if the data should be treated as training data or testing data. This information is denoted by the column headers as described below:
-
image_path header denotes the relative path to a given image inside of the dataset directory.
-
label header denotes the class id included in the image, ranging from
[0..n-1], wherenis the number of classes. In the case of multi-label classification, labels are separated by a space if a sample has multiple labels present. -
subset header denotes one of
train,test, orvalidation. Indicating if the image is in the training, test, or validation set. -
metadata [Optional] header denotes information relating to the given input data.
$ column -s, -t caltech256.csv | head -n 4
image_path                                  label  subset       metadata
./images/138.mattress/138_0117.jpg          0      train
./images/138.mattress/138_0103.jpg          0 3 11 validation
./images/138.mattress/138_0088.jpg          0      train
Where the column command is used for pretty-printing the .csv for display purposes.
The class index mapping file
The class_to_idx.json file is responsible for mapping the human-interpretable name to the class index. The expected format of this files is an string-index mapping dictionary.
$ python -m json.tool imagenet1000.json | head
{
    "tench, Tinca tinca": 0,
    "goldfish, Carassius auratus": 1,
    "great white shark, white shark, man-eater, man-eating shark, Carcharodon carcharias": 2,
    "tiger shark, Galeocerdo cuvieri": 3,
    "hammerhead, hammerhead shark": 4,
    "electric ray, crampfish, numbfish, torpedo": 5,
    "stingray": 6,
    "cock": 7,
"hen": 8,|
The The app does not check the existence of this file or its correctness. |
CIFAR 100 example
Download the CIFAR 100 data from https://www.cs.toronto.edu/~kriz/cifar.html
import asyncio
import aiofiles
from io import BytesIO
from PIL import Image
import pickle
from pathlib import Path
import pandas as pd
import random


# Change to false if only the labels.csv file needs to be processed
SAVE_IMAGE = True

# The async code will open too many files at one time. Let's limit this
num_of_max_files_open = 200

data_dir = Path('./data')
data_dir.mkdir(exist_ok=True)


def unpickle(file):
    with open(file, 'rb') as fo:
        data = pickle.load(fo, encoding='bytes')
    return data


def load_subset(subset):
    data = unpickle(f'./cifar-100-python/{subset}')

    filenames = data[b'filenames']
    labels = data[b'fine_labels']
    images = data[b'data']

    assert len(labels) == len(images)
    assert len(filenames) == len(images)

    return filenames, labels, images


async def save_image(path: str, image: memoryview) -> None:
    async with aiofiles.open(path, "wb") as file:
        await file.write(image)


async def write_image(filename, label, image, subset, row, sem):
    subset_dir = data_dir / subset
    filepath = subset_dir / filename.decode()

    async with sem:
        # Each row of the array stores a 32x32 colour image. The first 1024 entries contain the red channel values, the
        # next 1024 the green, and the final 1024 the blue. The image is stored in row-major order, so that the first 32
        # entries of the array are the red channel values of the first row of the image.
        if SAVE_IMAGE:
            image = image.reshape(3, 32, 32).transpose(1, 2, 0)
            img = Image.fromarray(image)
            buffer = BytesIO()
            img.save(buffer, format='png')
            await save_image(filepath, buffer.getbuffer())

    if row % 100 == 0:
        print(f"{row:05d}", flush=True)

    if subset == 'test':
        # we use the ``test`` set as the ``validation`` set in this example
        subset = 'validation'

    return [str(filepath.relative_to(data_dir)), str(label), subset, str('')]


async def process_subset(subset):

    subset_dir = data_dir / subset
    subset_dir.mkdir(exist_ok=True)

    tasks = []
    sem = asyncio.Semaphore(num_of_max_files_open)
    filenames, labels, images = load_subset(subset)

    for row, sample in enumerate(zip(filenames, labels, images)):
        tasks.append(asyncio.ensure_future(write_image(*sample, subset=subset, row=row, sem=sem)))

    results = await asyncio.gather(*tasks)
    df = pd.DataFrame(results, columns=["image_path", "label", "subset", "metadata"])
    return df


async def main():

    print("Processing training images")
    train_df = await process_subset('train')
    print("Processing test images")
    test_df = await process_subset('test')
    df = pd.concat([train_df, test_df])
    df.to_csv(data_dir / 'labels.csv', index=False)


asyncio.run(main())
Fine-tune
You will need to add your dataset to the platform before you can use it for fine-tuning.
Add the dataset
|
If you plan to use the sample dataset provided by the platform, you can skip this section and proceed to Create a project using the GUI. |
Follow the steps below to add the dataset using the GUI.
-
Click Datasets from the left menu to navigate to the Dataset Hub window.
-
Click the Add dataset button.
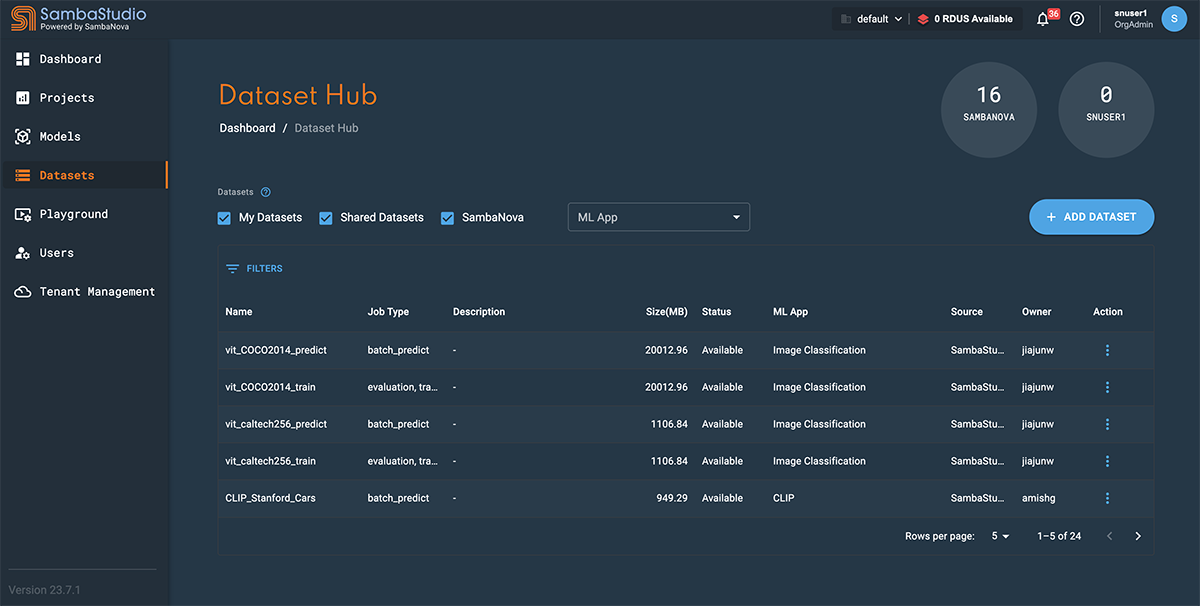 Figure 1. Dataset Hub with left menu
-
The Add a dataset window will open, as shown in Add a dataset.
-
-
In the Dataset name field, input a name for your dataset.
Including your dataset size in the name (corresponding to the
max_seq_lengthvalue used) will help you select the appropriate dataset when creating a training job. -
From the Job type dropdown, select whether the dataset is to be used for Train/Evaluation or Batch predict.
-
The Share settings drop-down provides options for which tenant to share your dataset.
-
Share with <current-tenant> allows the dataset to be shared with the current tenant you are using, identified by its name in the drop-down.
-
Share with all tenants allows the dataset to be shared across all tenants.
-
Dataset will be shared with all users in <current-tenant> identifies that the dataset will be shared with other users in the tenant you are using.
If the Dataset will be shared with all users in <current-tenant> option is displayed, the Share with <current-tenant> and Share with all tenants options described above will not be available. Share with all tenants is an optional feature of SambaStudio. Please contact your administrator or SambaNova representative for more information.
-
-
From the Applicable ML Apps drop-down, select the ML App(s) that you wish the dataset to be associated. Multiple ML Apps can be selected.
Be sure to select appropriate ML Apps that correspond with your dataset, as the platform will not warn you of ML Apps selected that do not correspond with your dataset.
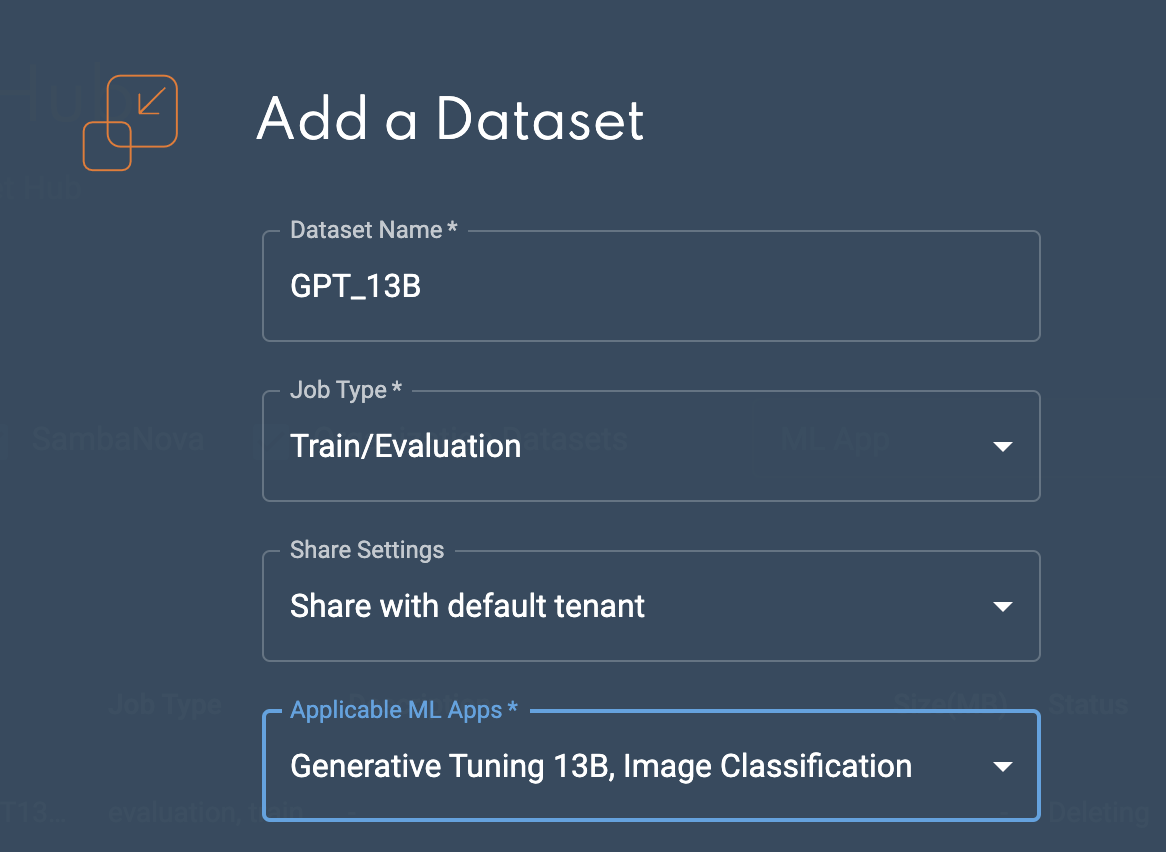 Figure 2. Add a dataset
Import the dataset from AWS S3
Follow the steps below to import your dataset from AWS S3.
|
-
Click the AWS button.
-
In the Bucket field, input the name of your S3 bucket.
-
In the Access key ID field, input the unique ID provided by AWS IAM to manage access.
-
Enter your Secret access key into the field. This allows authentication access for the provided Access Key ID.
-
Enter the AWS Region that your S3 bucket resides into the Region field.
-
Input the relative path to the dataset in the S3 bucket into the Folder field. This folder should include the required dataset files for the task (for example, the labels, training, and validation files).
-
Click Add dataset to submit the dataset to the Dataset Hub.
An Access key, Secret access key, and user access permissions are required for AWS S3 import.
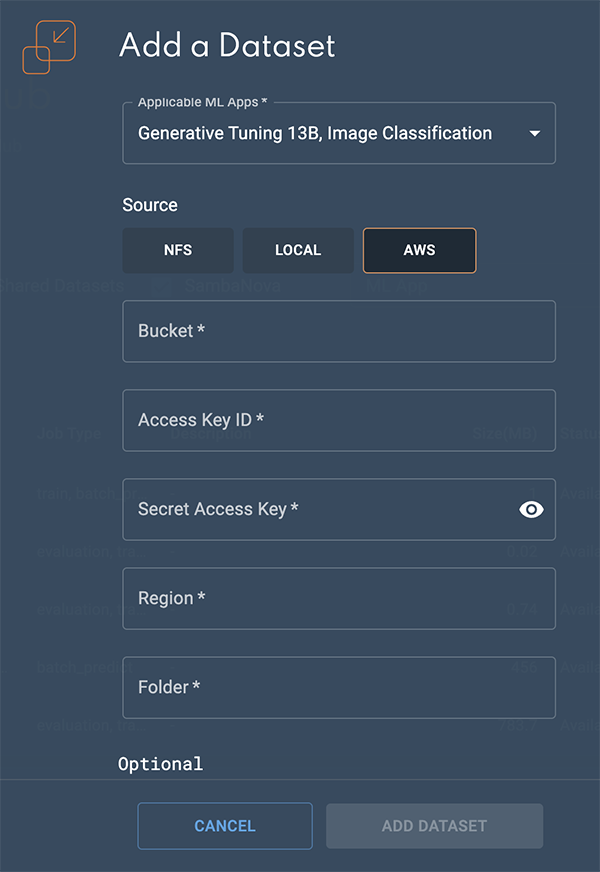 Figure 3. Import from AWS S3
Insufficient storage message
If the required amount of storage space is not available to add the dataset, the Insufficient storage message will display describing the Available space and the Required space to add the dataset. You will need to free up storage space or contact your administrator. Please choose one of the following options.
-
Click Cancel to stop the add a dataset process. Please free up storage space and then restart the add a dataset process.
-
Click Proceed anyway to add the dataset. Please free up storage space, otherwise the add a dataset process will fail.
|
A minimum of 10 minutes is required after sufficient storage space has been cleared before the dataset will start successfully saving to the Dataset Hub. |

Create a project using the GUI
Follow the steps below to create a project using the GUI.
-
Click Projects from the left menu to view the Projects window.
-
Click New project. The Create a new Project window will open.
-
Enter a name to be used into Project name field.
-
Add a brief description into the Description field.
-
Confirm that you want to create the new project:
-
Click Save and close to create your project and go to the Projects window.
-
Click Save and continue to create your project and go to your new project’s window. From the project window you can create a new job or new endpoint to be associated with your project.
-
Click Cancel to stop the creation of a new project and return to the Projects window.
-

Training jobs
You can fine-tune existing models by creating a new training job. The platform will perform the required data processing, such as tokenization, behind the scenes. You can select either a platform provided dataset or your own dataset.
Create a training job using the GUI
You no longer need to specify a Task during job creation. Instead, you select a model to use directly during the workflow or use the new ML App field to filter the list of models to use.
Create a new training job using the GUI for fine-tuning by following the steps below.
|
To navigate to a project, click Projects from the left menu and then select the desired project from the Projects window. See the Projects document for information on how to create and delete projects. |
-
Create a new project or use an existing one.
-
From a project window, click New job. The Create a new job window will appear.
-
Select Train model under Create a new job.
-
Enter a name for the job into the Job name field.
-
Select Image classification from the ML App drop-down.
-
From the Select dataset drop-down, choose My datasets, SambaNova datasets, or Select from datasets.
-
My datasets displays a list of datasets that you have added to the platform and can be used for the selected ML App.
-
SambaNova datasets displays a list of platform provided datasets for the selected ML App.
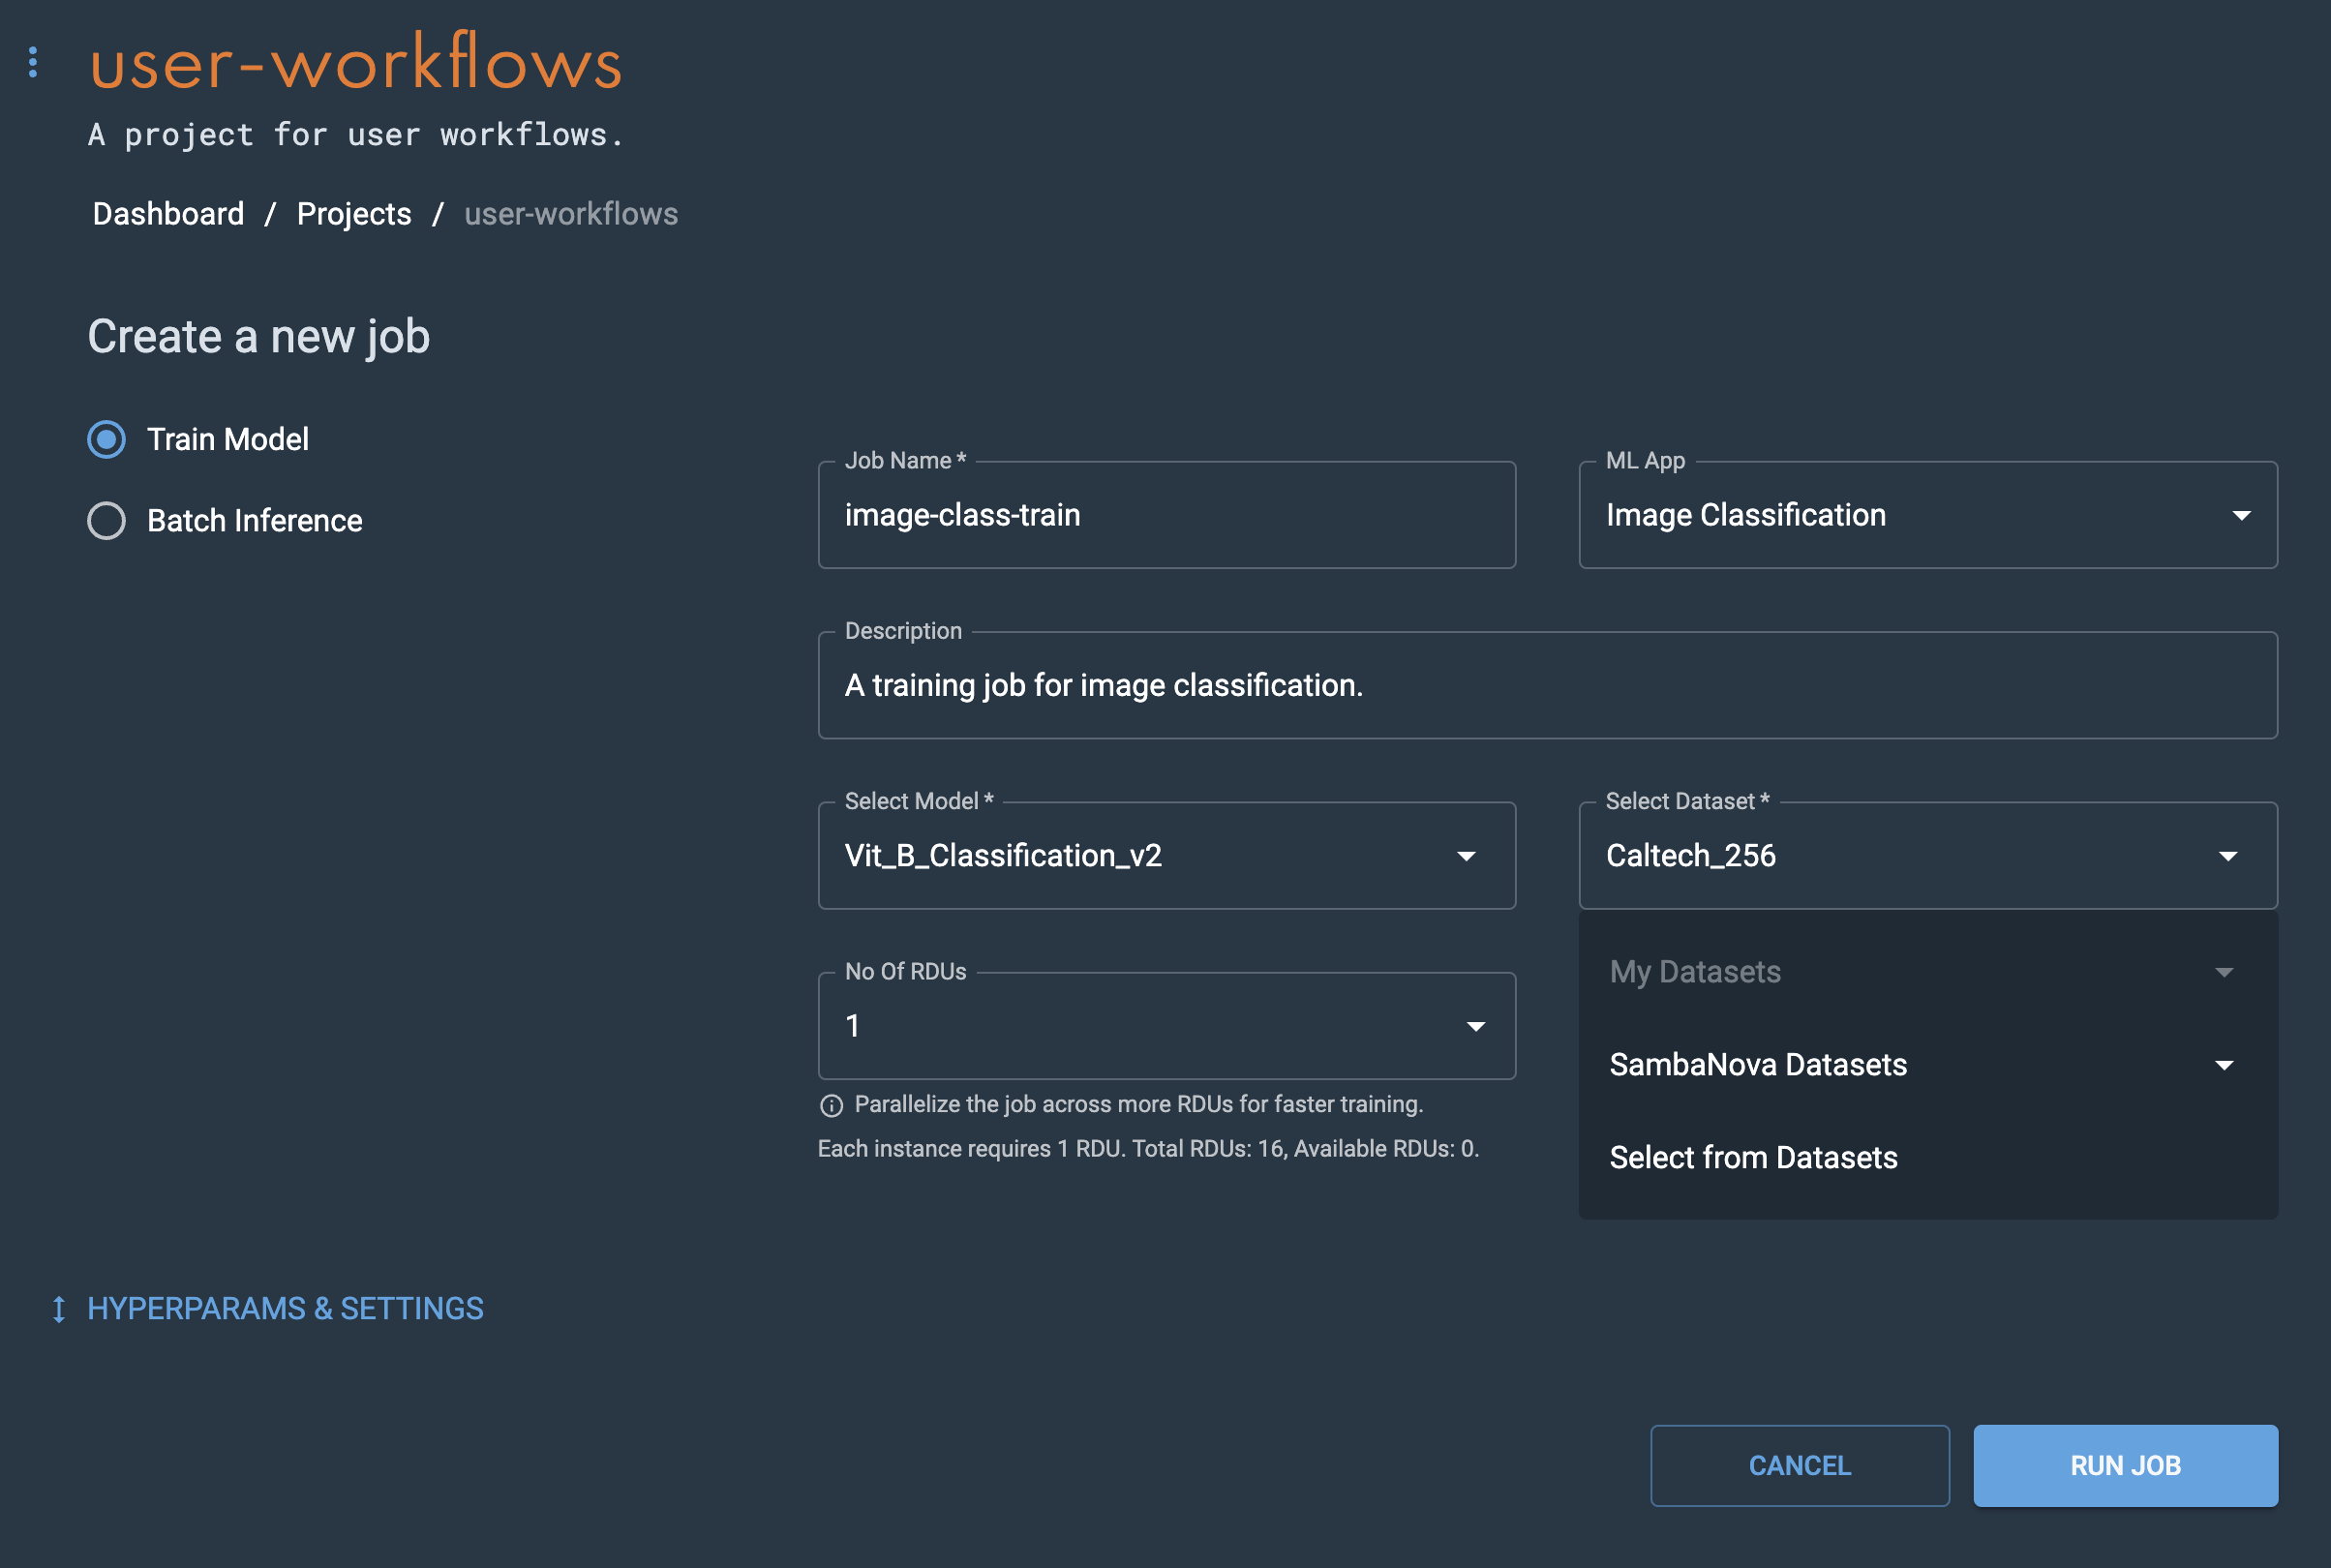 Figure 6. Create a training job
 -
Select from datasets displays the Dataset Hub window with a detailed list of datasets that can be used for the selected ML App. The My datasets and SambaNova checkboxes filter the dataset list by their respective group. The ML App drop-down filters the dataset list by the corresponding ML App. Choose the dataset you wish to use and confirm your choice by clicking Use dataset.
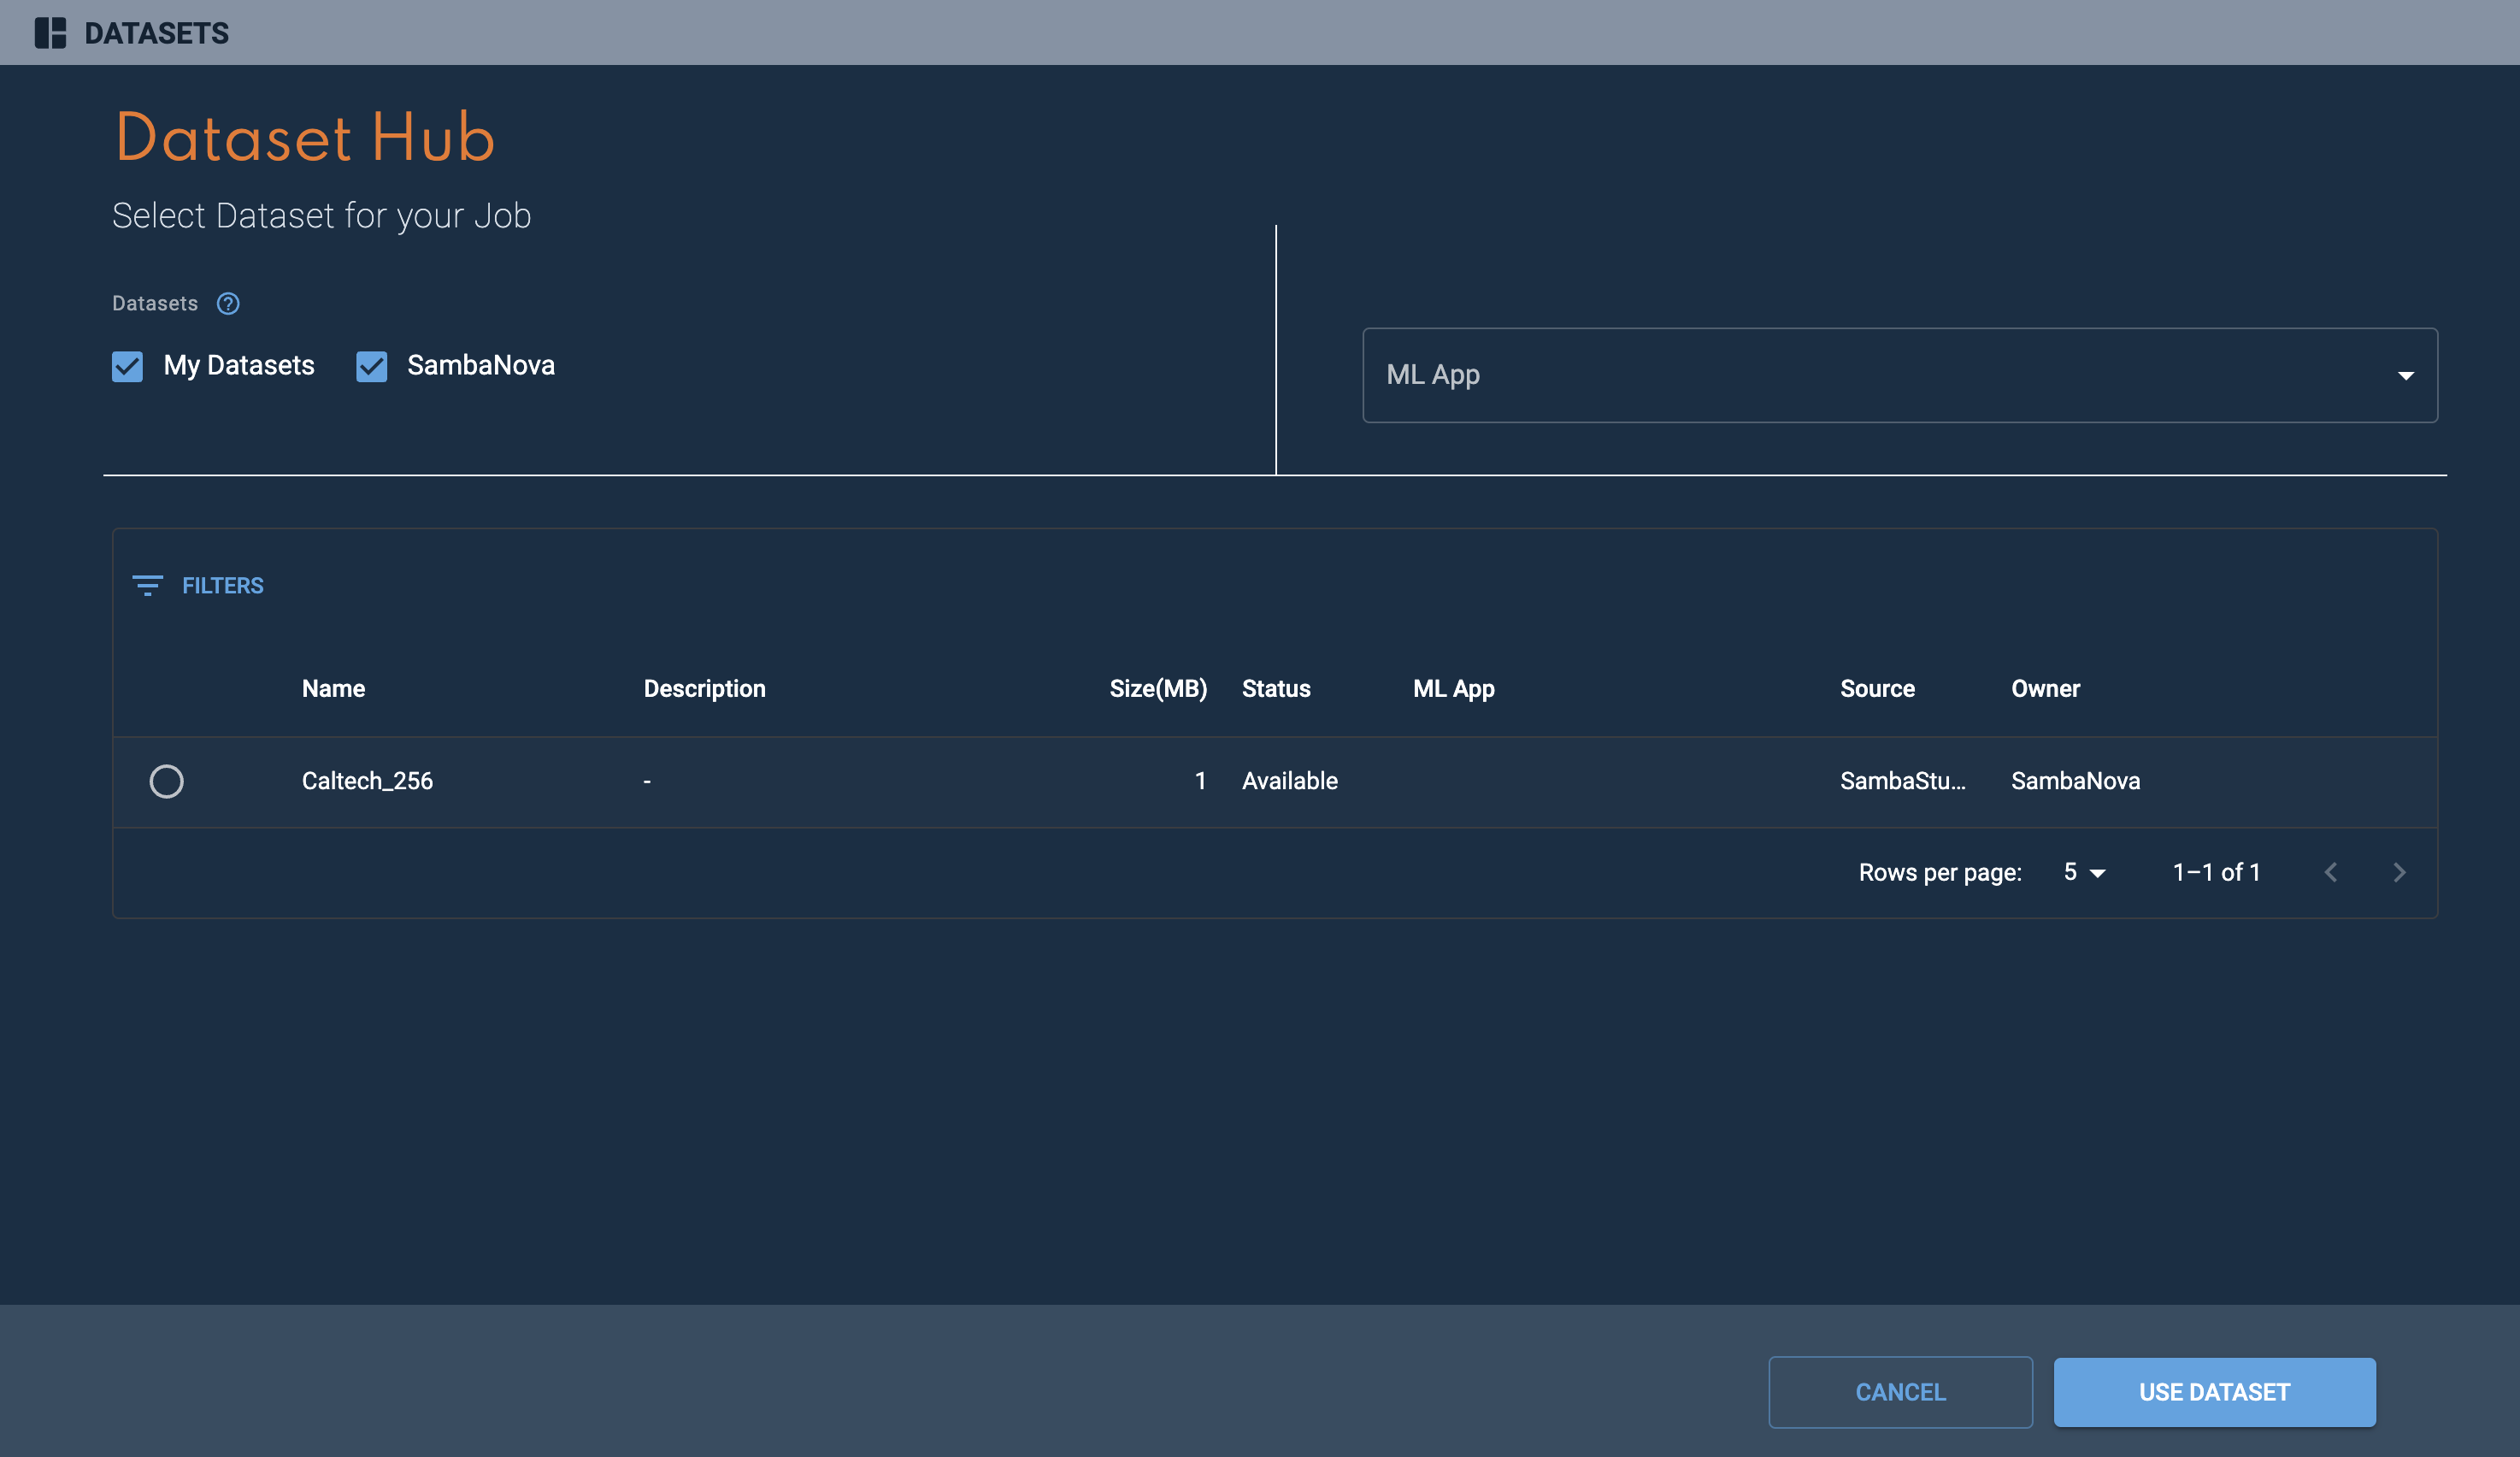 Figure 7. Dataset Hub
-
-
Set the hyperparameters to govern your training job or use the default values. Expand the Hyperparameters & settings pane by clicking the blue double arrows to set hyperparameters and adjust settings.
The num_intended_classes setting needs to match the number of classes in your dataset. For the CIFAR 100 example, the num_intended_classes setting would be 100.
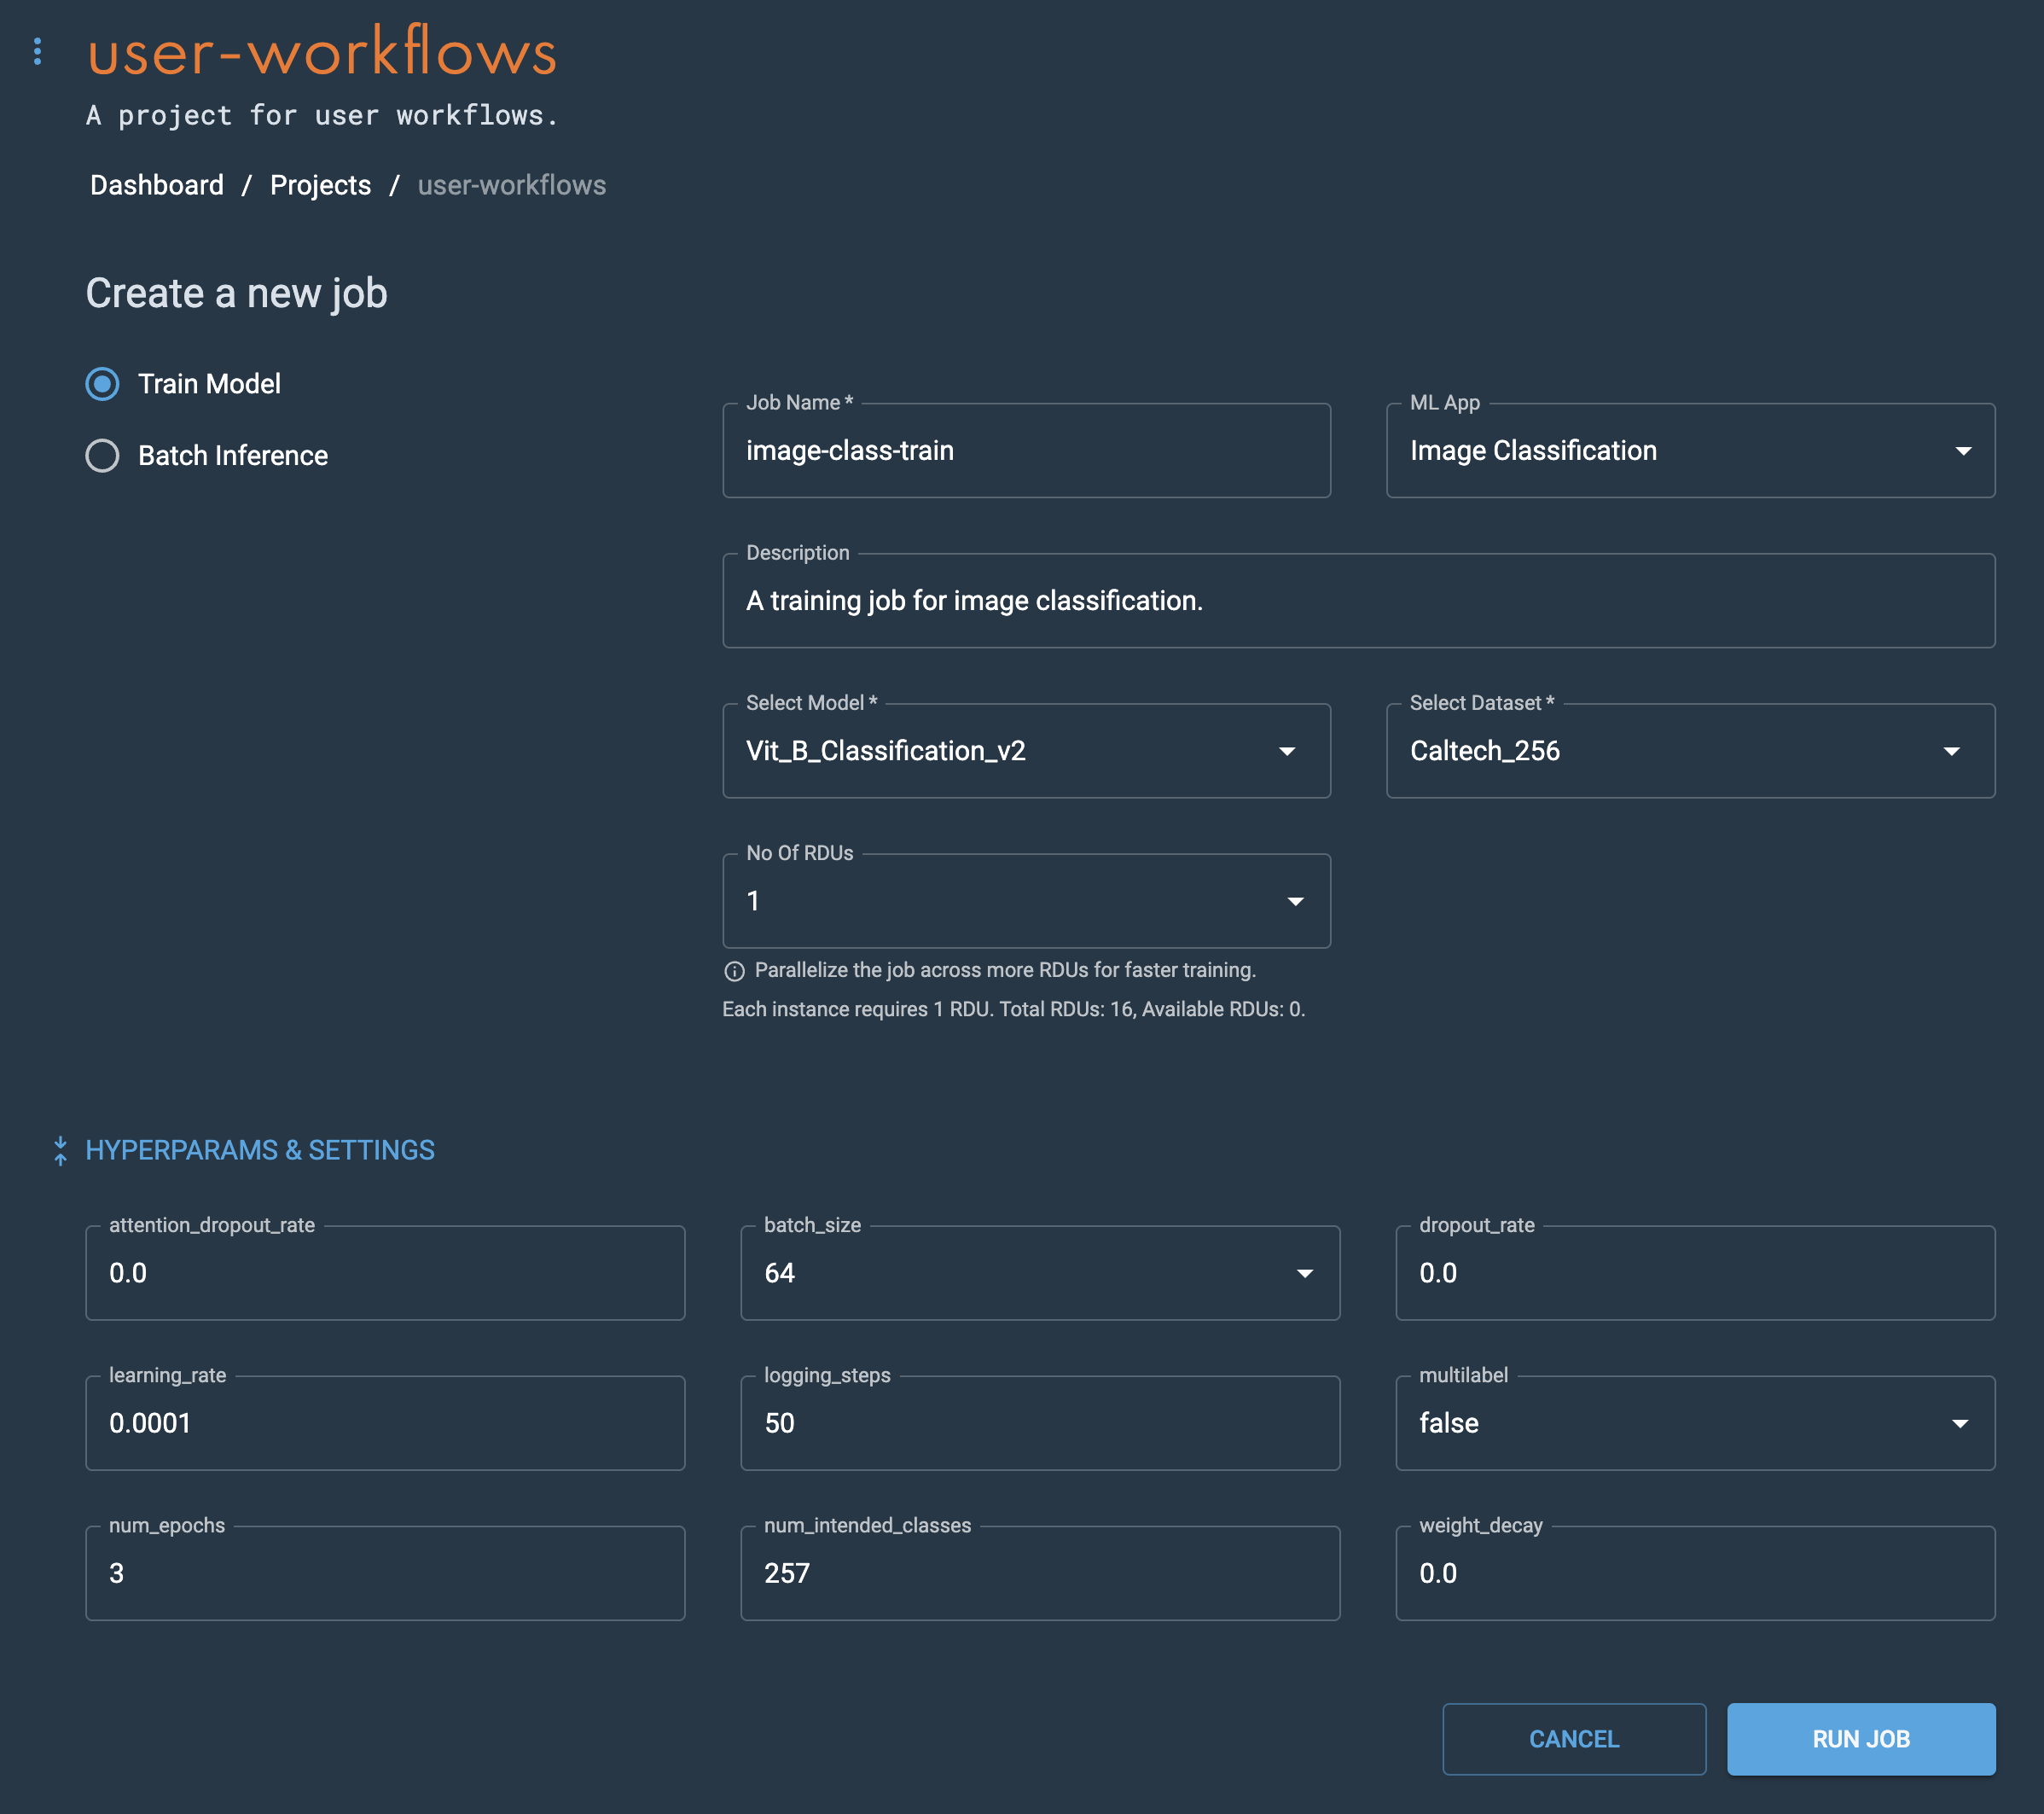 Figure 8. Hyperparameters & settings
Evaluate jobs
Evaluate your job by viewing detailed information about its performance using the GUI or CLI.
Evaluate the job using the GUI
Navigate to a training job’s detail page during the job run (or after its completion) to view job information, generated checkpoints, and metrics. You can evaluate a checkpoints' accuracy, loss, and other metrics to determine if the checkpoint is of sufficient quality to deploy.
View information and metrics using the GUI
You can view the following information and metrics about your training job.
- Model
-
Displays the model name and architecture used for training.
- Dataset
-
Displays the dataset used, including its size.
- Details & Hyperparameters
-
Displays a snapshot of the job settings. Click More to view a detailed list of the hyperparameters and settings used during training. Click Less to hide the detailed hyperparameters and settings list.
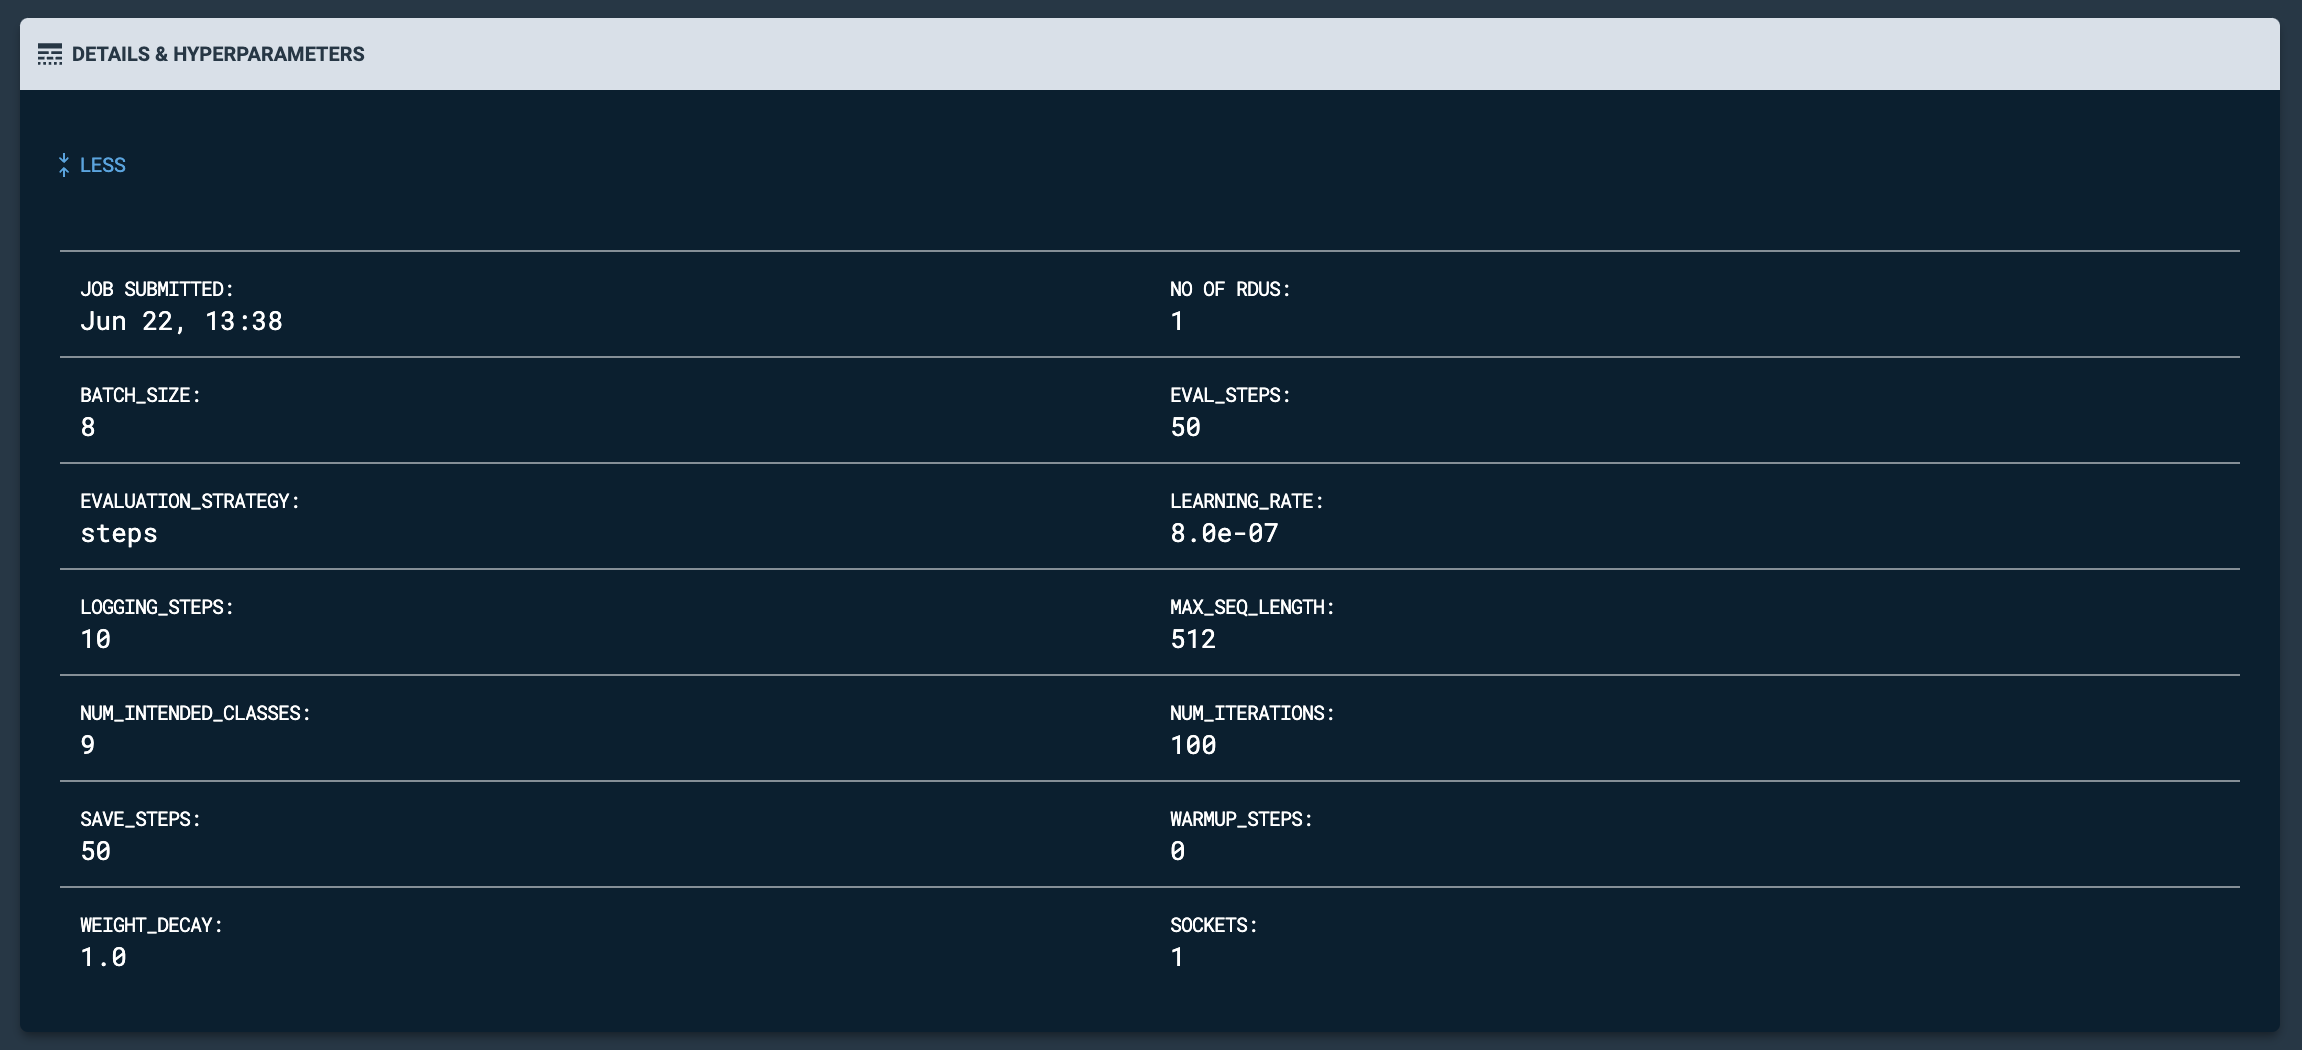 Figure 9. Expanded Details & Hyperparameters
 - Progress bar
-
The progress bar displays the state of the training job as well as the percentage completed of the training run.
- Metrics graph
-
Displays the various metrics generated during the training run.
-
Some models, such as GPT 13B, generate a Learning_rate graph. The learning rate graph depicts the learning rate hyperparameter during the training run, allowing you to monitor and optimize the balance between the quality of the final model with the required training time. The logging_steps parameter defines the number of plot points generated on the learning rate graph. For example, with logging steps set to 1, the learning rate graph will generate a point for each step. With logging steps set to 10, the learning rate graph will generate a point at every tenth step.
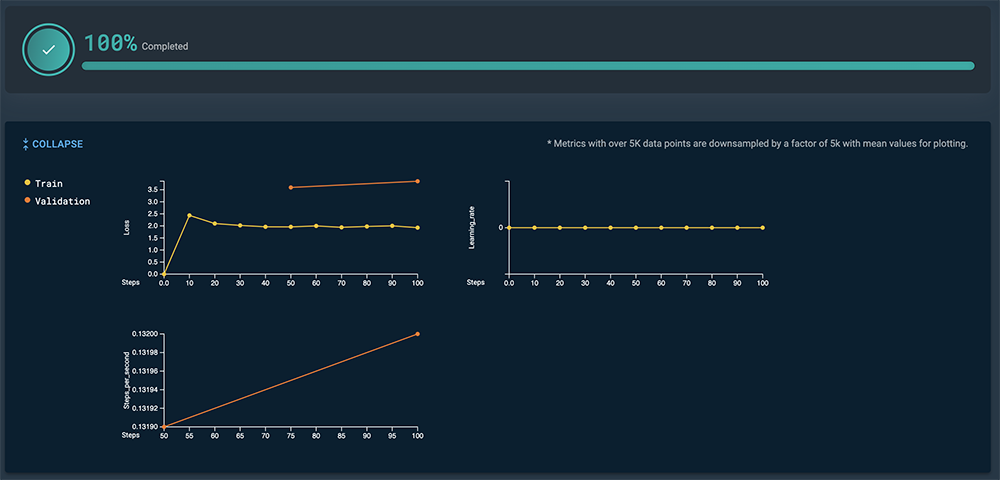 Figure 10. Example GPT 13B learning rate graph
 -
GPT 1.5B models, such as GPT_1.5B_NER_FINETUNED, generate additional metrics. Click Expand to view the additional metrics. Click Collapse to hide the additional metrics.
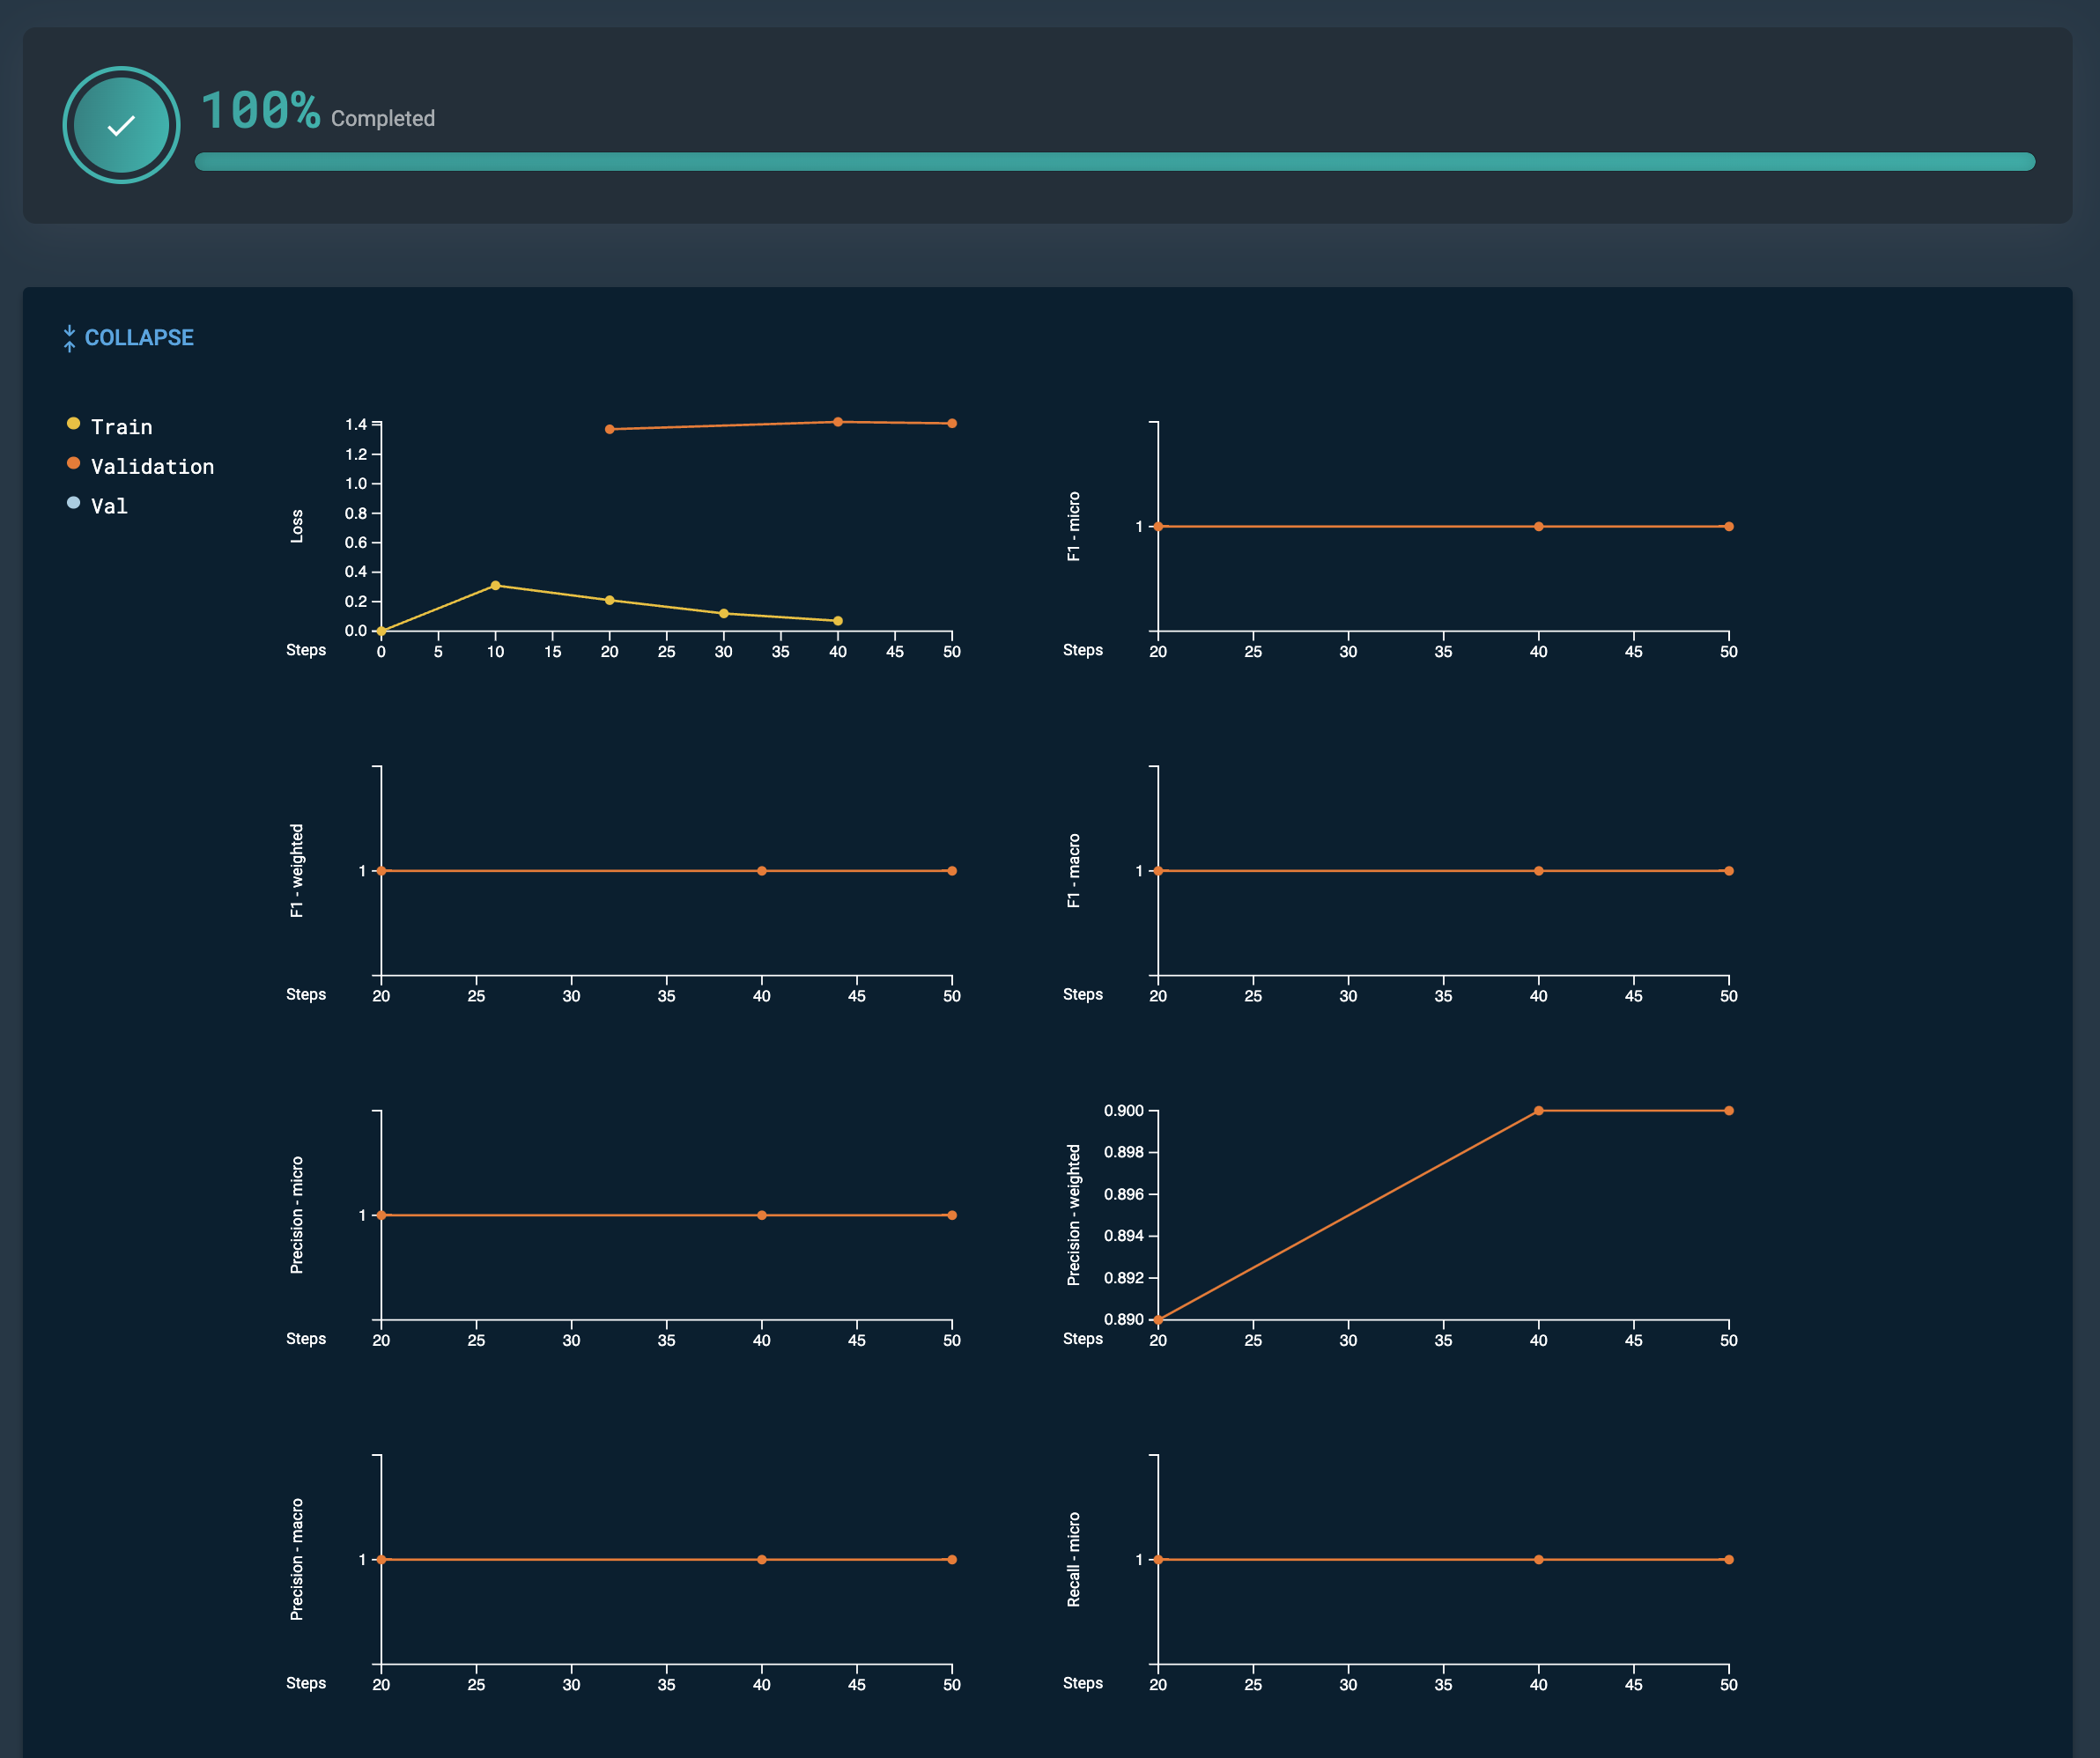 Figure 11. GPT 1.5 NER expanded additional metrics
-
- Checkpoints table
-
The Checkpoints table displays generated checkpoints of your training run along with the associated metrics of the chosen model.
-
You can customize your view of the Checkpoints table by enabling/disabling columns, from the Columns drop-down, to help you focus on comparing metrics that are relevant to you.
-
Download a CSV file of your checkpoints by clicking Export and selecting Download as CSV from the drop-down. The CSV file will be downloaded to the location configured by your browser.
-
From the Actions column drop-down, you can click Create new job, Save to Model Hub, or Delete for all checkpoints.
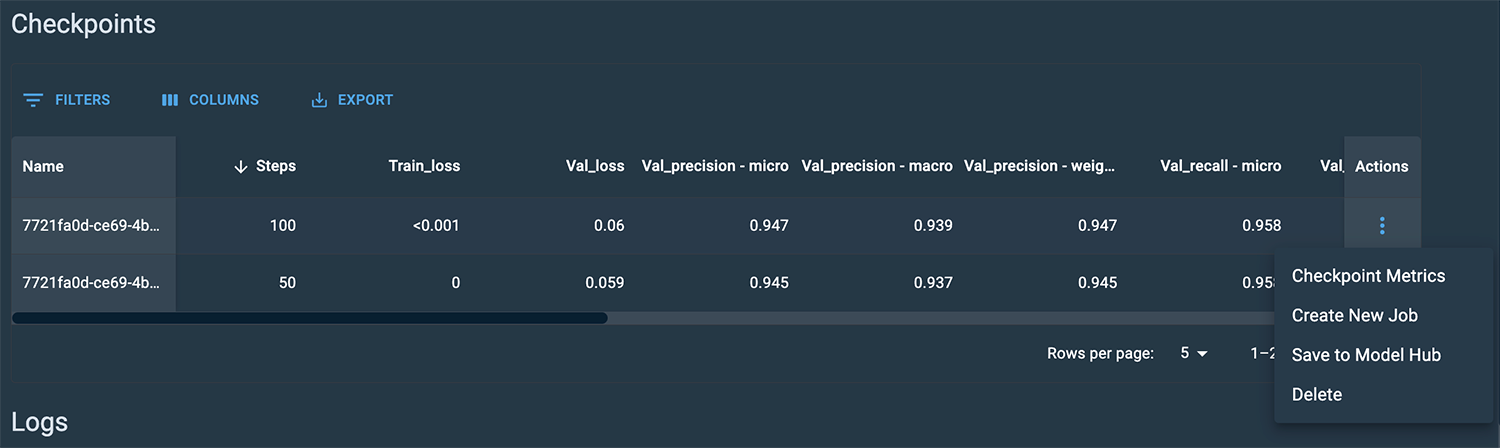 Figure 12. Checkpoints table
 -
For some GPT 1.5B model checkpoints, you can click Checkpoint metrics (Checkpoints table) to view the Confusion matrix (Confusion matrix), which can be used to further understand checkpoint performance.
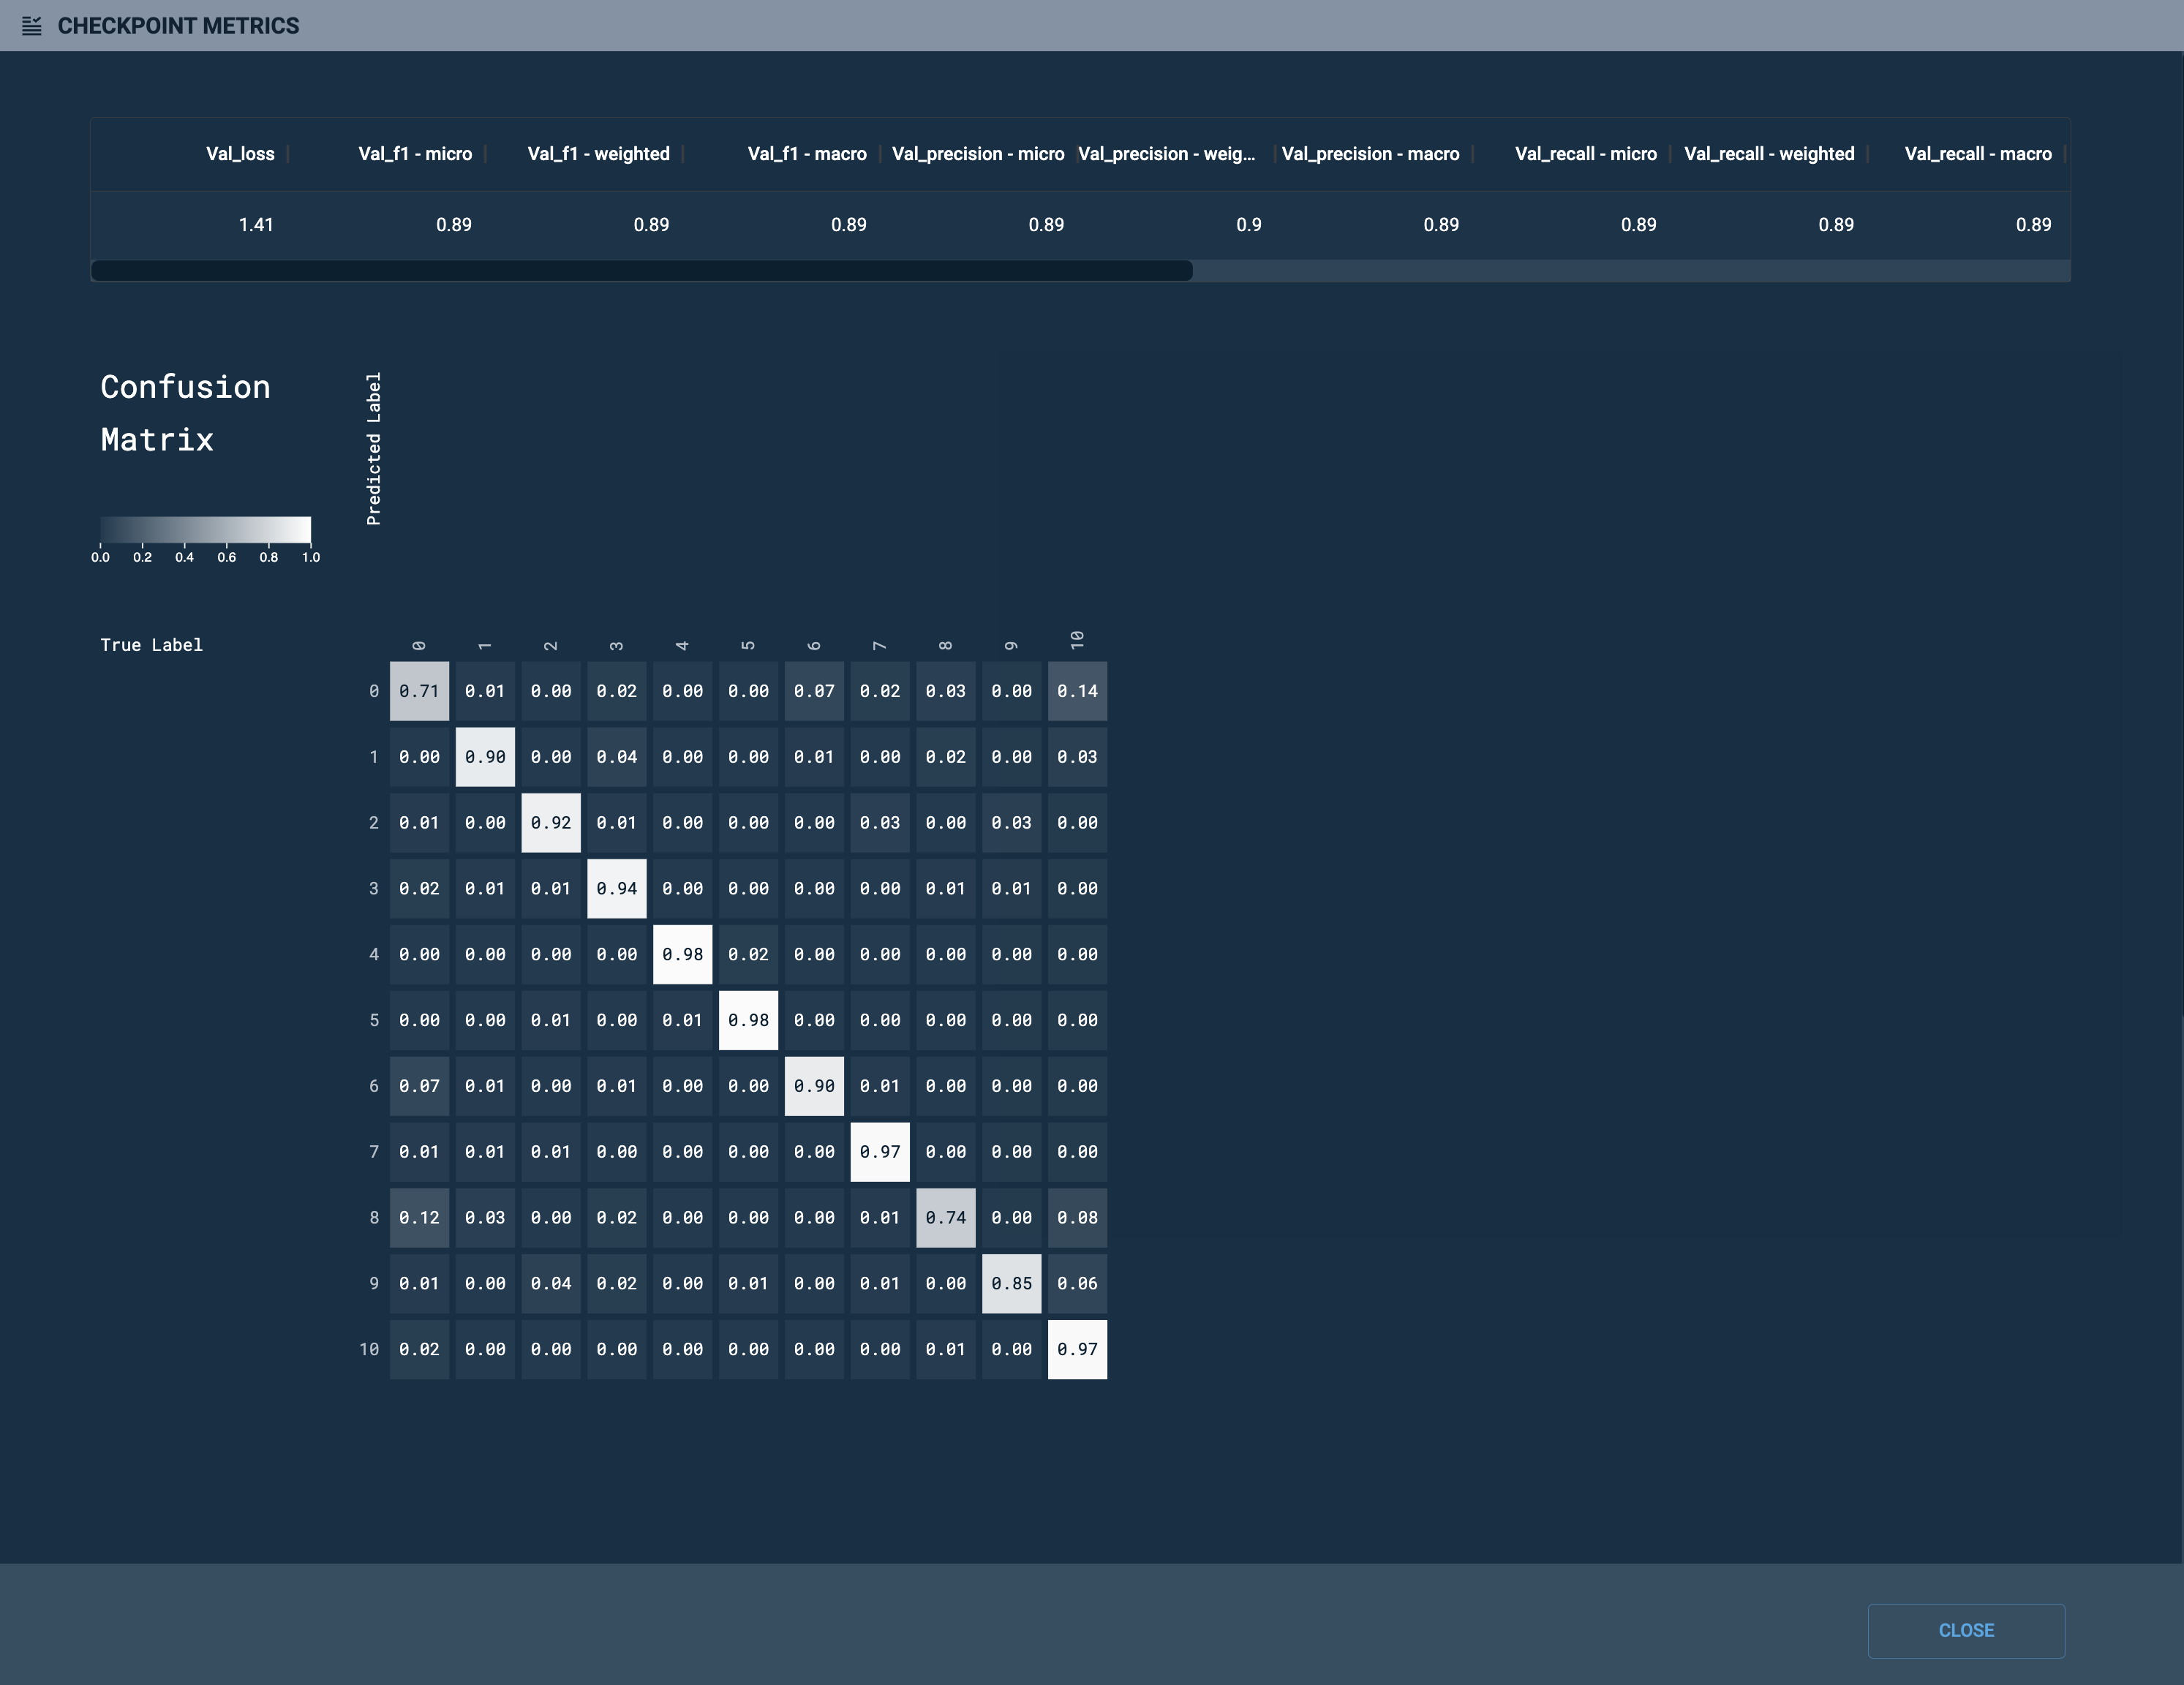 Figure 13. Confusion matrix
All labels listed in your labels file must be represented in the validation dataset. This ensures that the confusion matrix does not generate errors associated with missing labels or incorrectly attributed metrics.
-
Evaluate the job using the CLI
Similar to the GUI, the SambaNova API (snapi) provides feedback on job performance via the CLI.
View job information using the CLI
The example below demonstrates the snapi job info command used to provide information about your job, including:
-
Job ID provides the platform assigned ID.
-
RDU Arch provides the RDU generation version used.
-
Project ID provides the platform assigned ID.
-
Status displays the status of the job during its training run.
-
The training settings used for the job.
You will need to specify the following:
-
The project that contains, or is assigned to, the job you wish to view information.
-
The name of the job you wish to view information.
$ snapi job info \
   --project <project-name> \
   --job <job-name>

               Job Info
             ============
Name               : <job-name>
Job ID             : b661c723-4b90-477d-ac81-de6b4151f602
Type               : train
RDU Arch           : sn10
Project ID         : 87deae92-570e-443f-8ae8-4521fb43ad09
Status             : TRAINING
App                : Generative Tuning 1.5B
Dataset            : GPT_1.5B_Training_Dataset
Input path         : common/datasets/ggt_sentiment_analysis/hdf5_single_avoid_overflow/hdf5
Model Checkpoint   : GPT_1.5B_GT_Base_Model
Hyper Parameters   : [{'param_name': 'batch_size', 'value': '16', 'description': 'Number of samples in a batch'}, {'param_name': 'do_eval', 'value': 'true', 'description': 'whether or not to do final evaluation'}, {'param_name': 'eval_steps', 'value': '50', 'description': "Period of evaluating the model in number of training steps. This parameter is only effective when evaluation_strategy is set to 'steps'."}, {'param_name': 'evaluation_strategy', 'value': 'steps', 'description': 'Strategy to validate the model during training'}, {'param_name': 'learning_rate', 'value': '7.5e-06', 'description': 'learning rate to use in optimizer'}, {'param_name': 'logging_steps', 'value': '10', 'description': 'Period of logging training loss in number of training steps'}, {'param_name': 'lr_schedule', 'value': 'cosine_schedule_with_warmup', 'description': 'Type of learning rate scheduler to use'}, {'param_name': 'max_seq_length', 'value': '1024', 'description': 'Sequence length to pad or truncate the dataset'}, {'param_name': 'num_iterations', 'value': '100', 'description': 'number of iterations to run'}, {'param_name': 'precision', 'value': 'bf16_all', 'description': 'Controls which operators will use bf16 v.s. fp32 precision'}, {'param_name': 'prompt_loss_weight', 'value': '0.1', 'description': 'Loss scale for prompt tokens'}, {'param_name': 'save_optimizer_state', 'value': 'true', 'description': 'Whether to save the optimizer state when saving a checkpoint'}, {'param_name': 'save_steps', 'value': '50', 'description': 'Period of saving the model checkpoints in number of training steps'}, {'param_name': 'subsample_eval', 'value': '0.01', 'description': 'Subsample for the evaluation dataset'}, {'param_name': 'subsample_eval_seed', 'value': '123', 'description': 'Random seed to use for the subsample evaluation'}, {'param_name': 'use_token_type_ids', 'value': 'true', 'description': 'Whether to use token_type_ids to compute loss'}, {'param_name': 'warmup_steps', 'value': '0', 'description': 'warmup steps to use in learning rate scheduler in optimizer'}, {'param_name': 'weight_decay', 'value': '0.1', 'description': 'weight decay rate to use in optimizer'}, {'param_name': 'selected_rdus', 'value': '1', 'description': 'Number of RDUs each instance of the model uses'}]
RDUs Needed        : 11111111
Parallel Instances : 8
Created Time       : 2024-01-25T23:11:48.270543+00:00
Updated Time       : 2024-01-25T23:11:49.726331+00:00
Result Path : None|
Run snapi job info --help to display additional usage and options. |
View metrics using the CLI
The example below demonstrates the snapi job metrics command used to provide job performance metrics. You will need to specify the following:
-
The project that contains, or is assigned to, the job you wish to view metrics.
-
The name of the job you wish to view metrics.
|
$ snapi job metrics \
   --project <project-name> \
   --job <job-name>

TRAINING
INDEX        TRAIN_LEARNING_RATE        TRAIN_LOSS        TRAIN_STEPS
  0                  0.0                   0.0                0.0
  1                  0.0                  2.4356              10.0
  2                  0.0                  2.0979              20.0
  3                  0.0                  2.0202              30.0
  4                  0.0                  1.9618              40.0
  5                  0.0                  1.9598              50.0
  6                  0.0                  1.9981              60.0
  7                  0.0                  1.9393              70.0
  8                  0.0                  1.9757              80.0
  9                  0.0                  2.0027              90.0
  10                 0.0                  1.9259             100.0

VALIDATION
INDEX        VAL_STEPS        VAL_LOSS        VAL_STEPS_PER_SECOND
  0             0.0            3.5927                0.1319
  1             50.0           3.8509                0.1319
2 100.0 3.8509 0.132|
Run snapi job metrics --help to display additional usage and options. |
View the checkpoints using the CLI
The snapi checkpoint list command allows you to view the list of generated checkpoints from your job. Any job dependent on a checkpoint will be identified in the DEPENDENT JOBS column, allowing you to identify checkpoints used to create a new training job. You will need to specify the following:
-
The project that contains, or is assigned to, the job you wish to view its generated checkpoints.
-
The name of the job you wish to view its generated checkpoints.
$ snapi checkpoint list \
   --project <project-name> \
   --job <job-name>
CHECKPOINT NAME                                 STEPS        LABELS        VALIDATION LOSS        VALIDATION ACCURACY        CREATED TIME                            DEPENDENT JOBS
3cf2bab6-0343-41d5-9b95-26da07e6201c-50         50           None          3.5927                 None                       2024-01-25T17:03:12.905315+00:00
3cf2bab6-0343-41d5-9b95-26da07e6201c-100 100 None 3.8509 None 2024-01-25T17:35:50.332483+00:00 gpt-13b-from-checkpoint|
Run snapi checkpoint list --help to display additional usage and options. |
View detailed checkpoint information using the CLI
The example below demonstrates the snapi checkpoint info command used to provide detailed information about a checkpoint. You will need to specify the name of the checkpoint, which you can obtain by running the snapi checkpoint list command.
|
'USER_MODIFIABLE': True indicates that the parameter is adjustable. |
Click to view the example snapi checkpoint info command.
$ snapi checkpoint info \
   --checkpoint-name 3cf2bab6-0343-41d5-9b95-26da07e6201c-100

             Checkpoint Info
             ===============
Name                : 3cf2bab6-0343-41d5-9b95-26da07e6201c-100
Application Field   : None
Architecture        : None
Time Created        : 2024-01-25T17:35:50.332483+00:00
Validation Loss     : 3.8509
Validation Acc      : None
ML App              : Generative Tuning 13B
Labels              : None
Job ID              : 3cf2bab6-0343-41d5-9b95-26da07e6201c
Steps               : 100
Dependent Jobs      :
Hyperparameters     : [   {   'CONSTRAINTS': {'values': ['true', 'false']},
        'DATATYPE': 'bool',
        'DESCRIPTION': 'whether or not to do final evaluation',
        'FIELD_NAME': 'do_eval',
        'MESSAGE': 'Value must be one of (True, False)',
        'TASK_TYPE': ['train'],
        'TYPE_SPECIFIC_SETTINGS': {   'train': {   'DEFAULT': 'true',
                                                   'USER_MODIFIABLE': True}}},
    {   'CONSTRAINTS': {'ge': '1'},
        'DATATYPE': 'int',
        'DESCRIPTION': 'Period of evaluating the model in number of training '
                       'steps. This parameter is only effective when '
                       "evaluation_strategy is set to 'steps'.",
        'FIELD_NAME': 'eval_steps',
        'MESSAGE': 'Value must be greater than or equal to 1',
        'TASK_TYPE': ['train'],
        'TYPE_SPECIFIC_SETTINGS': {   'train': {   'DEFAULT': '50',
                                                   'USER_MODIFIABLE': True}}},
    {   'CONSTRAINTS': {'values': ['no', 'steps', 'epoch']},
        'DATATYPE': 'str',
        'DESCRIPTION': 'Strategy to validate the model during training',
        'FIELD_NAME': 'evaluation_strategy',
        'MESSAGE': 'Value must be one of (no, steps, epoch)',
        'TASK_TYPE': ['train'],
        'TYPE_SPECIFIC_SETTINGS': {   'train': {   'DEFAULT': 'steps',
                                                   'USER_MODIFIABLE': True}}},
    {   'CONSTRAINTS': {'ge': '0'},
        'DATATYPE': 'float',
        'DESCRIPTION': 'learning rate to use in optimizer',
        'FIELD_NAME': 'learning_rate',
        'MESSAGE': 'Value must be greater than or equal to 0.0',
        'TASK_TYPE': ['train'],
        'TYPE_SPECIFIC_SETTINGS': {   'train': {   'DEFAULT': '7.5e-06',
                                                   'USER_MODIFIABLE': True}}},
    {   'CONSTRAINTS': {'ge': '1'},
        'DATATYPE': 'int',
        'DESCRIPTION': 'Period of logging training loss in number of training '
                       'steps',
        'FIELD_NAME': 'logging_steps',
        'MESSAGE': 'Value must be greater than or equal to 1',
        'TASK_TYPE': ['train'],
        'TYPE_SPECIFIC_SETTINGS': {   'train': {   'DEFAULT': '10',
                                                   'USER_MODIFIABLE': True}}},
    {   'CONSTRAINTS': {   'values': [   'polynomial_decay_schedule_with_warmup',
                                         'cosine_schedule_with_warmup',
                                         'fixed_lr']},
        'DATATYPE': 'str',
        'DESCRIPTION': 'Type of learning rate scheduler to use',
        'FIELD_NAME': 'lr_schedule',
        'MESSAGE': 'Value must be one of '
                   '(polynomial_decay_schedule_with_warmup, '
                   'cosine_schedule_with_warmup, fixed_lr)',
        'TASK_TYPE': ['train'],
        'TYPE_SPECIFIC_SETTINGS': {   'train': {   'DEFAULT': 'cosine_schedule_with_warmup',
                                                   'USER_MODIFIABLE': True}}},
    {   'CONSTRAINTS': {'values': ['2048', '8192']},
        'DATATYPE': 'int',
        'DESCRIPTION': 'Sequence length to pad or truncate the dataset',
        'FIELD_NAME': 'max_seq_length',
        'MESSAGE': 'Value must be one of (2048, 8192)',
        'TASK_TYPE': ['compile', 'infer', 'serve', 'train'],
        'TYPE_SPECIFIC_SETTINGS': {   'train': {   'DEFAULT': '2048',
                                                   'USER_MODIFIABLE': False}}},
    {   'CONSTRAINTS': {'ge': '1'},
        'DATATYPE': 'int',
        'DESCRIPTION': 'number of iterations to run',
        'FIELD_NAME': 'num_iterations',
        'MESSAGE': 'Value must be greater than or equal to 1',
        'TASK_TYPE': ['train'],
        'TYPE_SPECIFIC_SETTINGS': {   'train': {   'DEFAULT': '100',
                                                   'USER_MODIFIABLE': True}}},
    {   'CONSTRAINTS': {'ge': '0'},
        'DATATYPE': 'float',
        'DESCRIPTION': 'Loss scale for prompt tokens',
        'FIELD_NAME': 'prompt_loss_weight',
        'MESSAGE': 'Value must be greater than or equal to 0.0',
        'TASK_TYPE': ['train'],
        'TYPE_SPECIFIC_SETTINGS': {   'train': {   'DEFAULT': '0.1',
                                                   'USER_MODIFIABLE': True}}},
    {   'CONSTRAINTS': {'values': ['true', 'false']},
        'DATATYPE': 'bool',
        'DESCRIPTION': 'Whether to save the optimizer state when saving a '
                       'checkpoint',
        'FIELD_NAME': 'save_optimizer_state',
        'MESSAGE': 'Value must be one of (True, False)',
        'TASK_TYPE': ['train'],
        'TYPE_SPECIFIC_SETTINGS': {   'train': {   'DEFAULT': 'true',
                                                   'USER_MODIFIABLE': True}}},
    {   'CONSTRAINTS': {'ge': '1'},
        'DATATYPE': 'int',
        'DESCRIPTION': 'Period of saving the model checkpoints in number of '
                       'training steps',
        'FIELD_NAME': 'save_steps',
        'MESSAGE': 'Value must be greater than or equal to 1',
        'TASK_TYPE': ['train'],
        'TYPE_SPECIFIC_SETTINGS': {   'train': {   'DEFAULT': '50',
                                                   'USER_MODIFIABLE': True}}},
    {   'CONSTRAINTS': {'values': ['true', 'false']},
        'DATATYPE': 'bool',
        'DESCRIPTION': 'whether or not to skip the checkpoint',
        'FIELD_NAME': 'skip_checkpoint',
        'MESSAGE': 'Value must be one of (True, False)',
        'TASK_TYPE': ['train'],
        'TYPE_SPECIFIC_SETTINGS': {   'train': {   'DEFAULT': 'false',
                                                   'USER_MODIFIABLE': True}}},
    {   'CONSTRAINTS': {'ge': '0'},
        'DATATYPE': 'float',
        'DESCRIPTION': 'Subsample for the evaluation dataset',
        'FIELD_NAME': 'subsample_eval',
        'MESSAGE': 'Value must be greater than or equal to 0.0',
        'TASK_TYPE': ['train'],
        'TYPE_SPECIFIC_SETTINGS': {   'train': {   'DEFAULT': '0.01',
                                                   'USER_MODIFIABLE': True}}},
    {   'CONSTRAINTS': {'ge': '1'},
        'DATATYPE': 'int',
        'DESCRIPTION': 'Random seed to use for the subsample evaluation',
        'FIELD_NAME': 'subsample_eval_seed',
        'MESSAGE': 'Value must be greater than or equal to 1',
        'TASK_TYPE': ['train'],
        'TYPE_SPECIFIC_SETTINGS': {   'train': {   'DEFAULT': '123',
                                                   'USER_MODIFIABLE': True}}},
    {   'CONSTRAINTS': {'values': ['true', 'false']},
        'DATATYPE': 'bool',
        'DESCRIPTION': 'Whether to use token_type_ids to compute loss',
        'FIELD_NAME': 'use_token_type_ids',
        'MESSAGE': 'Value must be one of (True, False)',
        'TASK_TYPE': ['train'],
        'TYPE_SPECIFIC_SETTINGS': {   'train': {   'DEFAULT': 'true',
                                                   'USER_MODIFIABLE': True}}},
    {   'CONSTRAINTS': {'values': ['50260', '307200']},
        'DATATYPE': 'int',
        'DESCRIPTION': 'Maximum size of vocabulary',
        'FIELD_NAME': 'vocab_size',
        'MESSAGE': 'Value must be one of (50260, 307200)',
        'TASK_TYPE': ['compile', 'infer', 'serve', 'train'],
        'TYPE_SPECIFIC_SETTINGS': {   'train': {   'DEFAULT': '50260',
                                                   'USER_MODIFIABLE': False}}},
    {   'CONSTRAINTS': {'ge': '0'},
        'DATATYPE': 'int',
        'DESCRIPTION': 'warmup steps to use in learning rate scheduler in '
                       'optimizer',
        'FIELD_NAME': 'warmup_steps',
        'MESSAGE': 'Value must be greater than or equal to 0',
        'TASK_TYPE': ['train'],
        'TYPE_SPECIFIC_SETTINGS': {   'train': {   'DEFAULT': '0',
                                                   'USER_MODIFIABLE': True}}},
    {   'CONSTRAINTS': {'ge': '0'},
        'DATATYPE': 'float',
        'DESCRIPTION': 'weight decay rate to use in optimizer',
        'FIELD_NAME': 'weight_decay',
        'MESSAGE': 'Value must be greater than or equal to 0.0',
        'TASK_TYPE': ['infer', 'serve', 'train'],
        'TYPE_SPECIFIC_SETTINGS': {   'train': {   'DEFAULT': '0.1',
                                                   'USER_MODIFIABLE': True}}}]
Params              : {'invalidates_checkpoint': {'max_seq_length': 2048, 'vocab_size': 50260}}
Reviewing metrics
Navigate to a Training job’s detail page from the Dashboard or from its associated Project page to review its metrics.
-
The details page provides information about your training job including its completion status. Click Expand to view additional information.
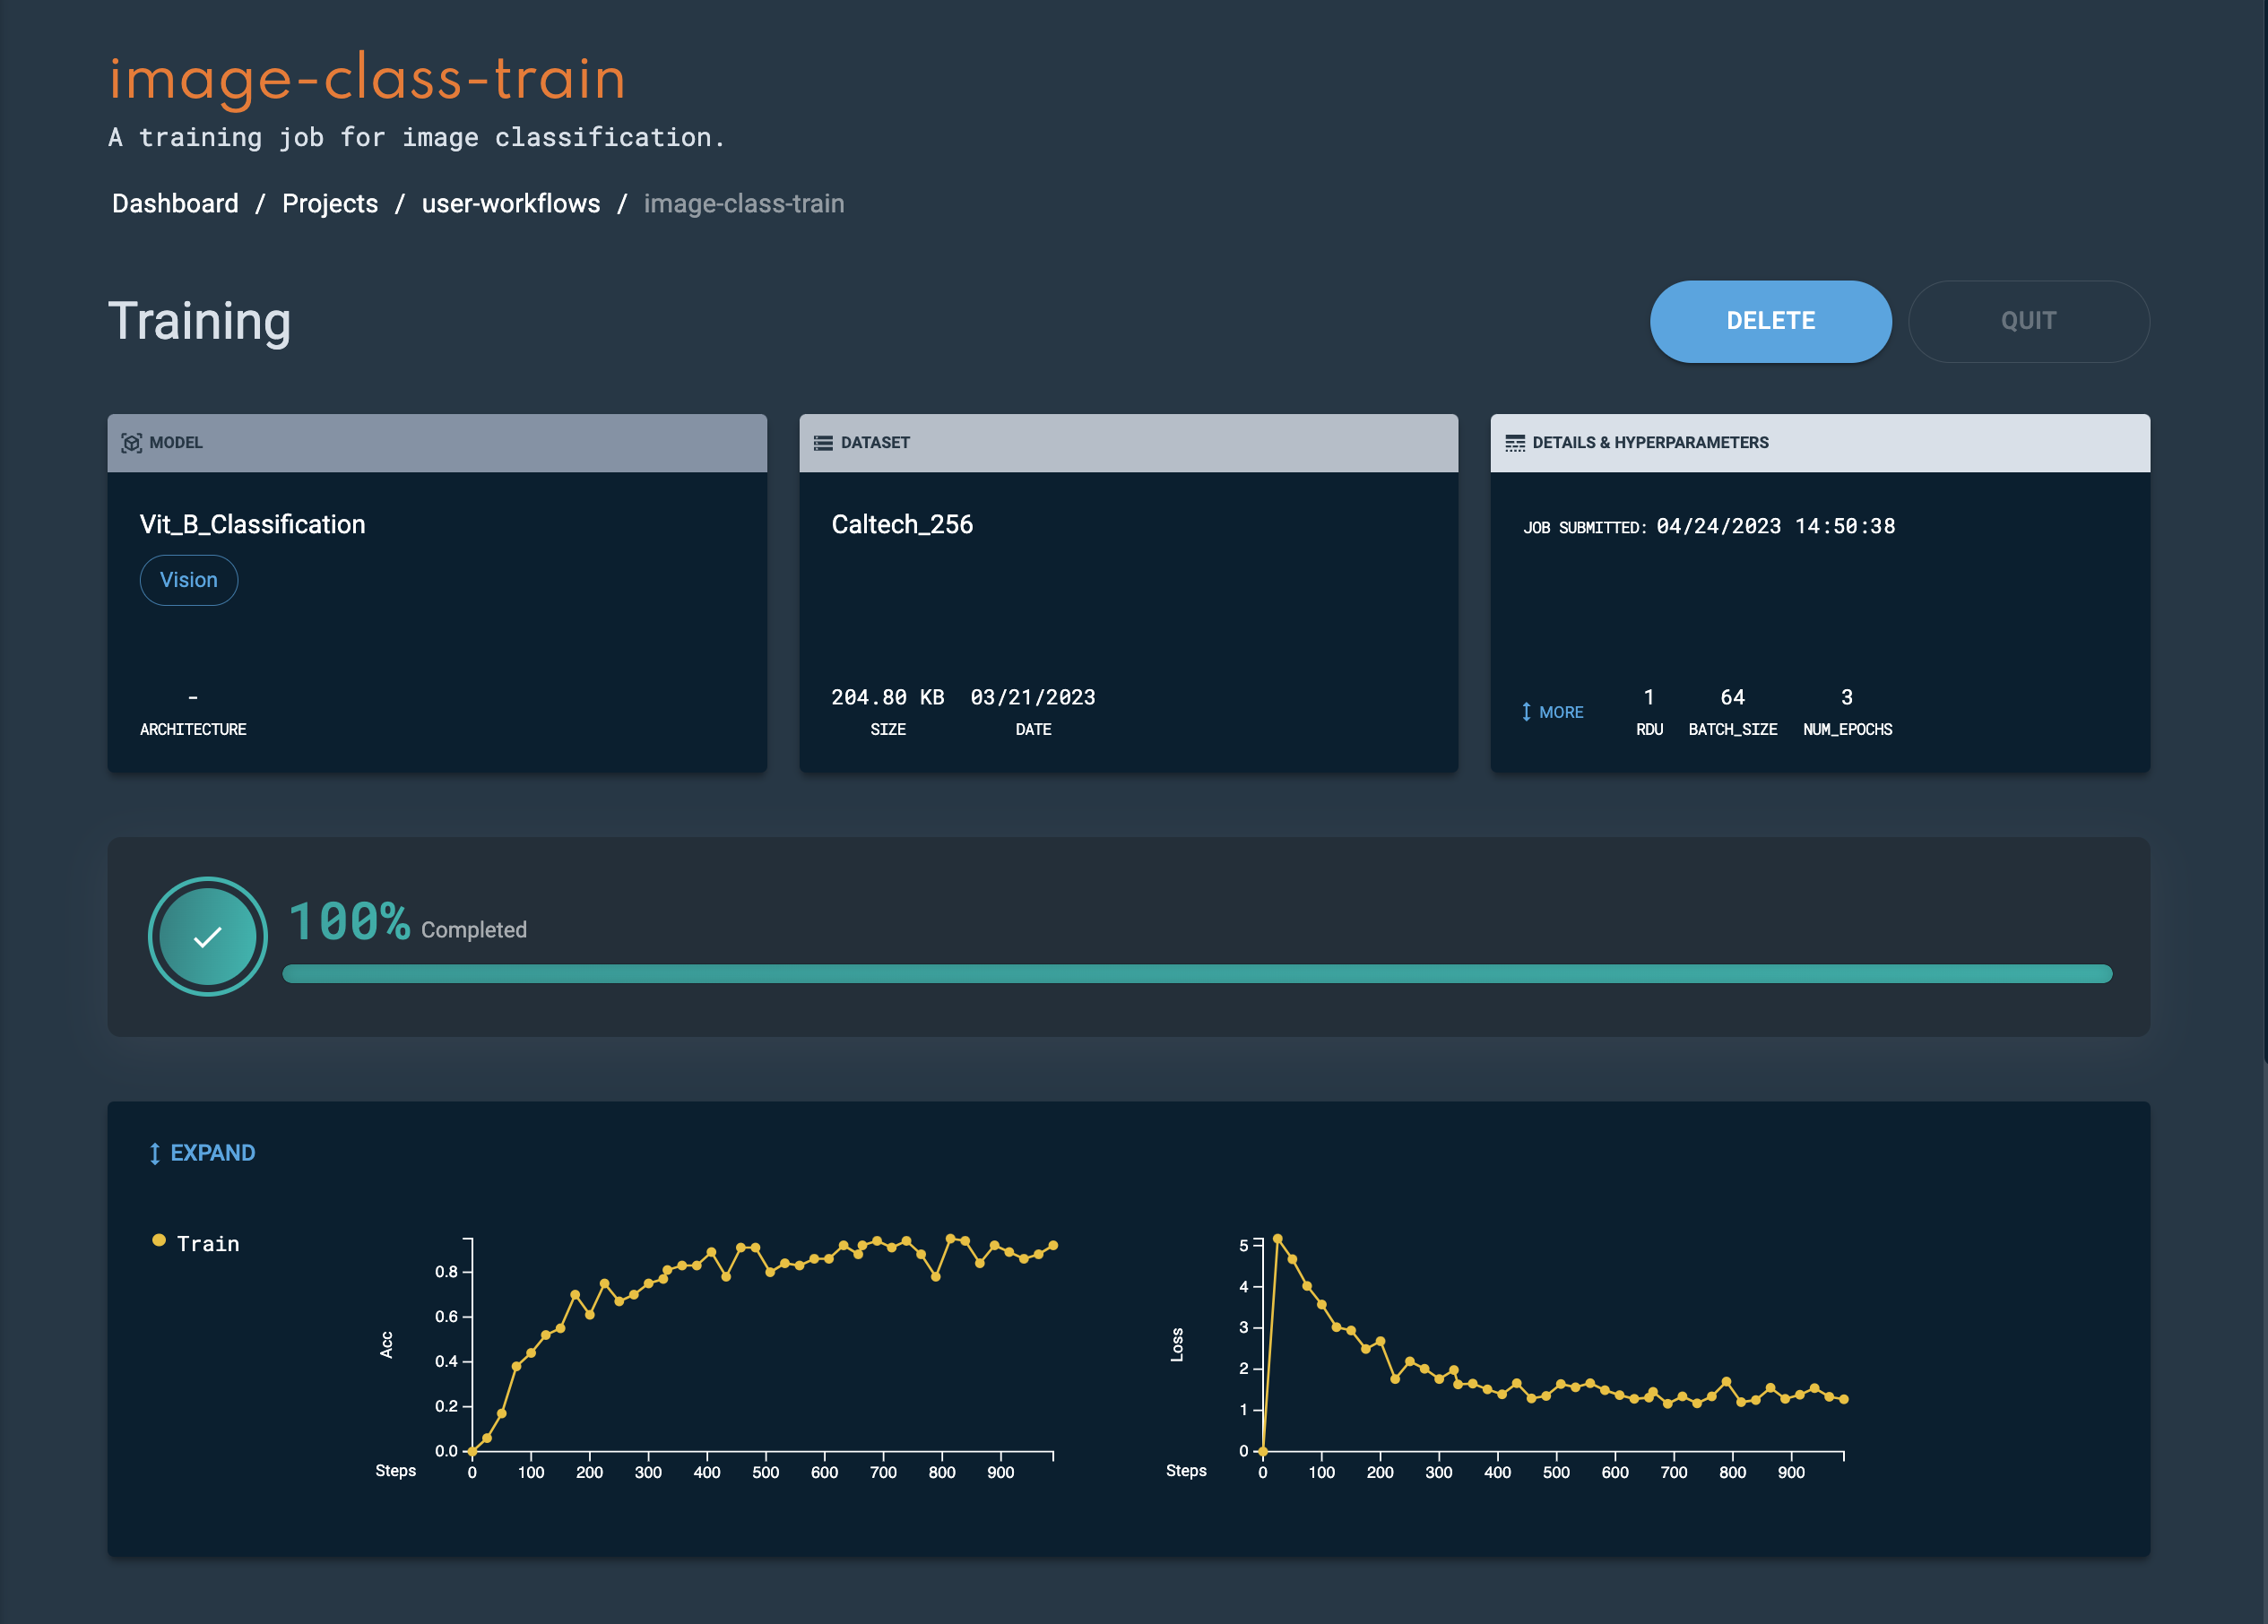 Figure 14. Training details
 -
Click Collapse to hide additional information.
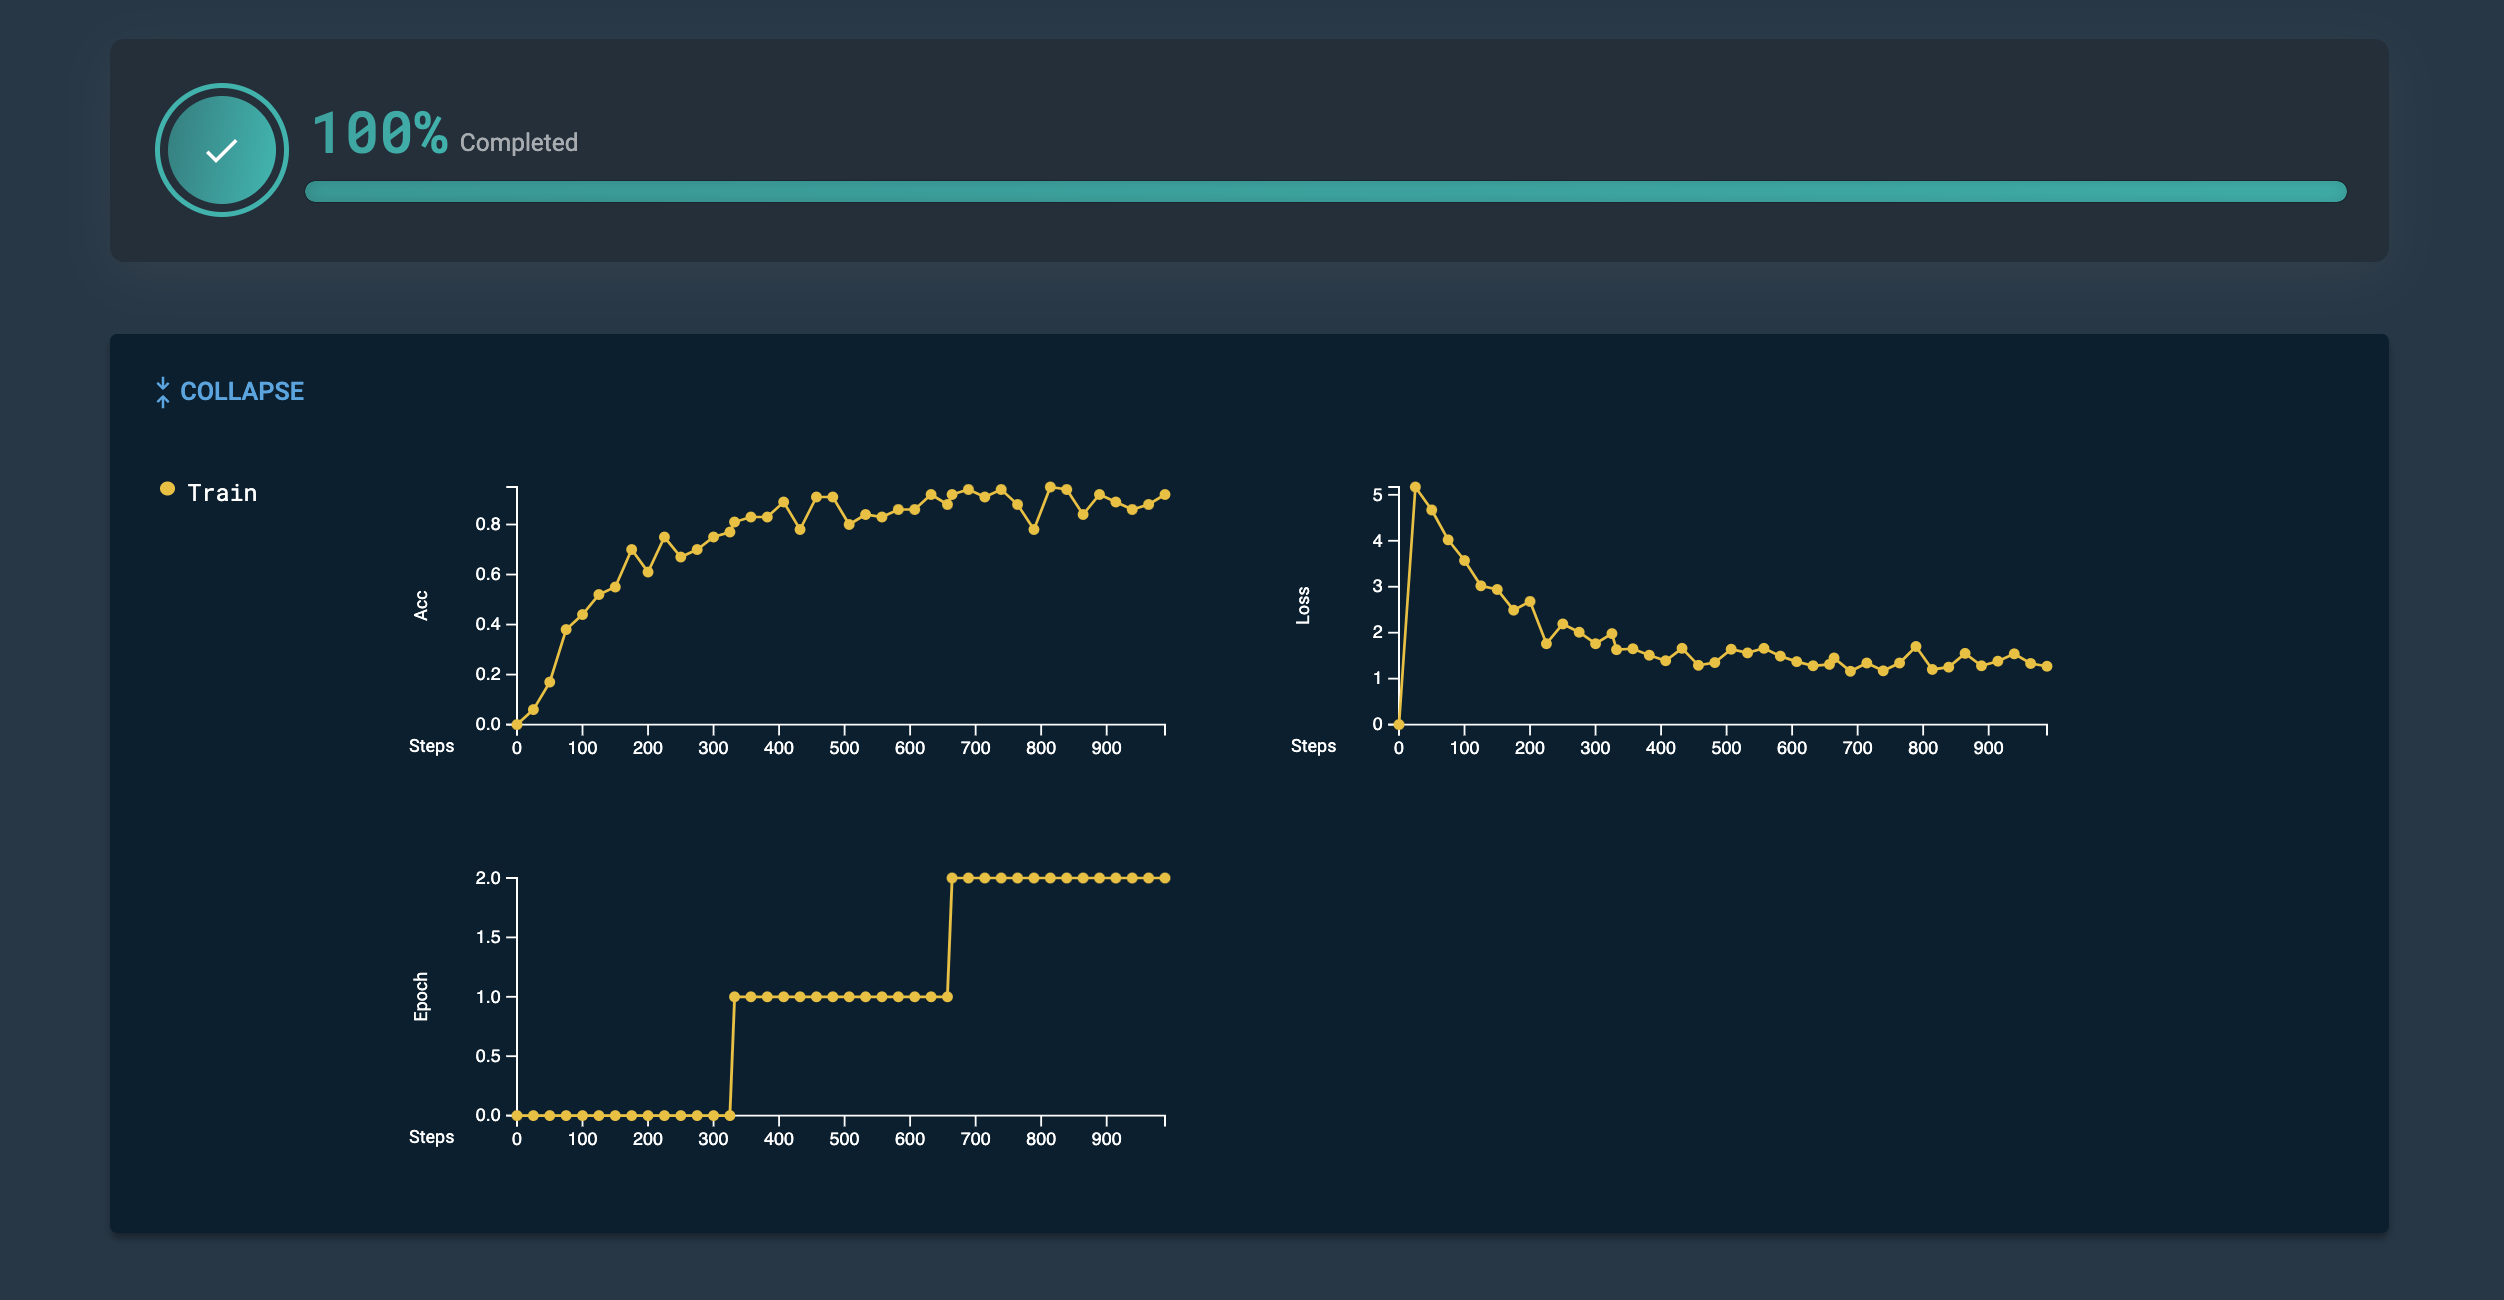 Figure 15. Expanded additional information
 -
Customize your view of the Checkpoints table by enabling/disabling columns to help you focus on comparing information that is relevant to you.
-
Download a CSV file of your checkpoints by clicking Export and selecting Download as CSV from the drop-down.
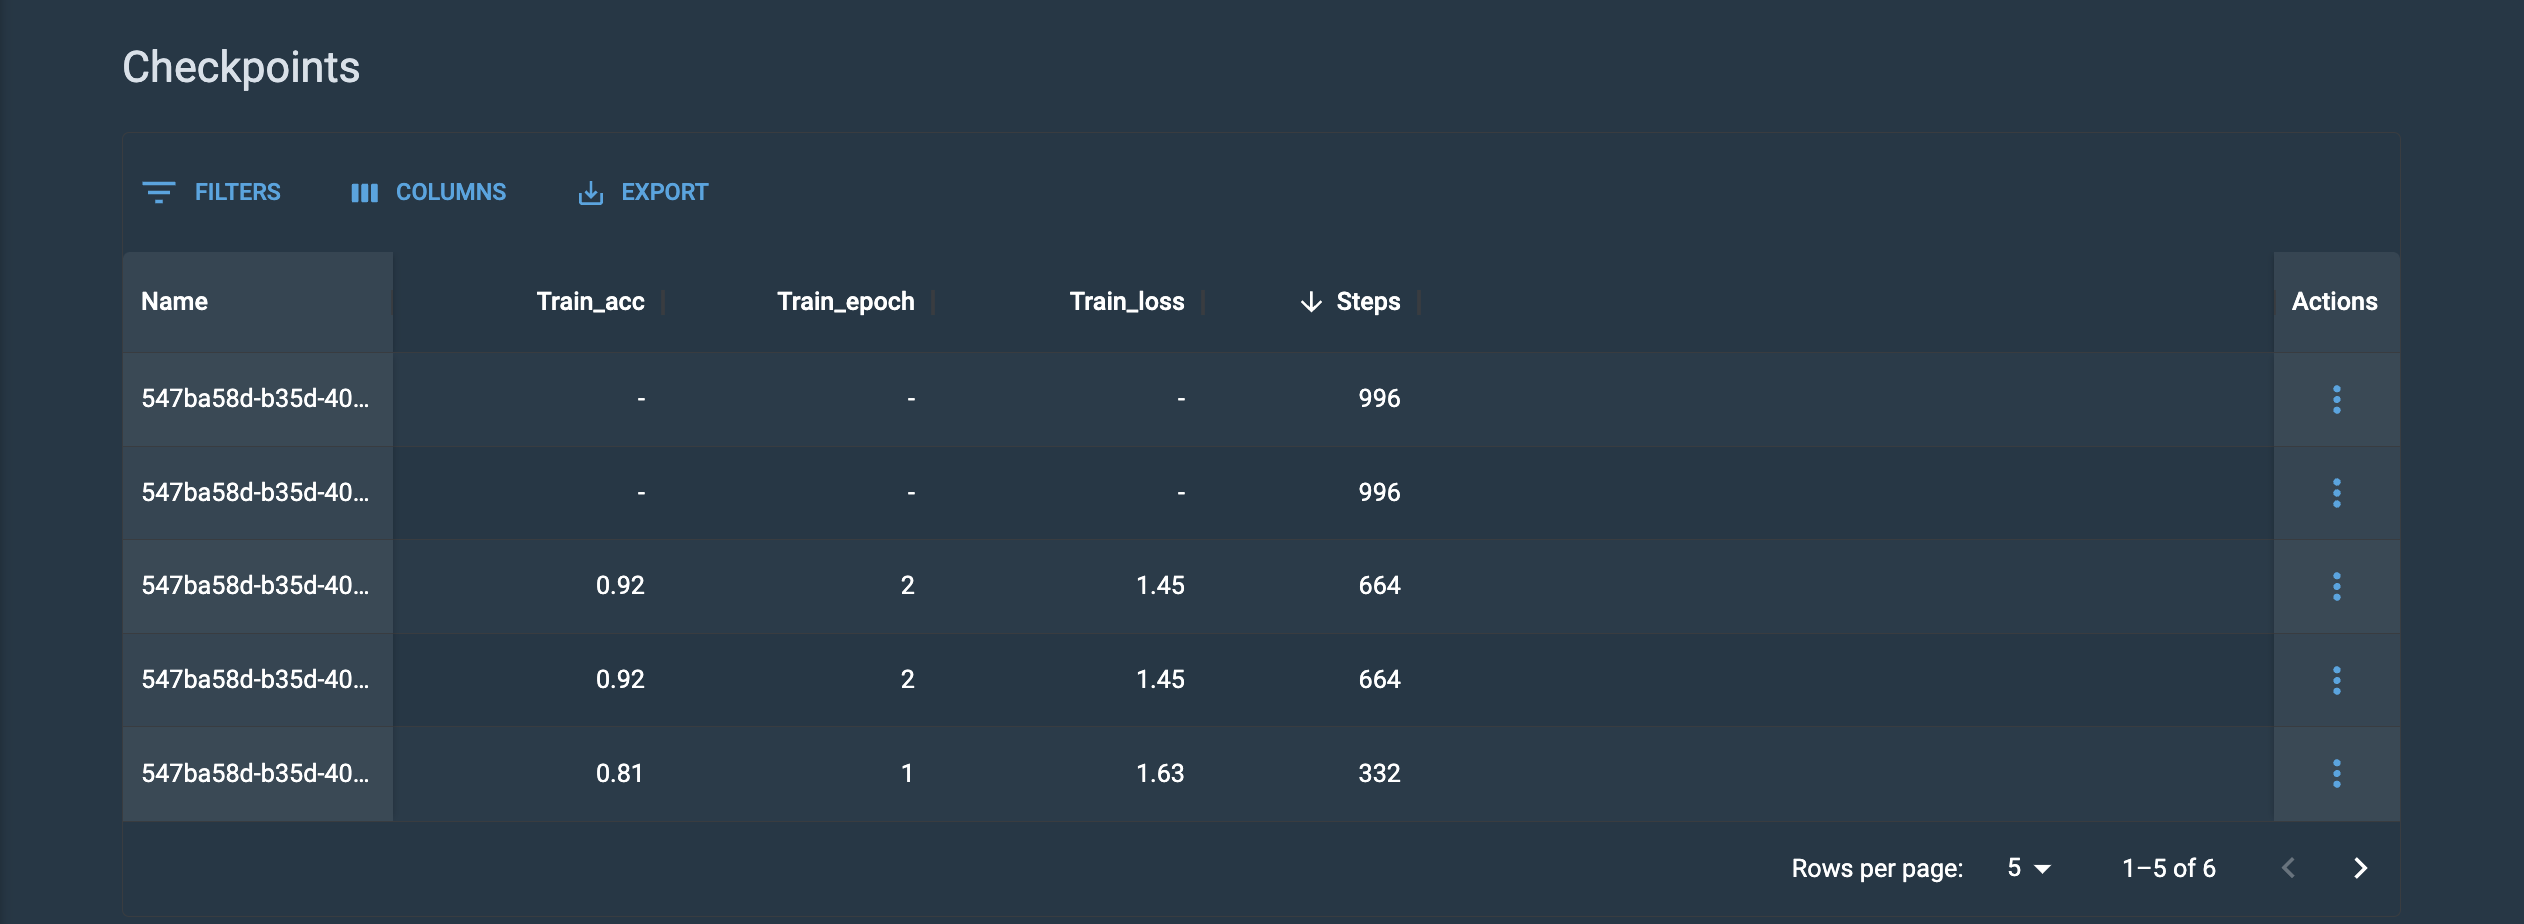 Figure 16. Checkpoints table
-
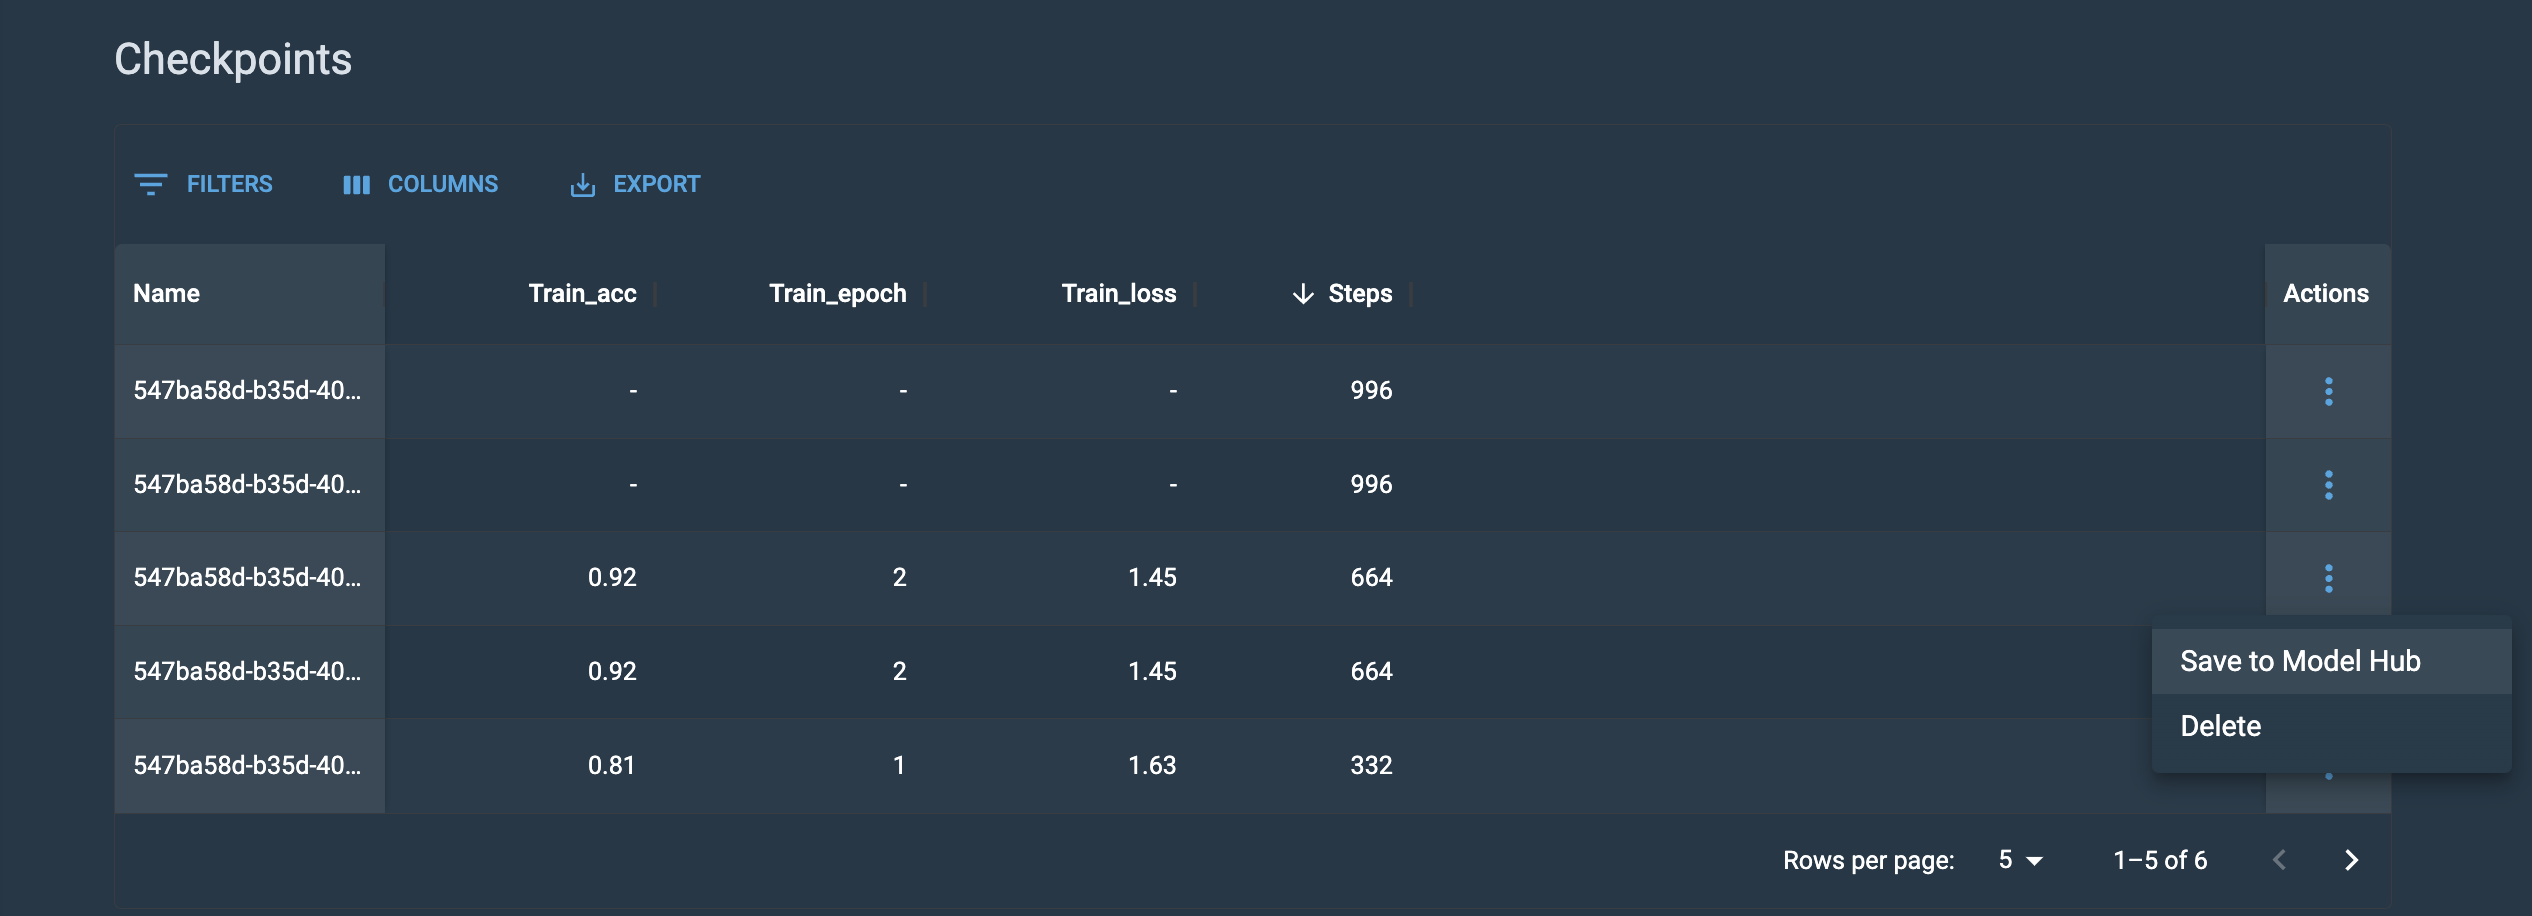
Save a checkpoint to the model hub
Once you’ve identified a checkpoint to use for inference or further fine-tuning, save it to the Model Hub. Do this by clicking on the 3-dot menu associated with that checkpoint, select Save to Model Hub and provide a Name and Description to help you identify the checkpoint.
View and download logs
Job logs can help you track progress, identify errors, and determine the cause of potential errors. You can view and download logs by using the GUI or CLI.
View and download logs using the GUI
The Logs section of the GUI allows you to preview and download logs of your training session.
|
Logs can be visible in the platform earlier than other data, such as metrics, checkpoints, and job progress. |
-
From the Preview drop-down, select the log file you wish to preview.
-
The Preview window displays the latest 50 lines of the log.
-
To view more than 50 lines of the log, use the Download all feature to download the log file.
-
-
Click Download all to download a compressed file of your logs. The file will be downloaded to the location configured by your browser.

View and download logs using the CLI
Similar to viewing logs using the GUI, you can use the SambaNova API (snapi) to preview and download logs of your training session.
View the job log file names
The example below demonstrates the snapi job list-logs command. Use this command to view the job log file names of your training job. This is similar to using the Preview drop-down menu in the GUI to view and select your job log file names. You will need to specify the following:
-
The project that contains, or is assigned to, the job you wish to view the job log file names.
-
The name of the job you wish to view the job log file names.
$ snapi job list-logs \
   --project <project-name> \
   --job <job-name>
train-0fb0568c-ca8e-4771-b7cf-e6ef156d1347-1-ncc9n-runner.log
train-0fb0568c-ca8e-4771-b7cf-e6ef156d1347-1-ncc9n-model.log|
Run snapi job list-logs --help to display additional usage and options. |
Preview a log file
After you have viewed the log file names for your training job, you can use the snapi job preview-log command to preview the logs corresponding to a selected log file. The example below demonstrates the command. You will need to specify the following:
-
The project that contains, or is assigned to, the job you wish to preview the job log file.
-
The name of the job you wish to preview the job log file.
-
The job log file name you wish to preview its logs. This file name is returned by running the snapi job list-logs command, which is described above.
$ snapi job preview-log \
   --project <project-name> \
   --job <job-name> \
   --file train-0fb0568c-ca8e-4771-b7cf-e6ef156d1347-1-ncc9n-runner.log
2023-08-10 20:28:46  -  INFO  -  20be599f-9ea7-44ea-9dc5-b97294d97529  -  Runner starting...

2023-08-10 20:28:46  -  INFO  -  20be599f-9ea7-44ea-9dc5-b97294d97529  -  Runner successfully started

2023-08-10 20:28:46  -  INFO  -  20be599f-9ea7-44ea-9dc5-b97294d97529  -  Received new train request

2023-08-10 20:28:46  -  INFO  -  20be599f-9ea7-44ea-9dc5-b97294d97529  -  Connecting to modelbox at localhost:50061

2023-08-10 20:28:54  -  INFO  -  20be599f-9ea7-44ea-9dc5-b97294d97529  -  Running training

2023-08-10 20:28:54  -  INFO  -  20be599f-9ea7-44ea-9dc5-b97294d97529  -  Staging dataset

2023-08-10 20:28:54  -  INFO  -  20be599f-9ea7-44ea-9dc5-b97294d97529  -  initializing metrics for modelbox:0

2023-08-10 20:28:54  -  INFO  -  20be599f-9ea7-44ea-9dc5-b97294d97529  -  initializing checkpoint path for modelbox:0

2023-08-10 20:31:35  -  INFO  -  20be599f-9ea7-44ea-9dc5-b97294d97529  -  Preparing training for modelbox:0

2023-08-10 20:31:35 - INFO - 20be599f-9ea7-44ea-9dc5-b97294d97529 - Running training for modelbox|
Run snapi job preview-log --help to display additional usage and options. |
Download the logs
Use the snapi download-logs command to download a compressed file of your training job’s logs. The example below demonstrates the command. You will need to provide the following:
-
The project that contains, or is assigned to, the job you wish to download the compressed log file.
-
The name of the job you wish to download the compressed log file.
$ snapi job download-logs \
   --project <project-name>> \
   --job <job-name>
Successfully Downloaded: <job-name> logs|
The default destination for the compressed file download is the current directory. To specify a destination directory, use the --dest option. Run snapi job download-logs --help for more information and to display additional usage and options. |