DataScale SN30 Rack System Administration
Copyright © 2020-2023 by SambaNova Systems, Inc. All contents are subject to a licensing agreement with SambaNova Systems, Inc. Any disclosure, reproduction, distribution, reverse engineering, or any other use made without the advance written permission of SambaNova Systems, Inc. is unauthorized and strictly prohibited. All rights of ownership and enforcement are reserved.
- 1. Get started with DataScale SN30 rack administration
- 2. Network administration
- 3. DataScale SN30 power management
- 4. Host module OS administration
- 5. BMC administration
- 6. DataScale SN30 RDU module administration
- 7. Monitor and debug the DataScale SN30 rack
- 7.1. Overview of tools and logs
- 7.2. View xrdutool diagnostics and logs
- 7.3. Set up SNMP alerts
- 7.4. Viewing system logs
- 7.5. SambaNova daemon (SND) diagnostics
- 7.6. Debugging DataScale SN30 issues
- 7.7. Debug model compilation
- 7.8. Collect diagnostic materials for SambaNova Support
- 7.9. View SN30-H BMC diagnostic information and logs
- 8. Back up and restore components
1. Get started with DataScale SN30 rack administration
This SambaNova DataScale® hardware administration document targets the SN30 version of the SambaNova DataScale rack.
This page gets you started:
-
Learn about SambaNova support, SambaNova documentation, and other resources.
-
Get an overview of the DataScale hardware and software stacks.
| See the DataScale hardware installation documentation for details on hardware installation requirements and tasks. |
1.1. SambaNova support
SambaNova customers that have valid support contracts can contact support and obtain product support documentation through the SambaNova support portal at https://support.sambanova.ai.
1.2. SambaNova documentation
As part of hardware installation, you might need SambaNova documentation, SambaNova KBs, and third-party documentation.
-
SambaNova product documentation: https://support.sambanova.ai.
-
SambaNova knowledge base (KB) articles: https://support.sambanova.ai.
1.3. Third-party documentation
For operational issues with the third-party components in the DataScale SN30 rack, see the following vendor-specific product documentation. If you need additional support or have troubleshooting questions related to troubleshooting, open a support case through SambaNova Support. See KB article #1017, "SambaNova Systems Support Best Practices," at https://support.sambanova.ai.
| Do not open a support case with the product vendor. |
-
Lantronix SLC8000 serial console server:
https://cdn.lantronix.com/wp-content/uploads/pdf/900-704-RZ-SLC-UG-release.pdf -
Juniper EX series access switch:
https://www.juniper.net/documentation/product/en_US/ex4300 (EX 4300)
https://www.juniper.net/documentation/product/us/en/ex4400/ (EX 4400) -
Juniper QFX5130 Ethernet high-bandwidth data switch (for the data network):
https://www.juniper.net/documentation/product/us/en/qfx5130/ -
Vertiv UU30010L (switched PDU):
https://www.vertiv.com/globalassets/products/critical-power/power-distribution/vertiv-geist-power-distribution-upgradeable-installeruser-guide.pdf -
GIGABYTE® R282-Z93 (DataScale SN30-H BMC):
https://download.gigabyte.com/FileList/Manual/server_manual_mgt_console_user_guide_ami_v1.x.pdf -
Red Hat Enterprise Linux (DataScale SN30-H OS option):
https://access.redhat.com/documentation/en-us/red_hat_enterprise_linux/8/ -
Ubuntu Linux Server (DataScale SN30-H OS option):
https://help.ubuntu.com/18.04/serverguide/index.html
1.4. Overview of DataScale SN30 rack hardware
The DataScale SN30 is self-contained in a standard 42 rack unit (RU) datacenter rack. Different configurations are available for purchase, depending on customer requirements (including data center requirements). System population begins at the bottom of the rack with node 1 and increments up the rack. Network switches and other equipment are installed at the top of the rack.
A DataScale SN30 rack system consists of:
-
SN30-2 modules. Four DataScale SN30-2 RDU modules. Each DataScale SN30-2 module contains two Reconfigurable Data Units™ (RDUs), for a total of eight RDUs per DataScale SN30 rack system. The RDUs are managed by the SambaFlow software stack running on the host.
-
Host module. An x86-based DataScale SN30-H host module running either Red Hat® Enterprise Linux® or Ubuntu® Linux.
Both the DataScale SN30-2 RDU module and the DataScale SN30-H module are 2RU chassis.
Switch equipment at the top of the rack provides a data network and an access network by default. The following image and table identify the main components in the DataScale SN30 rack.
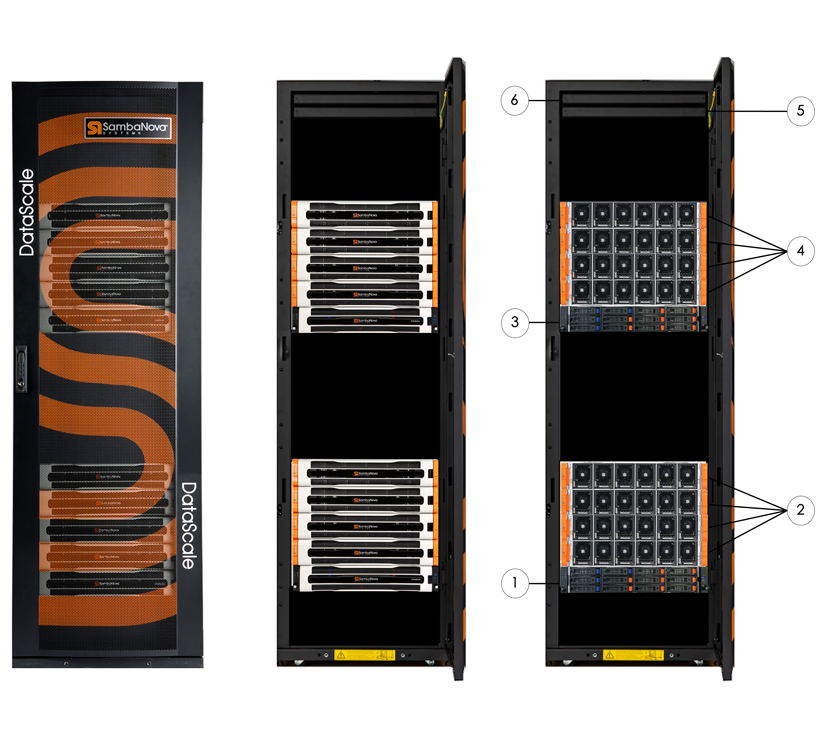
| No. | Component |
|---|---|
1 |
System 1 SN30-8 (SN30-H) |
2 |
System 1 SN30-8 (four SN30-2) |
3 |
System 2 SN30-8 (SN30-H) |
4 |
System 2 SN30-8 (four SN30-2) |
5 |
Juniper® QFX5130 Ethernet (fan-side) |
6 |
Lantronix® serial console server (Juniper EX series switch behind) |
1.5. SambaNova DataScale software stack
The software stack consists of the following components:
-
Host module OS. At the bottom of the stack is the host module OS, either RHEL or Ubuntu.
-
SambaFlow SambaFlow™ is a software stack that is running on SambaNova systems. This stack includes
-
SambaFlow Runtime. Responsible for communication with the DataScale hardware including hardware initialization, error handling, resource management, and interfacing with userspace processes requesting hardware resources.
-
Compilers. Proprietary compilers make your models available to the DataScale hardware.
-
SambaFlow Python SDK which developers use to create and run models.
-
The SambaFlow software is installed and executed on the SN30-H host modules.
The SambaFlow documentation (SambaFlow SDK and SambaFlow Runtime) describe the software stack, model development, and deployment. See https://docs.sambanova.ai.
1.5.1. DataScale SN30 host module OS
The DataScale SN30 rack includes two preinstalled OS (operating system) flavors that run on the DataScale SN30-H host module on each system:
The SN30-H host module supports the following OS versions:
-
Red Hat Enterprise Linux 8.5
-
Ubuntu Server 20.04.2 Long-Term Support (LTS)
|
Both images are preinstalled on each SN30-H host module. |
SambaNova provides updates for the OS images and updates for the software components through a repository that is described in Connecting to the SambaNova OS repository.
1.5.2. How to identify the SambaFlow software version
The command you run to identify the version of the SambaFlow software packages that are installed on the DataScale SN30-H host modules depends on the OS that is running on the module.
-
RHEL Identify the software version on RHEL:
# dnf list installed | grep samba[nf]The command results in output that starts like the following (the exact output depends on the SambaFlow version you are using):
sambaflow.x86_64                            1.12.7-15.el8
sambaflow-apps-datascale-image-unet.x86_64  1.12.7-15.el8
sambaflow-apps-starters-logreg.x86_64		1.12.7-15.el8
sambaflow-cpp.x86_64						1.12.7-15.el8
sambaflow-deps-capnproto.x86_64				0.8.0-1.el8
sambaflow-deps-isl.x86_64					0.22-1.el8
sambaflow-deps-pillow-simd.x86_64			7.2.0.post1-1.el8
sambaflow-deps-venv.x86_64					1.12.4-2.el8
sambaflow-exec.x86_64						1.12.7-15.el8
sambaflow-tools-llvm11.x86_64				11.0.0-3.rc1.el8
...
Identify the software version on Ubuntu Linux:
# apt list --installed | grep samba[nf]The command results in output that starts like the following:
sambaflow-apps-datascale-language-transformers/focal,focal,now 1.13.0-2207251206 amd64
sambaflow-apps-starters-logreg/focal,focal,now 1.13.0-2207251206 amd64
sambaflow-cpp/focal,now 1.12.4-2203291247 amd64
sambaflow-deps-capnproto/focal,focal,focal,focal,focal,focal,focal,focal,focal,focal,focal,focal,focal,now 0.8.0-1 amd64
sambaflow-deps-pillow-simd/focal,focal,focal,focal,focal,focal,focal,focal,focal,focal,focal,focal,now 7.2.0.post1-1 amd64
sambaflow-exec/focal,focal,now 1.13.0-2207251206 amd64
...
1.6. Default username and passwords for components
The following table shows several components in the DataScale SN30 rack that have default passwords for users with administrative/root credentials. See Network administration for information on changing passwords for switches.
| SambaNova highly recommends that you change these default passwords as soon as possible. |
| Do not use a slash character in a password for an XRDU. Both forward slash (/) and backward slash (\) can cause problems. |
| Component | Username | Default password |
|---|---|---|
Lantronix serial console server |
|
|
Juniper QFX5130 high-bandwidth Ethernet data switch |
|
|
Juniper EX series ccess switch |
|
|
DataScale SN30-2/XRDU BMC |
|
|
DataScale SN30-H BMC |
|
|
DataScale SN30-H OS |
|
|
DataScale SN30-H OS |
|
|
VertivTM PDU |
|
|
By default, the operating system on SN30-H is configured with a user snuser1 which has superuser privileges (i.e. can run sudo commands).
The post-install test of the system uses this user to run example applications.
For security reasons SambaNova recommends that you delete this user
after the test is completed.
You can then create your own users or configure the system
to use a company-wide LDAP server.
|
2. Network administration
This page has information about network administration for the DataScale® SN30 rack.
-
Pointers to third-party documents for the network devices.
-
Instructions for changing passwords for the network devices.
-
Shows examples for the DataScale SN30 rack IP address assignments for the management, access, and data networks, as described in the DataScale hardware installation. The actual IP addresses depend on the subnets and host IP addresses in the Pre-Delivery Site Survey document that your company provided before delivery and installation of the DataScale SN30 rack.
| In a single-node DataScale deployment, an amber light appears on port 16 of the QFX5130. This is expected behavior for this switch. |
2.1. Network device administration
Most users do not configure the serial console server and the Juniper access switch. This topic discusses only tasks that you’re likely to perform and includes sample IP addresses. For more information:
-
About general configuration and maintenance of the network devices in the DataScale SN30 rack, see Third-party documentation.
-
About port connection details, see the DataScale hardware installation document, available at (https://docs.sambanova.ai).
2.1.1. Change default passwords for switches
| SambaNova highly recommends that you change the default passwords at first login. |
This section gives instruction for changing passwords on switches. Change the default password for other components as well. See Default Passwords.
Change password for the Juniper EX series access switch and QFX5130 data switch:
-
Run the following command:
$ ssh root@<Juniper_switch_IP_address> root@:RE:0% cli root> configure root# set system root-authentication plain-text-password root# commit -
Log out of the switch by using the
exitcommand 3 times (exit config mode, exit operational mode, exit the Linux CLI) -
Log back in with the new password.
Lantronix SLC8000 serial console server:
Run the following command:
$ ssh sysadmin@<Lantronix_switch_IP_address>
> set localusers password sysadmin
2.1.2. Patch releases for network devices
SambaNova provides a periodic patch release for these network devices.
You can download these patches from the SambaNova ext-infra-patch repository.
See KB article #1062 "Listing and downloading available SN30 rack firmware" for details.
Patch release notes explain any steps that differ from the standard steps described in the specific product administration documentation.
2.2. IP address assignments for the access and management network
The management and access network share the same 1GbE Switch but, depending on the customer requirements, they can be the same network or two separate networks separated by VLAN. In the table below, the example IP addresses assume that the customer chose to merge the access and management networks into the same network.
Table 3 shows examples for the access and management network IP address assignments for components such as the BMC (baseboard management controller), the switch equipment, and the PDUs in the DataScale SN30 rack.
The information the Example IP address (10.0.1.0/24) column assume a customer who provided a 10.0.1.0/24 subnet. The IP address range is starting at .16 in the last octet because some IPs are reserved for SambaNova usage. The addresses include placeholders for customer networking infrastructure like gateway IP.
| Example IP address (10.0.1.0/24) | Component | System # |
|---|---|---|
10.0.1.1-4 Reserved for customer infra |
- |
- |
10.0.1.5-15 Reserved for SambaNova |
- |
- |
10.0.1.16 |
Serial console server |
- |
10.0.1.17 |
Access/Mgmt switch |
- |
10.0.1.18 |
Data switch |
- |
10.0.1.19 |
PDU 1 |
- |
10.0.1.20 |
PDU 2 |
- |
10.0.1.21 |
PDU 3 |
- |
10.0.1.22 |
PDU 4 |
- |
10.0.1.23 |
SN30-H-1 OS (eth0) |
System 1 |
10.0.1.24 |
SN30-H-1 BMC |
System 1 |
10.0.1.25 |
SN30-H-1-XRDU0 BMC |
System 1 |
10.0.1.26 |
SN30-H-1-XRDU1 BMC |
System 1 |
10.0.1.27 |
SN30-H-1-XRDU2 BMC |
System 1 |
10.0.1.28 |
SN30-H-1-XRDU3 BMC |
System 1 |
10.0.1.29 |
SN30-H-2 OS (eth0) |
System 2 |
10.0.1.30 |
SN30-H-2 BMC |
System 2 |
10.0.1.31 |
SN30-H-2-XRDU0 BMC |
System 2 |
10.0.1.32 |
SN30-H-2-XRDU1 BMC |
System 2 |
10.0.1.33 |
SN30-H-2-XRDU2 BMC |
System 2 |
10.0.1.34 |
SN30-H-2-XRDU3 |
System 2 |
x.x.x.255 |
- |
- |
2.3. IP address assignments for the data network
Table 4 shows examples for the high-bandwidth data network IP address assignments for the compute components in the DataScale SN30 rack.
The example IP addresses shown in the Example IP address (10.0.1.64/27) column assume a customer who provided a 10.0.1.64/27 subnet.
| Example IP address (10.0.1.64/27) | Component | System # |
|---|---|---|
x.x.x.1-4 |
- |
- |
10.0.2.5 |
SN30-H-1 snhni0 |
System 1 |
10.0.2.6 |
SN30-H-2 snhni0 |
System 2 |
10.0.2.31 |
- |
- |
3. DataScale SN30 power management
For proper operation of the DataScale® SN30 rack and to prevent issues, be sure you power on and power off the system appropriately and in the correct sequence, as described on this page.
3.1. Warnings and general notes
The following notices apply to the DataScale SN30 rack.
| Some components within the rack work at high voltage. To prevent personal injury and voiding of the warranty, do not attempt to service components except where noted. |
| To protect the DataScale SN30 rack from interference and to prevent damage to its components, keep the front and rear rack doors closed during standard operation. |
| To prevent DataScale SN30 rack components from overheating, keep the front and rear of the rack clear of obstructions to allow proper airflow. |
| Before powering on the DataScale SN30 rack, read the SambaNova DataScale SN30 Rack Release Notes, included in SN30 hardware installation (at https://docs.sambanova.ai) to ensure that you understand any known issues or limitations. If you do not read the release notes, you might incorrectly configure the system components or software, which might necessitate a factory reset. |
| Do not power off or reboot the DataScale SN30 rack components during any firmware update procedure. Doing so might damage the DataScale SN30 rack components, and damaged components might not be recoverable. Perform a shutdown or reboot only after a firmware update has been completed. |
| When the PDUs are physically connected to the datacenter’s power receptacles and power is applied to the rack, all DataScale SN30 rack components begin to power on. The fans of these components initially run at full speed but eventually ramp down after the BMCs finish their boot sequence. Power is not immediately applied to the rack components because the breakers on the PDUs are turned off. You must manually turn on these breakers to begin feeding power to the DataScale SN30 rack components. |
3.2. Process overview
To avoid damage to the system, perform the power-on procedure or a graceful shutdown in the correct order. Here’s an overview.
To turn on the DataScale SN30 rack, follow the detailed steps below. Here’s an overview:
-
Power on the DataScale SN30 rack by turning on the circuit breakers for each PDU.
-
Boot the DataScale SN30-2 RDU modules
-
Boot the DataScale SN30-H host module
To gracefully shut down the DataScale SN30 rack, follow the detailed steps in Gracefully shutting down the DataScale SN30 rack. Here’s an overview:
-
Shut down the SN30-H host modules
-
Shut down the DataScale SN30-2 RDU modules
3.3. Power on the DataScale SN30 rack
| Power on the DataScale SN30-2 RDU modules before you power on the DataScale SN30-H host modules, as described in the following steps. |
-
Turn on the six circuit breakers for each PDU.
When the PDUs are plugged into the datacenter power and you close the circuit breakers, power is automatically applied to the DataScale SN30 rack components. Circuit breakers on PDU shows what a PDU circuit breaker group looks like and shows breaker switch 6 circled. Each PDU has a bank of three circuit breakers grouped together.
 Figure 2. Circuit breakers on PDU
The DataScale SN30-H host modules and DataScale SN30-2 RDU modules boot into standby mode and wait to be manually powered on. The BMC/service processors are powered on through these devices. The networking equipment in the rack does not go into standby mode; instead, it completely boots when power is established.
SambaNova uses networking equipment from other suppliers. See Third-party documentation.
3.4. Boot the DataScale SN30-2 modules
Boot the DataScale SN30-2 RDU modules by using SSH to connect to the SN30-2 BMC, or by sending an API call to the SN30-2 BMC. This section includes steps for both options.
3.4.1. Option 1: Use SSH to connect to the SN30-2 BMC
-
From a system that has access to the DataScale SN30 rack access network, open a terminal session and use
sshto securely connect to the first DataScale SN30-2 RDU module in each system.See the IP address assignment information in Network administration or use your customer-specific IP assignment worksheet to get the IP address to connect to. The first DataScale SN30-2 RDU module in each system is as follows:
System 1: SN30-2-1 (SN30-H-1-XRDU0)
System 2: SN30-2-5 (SN30-H-1-XRDU0)
Here’s an example for system 1 that assumes IP address subnet 10.0.1.0/26 for the access network:
$ ssh [email protected] [email protected]’s password: <Enter root password> root@xrdu:~# -
Run the following
xrduutilcommand to power on the system:root@xrdu:~# xrduutil -U root -P <root_password> poweron -
To ensure the DataScale SN30-2 RDU modules are up before you boot the DataScale SN30-H host module, check the status of each of each module by running this command:
root@xrdu:~# xrduutil -U root -P <root_password> powerstate
Power is on for XRDU_0
Power is on for XRDU_1
Power is on for XRDU_2
Power is on for XRDU_3
3.4.2. Option 2: Send a REST API call to the SN30-2 BMC
-
Generate a token (recommended). If you use the REST API, SambaNova recommends that you use token-based authentication so that plain-text passwords are not sent over the network for REST API commands. See Generate a secure API login token for details.
-
Run the REST API power-on command for each DataScale SN30-2 RDU module. Run this command for each DataScale SN30-2 RDU module in each of the nodes, in no particular order.
Format:
$ curl -b cjar -k -H "X-Auth-Token: $token" -X PUT -d '\{"data":"xyz.openbmc_project.State.Chassis.Transition.On"}' https://<SN30-2_BMC_IP>/xyz/openbmc_project/state/chassis0/attr/RequestedPowerTransitionExample:
$ curl -b cjar -k -H "X-Auth-Token: $token" -X PUT -d '\{"data":"xyz.openbmc_project.State.Chassis.Transition.On"}' https://10.0.1.21/xyz/openbmc_project/state/chassis0/attr/RequestedPowerTransition -
To ensure the DataScale SN30-2 RDU modules are up before you boot the SN30-H, run the following command against each of the DataScale SN30-2 RDU modules:
Format:
$ curl -b cjar -k -H "X-Auth-Token: $token" https://<SN30-2_BMC_IP>/xyz/openbmc_project/state/chassis0Example:
$ curl -b cjar -k -H "X-Auth-Token: $token" https://10.10.0.25/xyz/openbmc_project/state/chassis0After an SN30-2 RDU module is powered on, the output looks similar to the following:
{
"data": {
"CurrentPowerState": "xyz.openbmc_project.State.Chassis.PowerState.On",
"LastStateChangeTime": 1591197275103,
"POHCounter": 75,
"RequestedPowerTransition": "xyz.openbmc_project.State.Chassis.Transition.On"
},
"message": "200 OK",
"status": "ok"
}
3.4.3. Option 3: Mechanical power-on
To power on the SN30-2 resources:
-
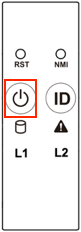
Press the power button located on the front panel of the SN30-2 for 5 seconds. This panel is located on the front left side of the system. The power button is identified as item 1 in SN30 front panel (annotated).
-
Wait for the system LED (callout item 2) to go from blinking to solid green light.
 Figure 3. SN30 front panel (annotated)
 -
When the system LED is no longer blinking, the SN30-2 resources are being powered on. This power on process can take up to a minute.
-
Repeat the process for each SN30-2 system in the SN30-8 node.
3.5. Power on the DataScale SN30-H host module
| To ensure that the DataScale SN30-H host module populates the system device tree properly, power on the host module only after the DataScale SN30-2 RDU modules are powered on fully. |
Boot the DataScale SN30-H host module using either mechanical power on, or power on via IPMI, or power on via the Web UI. This section discusses each option.
3.5.1. Option 1: Mechanical power on
To power on the SN30-H host module, press the power button located on the front panel of the SN30-H. This panel is located on the front left side of the server.
3.5.2. Option 2: Power on via IPMI
Run the following command from a system that has ipmitool installed and that has access to the SN30-H host module’s BMC via the access network.
$ ipmitool -I lanplus -H <SN30-H_BMC_IP_Address> -U root -P <root password> power on3.5.3. Option 3: Power on via WebUI
To power on via WebUI your system must meet the following requirements:
-
Access to the DataScale SN30-H host module’s BMC via the access network
-
One of the following supported web browsers:
-
Chrome (latest version)
-
Firefox (latest version)
-
Follow these steps:
-
Open a web browser.
-
In the browser’s address bar, enter the IP address of the SN30-H host module’s BMC.
-
Log in to the management console by entering the user credentials.

-
Click Sign me in.
-
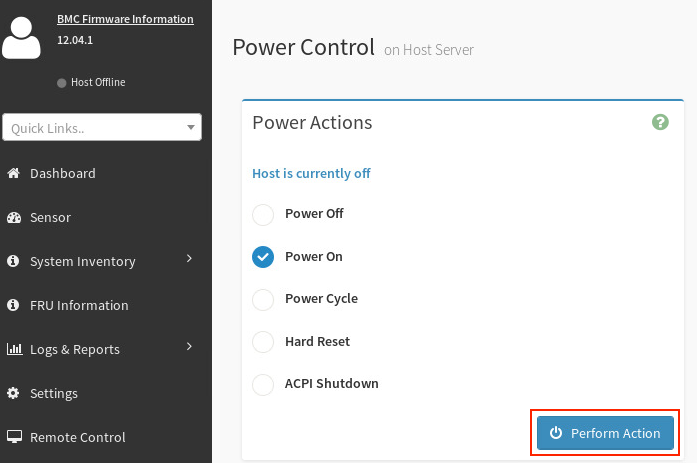
Select Power Control from the BMC dashboard.
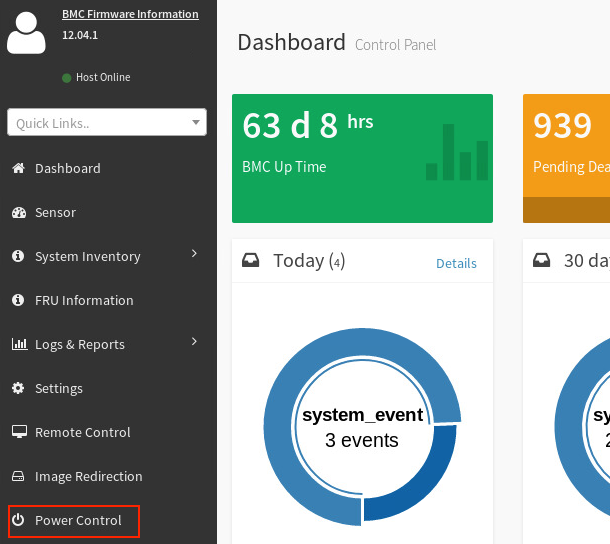
-
Select the Power On checkbox, and then click Perform Action.
-
Perform this boot sequence for all nodes in the DataScale SN30 rack. The order in which you bring up the nodes does not matter.
3.6. Gracefully shutting down the DataScale SN30 rack
You can shut down the DataScale SN30 rack without completely powering off the entire rack. Follow these steps for each node in the DataScale SN30 rack.
3.6.1. Shut down the SN30-H host modules from the OS
Log in to the node via ssh as snuser1 and initiate a shutdown command.
$ ssh snuser1@<SN30-H_OS_IP_Address>
snuser1@SN30-H1’s password: <password>
$ sudo shutdown
This command does not shut down the system immediately, but waits about a minute for users to save their work.
3.6.2. Shut down the DataScale SN30-2 RDU modules
Shut down the DataScale SN30-2 RDU modules in the node using one of the following methods:
Option 1: Use SSH to connect to the DataScale SN30-2 BMC
-
Open a terminal session from a system that has access to the DataScale SN30 rack access network
-
Use
sshto connect to the first DataScale SN30-2 in each node.See the IP address assignment information in Network administration or use your customer-specific IP assignment worksheet to get the IP address to connect to. The first DataScale SN30-2 RDU module in each system is as follows:
System 1: SN30-2-1 (SN30-H-1-XRDU0)
System 2: SN30-2-5 (SN30-H-1-XRDU0)
Example for system 1 given IP address subnet 10.0.1.0/26 for the access network:
$ ssh [email protected] [email protected]’s password: <Enter root password> root@xrdu:~# -
Run the
xrduutil poweroffcommand:root@xrdu:~# xrduutil -U root -P <root_password> poweroff
Option 2: Send a REST API call to the DataScale SN30-2 BMC
SambaNova recommends that you use token-based authentication so that you do not send plain-text passwords over the network for REST commands. See Generate a secure API login token. After you generate the token, start shutting down the components:
-
Run the REST API power-off command for each of the DataScale SN30-2 RDU modules in each of the systems.
Format:
$ curl -b cjar -k -H "X-Auth-Token: $token" -X PUT -d '\{"data":"xyz.openbmc_project.State.Chassis.Transition.Off"}' https://<SN30-2_BMC_IP>/xyz/openbmc_project/state/chassis0/attr/RequestedPowerTransitionExample:
$ curl -b cjar -k -H "X-Auth-Token: $token" -X PUT -d '\{"data":"xyz.openbmc_project.State.Chassis.Transition.Off"}' https://10.0.1.25/xyz/openbmc_project/state/chassis0/attr/RequestedPowerTransition -
Shut down the Juniper QFX5130 high-bandwidth data switch, the Lantronix SLC8000 serial console server, and the Juniper EX series access switch.
When you power down the entire DataScale SN30 rack, shut down the Juniper EX series access switch last, because that switch controls the final access to the system via the network.
See the product-specific documentation listed under Third-party documentation for information on how to shut down each of these network devices:
| After shutting down these switches, you can no longer access the PDUs to cycle outlets because their network switch is down. You have to break and manually remake the relevant breakers from the physical PDU to properly cycle power. |
4. Host module OS administration
Administrative tasks differ depending on which supported OS you are running on each of the SN30-H host modules.
4.1. Supported versions of the SN30-H operating systems
The SN30-H host module supports the following OS versions:
-
Red Hat Enterprise Linux 8.5
-
Ubuntu Server 20.04.2 Long-Term Support (LTS)
4.2. General notes and warnings
| Some third-party software and OS packages may prevent the SambaFlowTM software stack from functioning properly. In this case, SambaNova Support may require all non-certified third-party software or non-certified packages, including the package version, to be removed to get the DataScale® SN30-H host module to a satisfactory state and to continue working on any support issues. |
DataScale SN30-H host modules are configured with a default login password for users root and snuser1. SambaNova strongly recommends that you change these passwords immediately after logging in to a DataScale SN30-H host module.
|
| SambaNova strongly recommends that you do not perform a major upgrade or a kernel update to the DataScale SN30-H host module OS without referring to the supported OS, kernel, and package versions noted within this document and the software release notes because the SambaNova software relies on some strict packages dependencies. SambaNova recommends that you do not perform any major updates unless you are directed to do so by SambaNova. |
| Before you perform Linux package updates, check the SambaFlow software release notes to ensure there are no package dependencies that might break the SambaFlow software if the packages are not at the correct level. |
4.3. Licensing
SambaNova provides the package repositories for Red Hat Enterprise Linux and for Ubuntu running on the DataScale SN30 rack.
-
SambaNova has a partnership with Red Hat that allows SambaNova to distribute a customized repository for the DataScale SN30 rack.
-
SambaNova has a partnership with Ubuntu that allows SambaNova to distribute a customized repository for the DataScale SN30 rack.
Adding other repositories can cause issues with the operation of the SambaFlow software because of some package and kernel version dependencies.
If the SambaNova software stack has problems running, SambaNova Support might request that you remove any packages that were not originally included from the your Linux repository or that you downgrade certain packages to a version that was certified.
4.4. Login process
To access the DataScale SN30-H host module for the first time:
-
Find a system that can access the DataScale SN30 rack access network. The access network might be combined with the management or data network.
-
Use
sshas usersnuser1to log in to the DataScale SN30-H host module. -
Enter the default password for
snuserwhen prompted. See Default username and passwords for components.
$ ssh snuser1@<SN30-H_OS_IP_Address>
snuser1@<SN30-H_OS_IP_Address>’s password: <Default Password>|
SambaNova strongly recommends that you change the default password for |
4.5. Connect to the SambaNova OS repository
DataScale SN30-H host module connectivity to the SambaNova repository is set up as part of the DataScale SN30 rack installation and relies on the site survey that your company completed.
As part of the initial installation, SambaNova provides a sambanova.repo file that contains the appropriate credentials and paths to your specific repository.
If you need to check the setup for the SambaNova OS repository, see KB article #1057.
4.6. OS repository configuration file
Do not modify the sambanova.repo repository file.
Doing so can break SambaFlow software package dependencies, which might cause unrecoverable package dependency issues. You might have to rebuild the SN30-H host module as a result.
If you need any packages that are not provided by SambaNova, open a support case with SambaNova Support.
|
4.7. Updating the DataScale SN30-H host module OS
SambaNova patch releases handle major upgrades to the DataScale SN30-H host module OS, for example:
-
Going from RHEL 8.5 to RHEL 8.6 or later
-
Going from 20.04 LTS to 22.04 LTS
-
Kernel updates.
See the SambaFlow Release Notes documentation for information about commands that you need to run to perform the upgrade.
4.8. Updating the SambaFlow software
To update the SambaFlow software packages, log in to the DataScale SN30-H host module(s) where the software packages need to be updated. The commands you run depend on the OS you’re using.
4.8.1. Update SambaFlow on RHEL
To view what packages are installed on the DataScale SN30-H host module, run the following command:
$ dnf list installed | grep samba[nf]To view which SambaFlow packages have an update that you can apply, run the following command:
$ dnf check-update | grep samba[nf]To update the SambaFlow packages, examine the check-update command output, and then run the following command to update a package and any package dependencies:
$ sudo dnf update <package_name>For example, if the output produced by the check-update command shows that an update is available for the sambaflow package, run the following command:
$ sudo dnf update sambaflowRepeat this step for each package that needs to be updated. Due to package dependencies, updating one package might update several other packages.
4.8.2. Update SambaFlow on Ubuntu
To update the SambaFlow software packages, log in to the DataScale SN30-H host module(s) where the software packages need to be updated.
To view what packages are installed on the DataScale SN30-H host module, run the following command:
$ dpkg -l | grep samba[nf]To view which SambaNova packages have an update you can apply, run the following command:
$ apt list --upgradable | grep samba[nf]To update all the packages that need to be updated, run the following command, which updates the packages and any package dependencies:
$ sudo apt install --only-upgrade samba[nf]To update a specific package, replace samba[nf] with the name of a specific package. For example, to update sambaflow, run the following command:
$ sudo apt install --only-upgrade sambaflow5. BMC administration
When security patches are available or when BMC firmware updates are required for other reasons, you can perform the tasks in this section. Updating the BIOS is included with this BMC administration topic because the two tasks are usually performed at the same time. The tasks include:
-
Updating the DataScale® SN30-H host module BMC firmware
-
Updating the DataScale SN30-H host module BIOS
-
Recovering the DataScale SN30-H BMC
| See View SN30-H BMC diagnostic information and logs for information on diagnostics. |
5.1. General notes and warnings
| Do not remove the admin user account or change this account’s password. This account is needed for password recovery of the DataScale SN30-H host module’s BMC. |
| Do not power off or reboot the DataScale SN30 rack components during firmware updates. Interrupting a firmware update can damage the DataScale SN30 rack components. The damaged component might not be recoverable. Perform a shutdown or reboot only after a firmware update has been completed successfully. |
| Settings on the BMCs do not need modification and remain static unless you are updating the BMCs, collecting diagnostic material, or changing the log in credentials. Do not make configuration changes to the BMC unless you are otherwise instructed. |
5.2. Updating the DataScale SN30-H host module BMC firmware
| If you start the firmware update process and you decide to cancel the process, you must reset BMC. To do that, close the web browser that was logged in to the BMC WebUI, and then log in to the BMC WebUI again before you attempt any administrative operations for the BMC. |
5.2.1. Back up the existing configuration
Before you update the firmware, back up the existing configuration of the DataScale SN30-H host module. Having a backup might help with recovering the BMC.
To back up the existing configuration, your system must meet the following requirements:
-
Access to the DataScale SN30-H host module’s BMC via the access network
-
One of the following supported web browsers:
-
Chrome (latest version)
-
Firefox (latest version)
-
Follow these steps to back up the existing configuration:
-
Open a web browser.
-
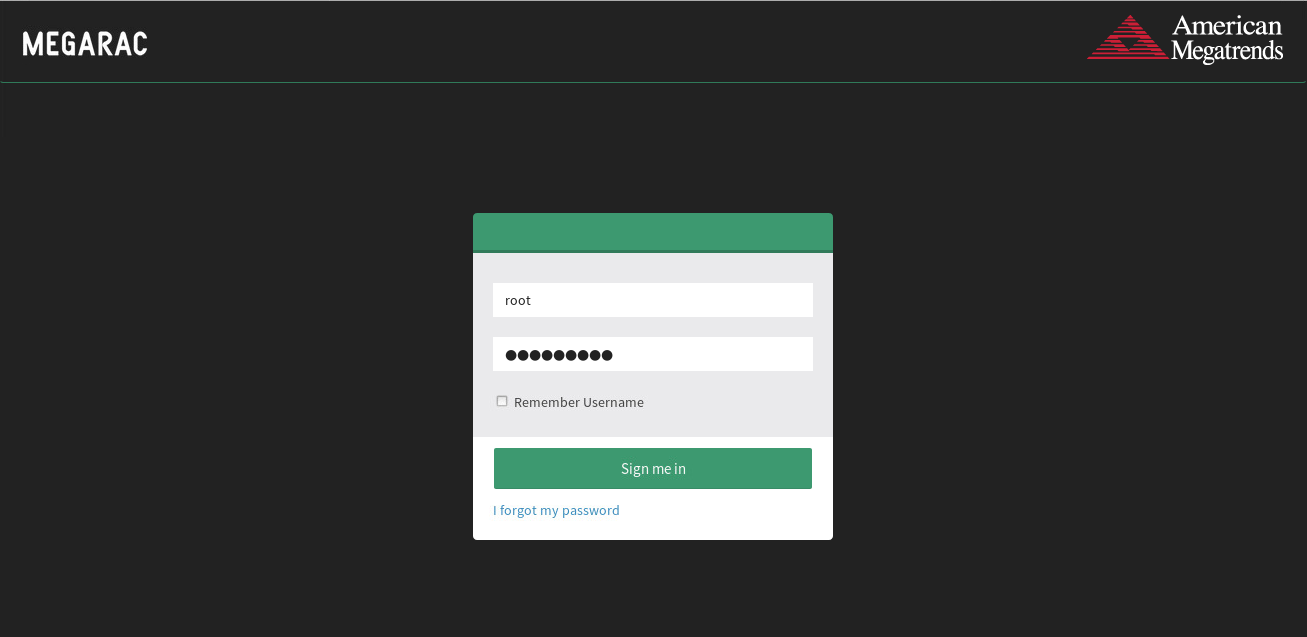
In the browser’s address bar, enter the IP address of the DataScale SN30-H host module’s BMC, and log in to the management console with your user credentials, and click Sign me in.
-
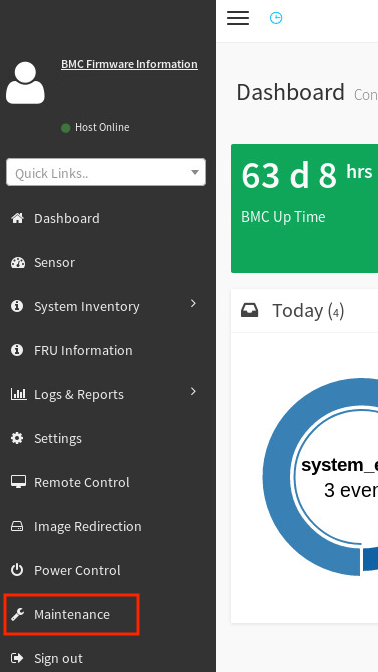
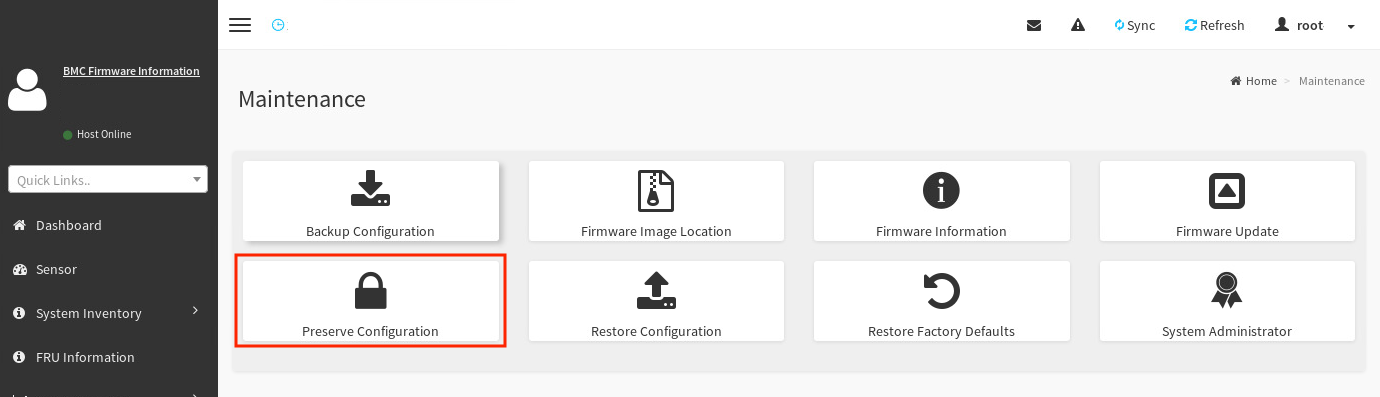
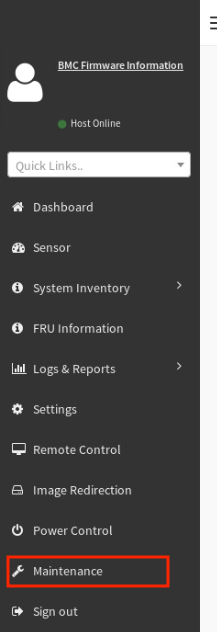
In the dashboard, select Maintenance.
-
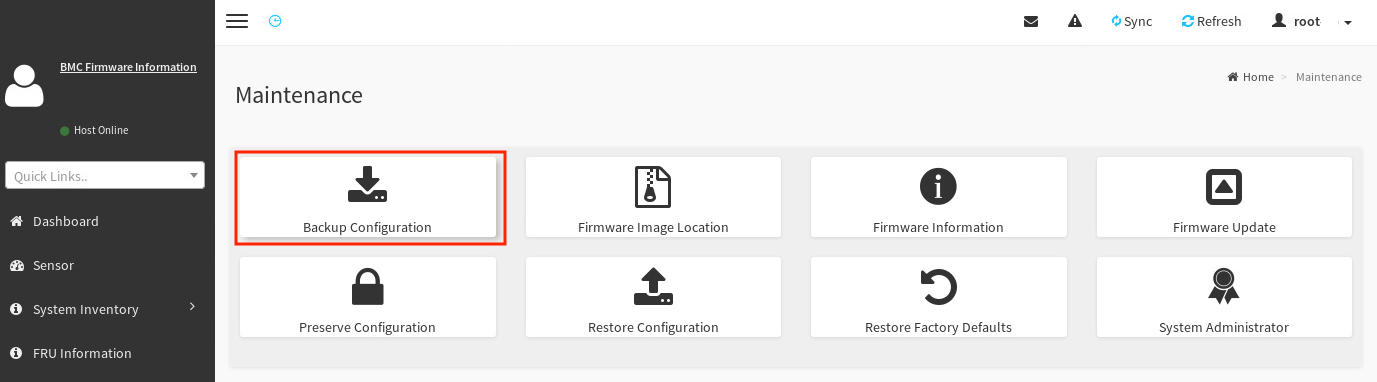
On the Maintenance screen, select Backup Configuration.
-
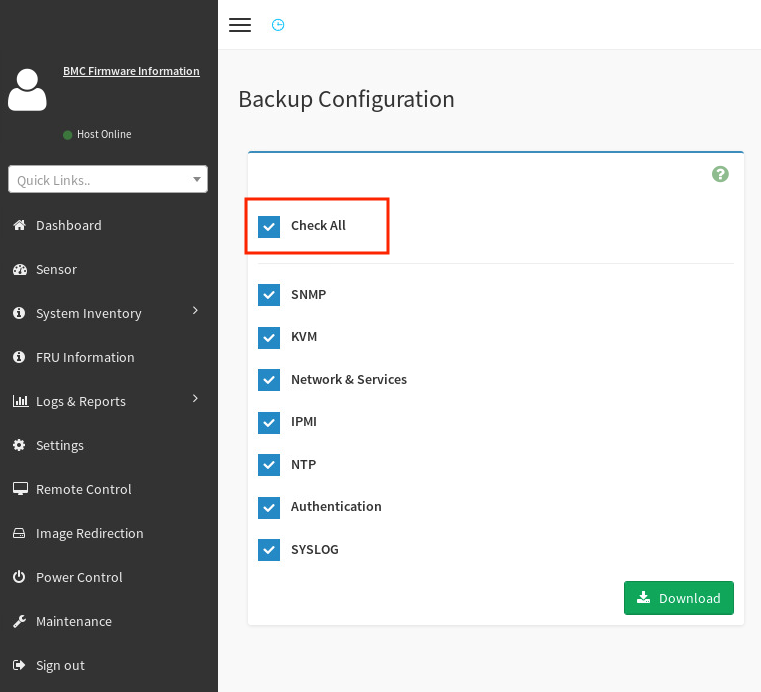
On the Backup Configuration screen, select Check All to back up all the BMC configuration details.
-
Click Download to save this configuration to the local system (which is accessing the BMC WebUI).
-
Click OK to download the
bmc-config.bakbackup configuration file. You can use that file later if a restore is required.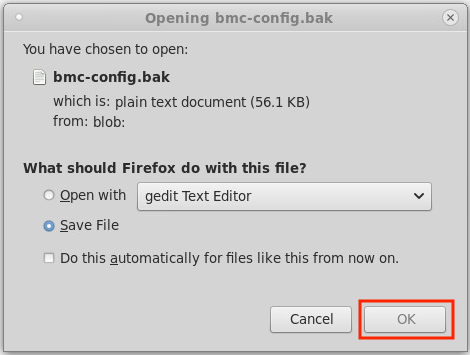
5.2.2. Update the host moducle BMC firmware
Now that you have backed up the BMC configuration, you can update the SN30-H host module’s BMC firmware while preserving the configuration. Follow these steps:
-
Download the DataScale SN30-H host module’s BMC patch update from the SambaNova Support portal to the local system that is accessing the BMC WebUI.
-
Unzip the SambaNova patch update to a directory on the local system.
-
On the Backup Configuration screen, select Maintenance in the left pane.
-
On the Maintenance screen, select Preserve Configuration.
-
Select Check All at the top of the list to preserve the configuration of everything.
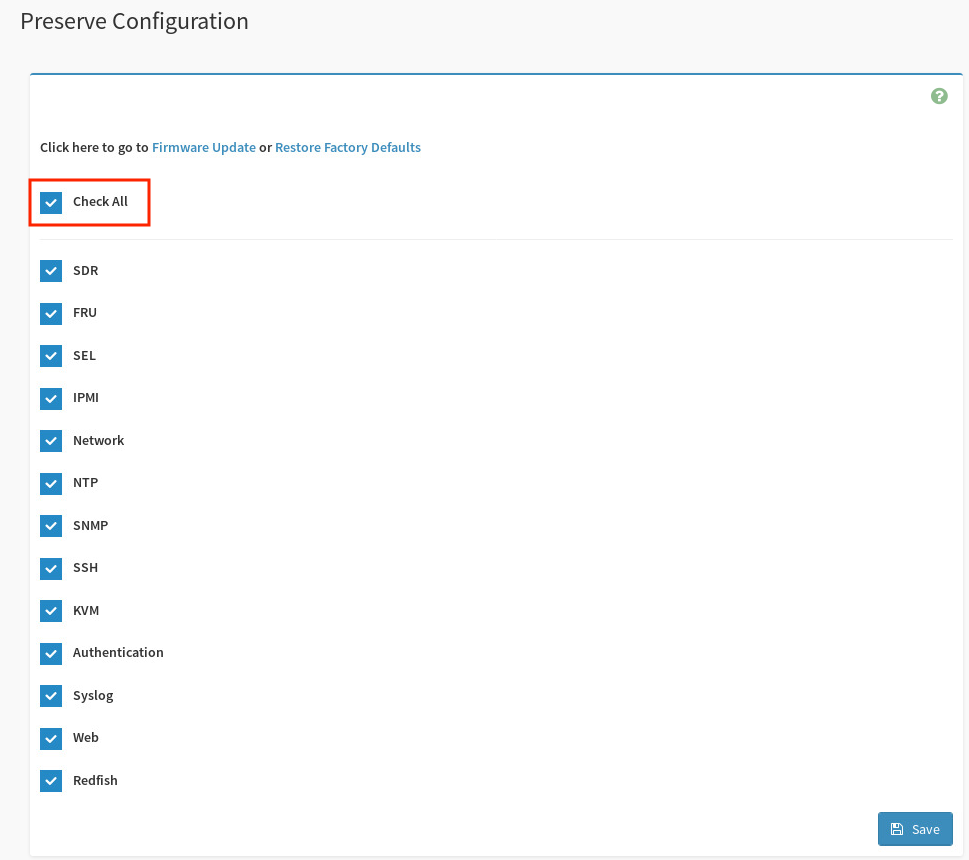
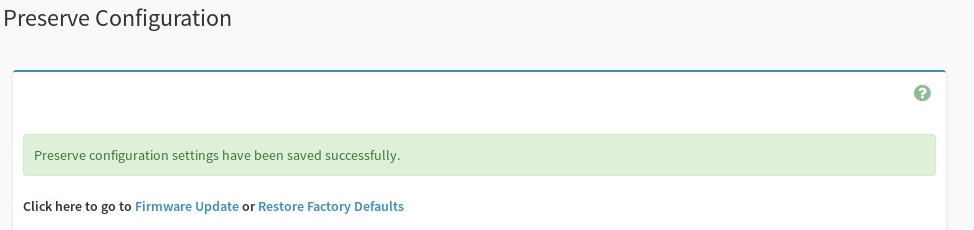
The following message appears if the configuration preservation was successful.
-
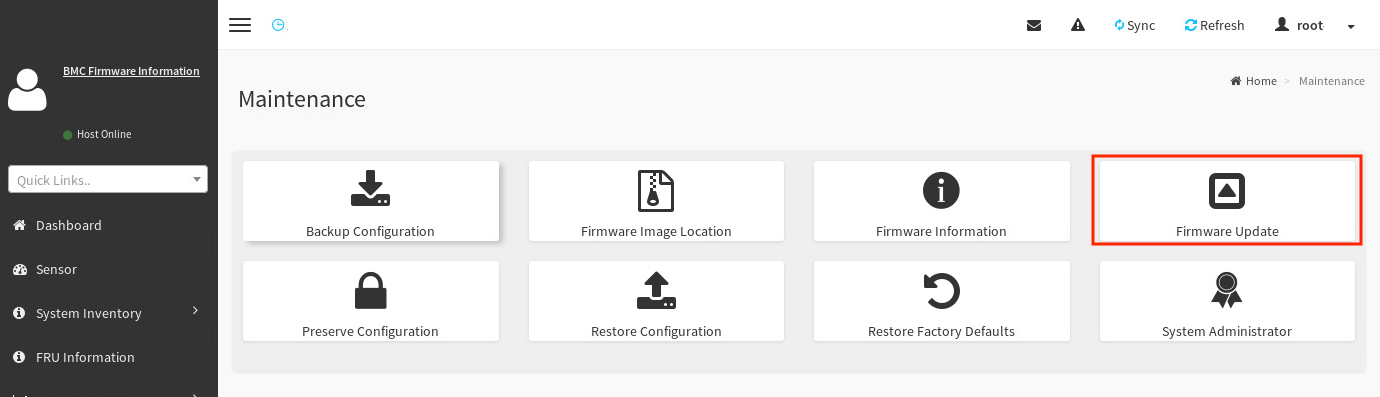
In the left pane, click Maintenance.
-
In the Maintenance screen, select Firmware Update.
-
Find the
rom.ima_encfile:-
In the Firmware Update screen, click Browse.
-
Navigate to the
.binfile that you downloaded and unzipped. This file is located in the/SN30 rack/<version>/HostBMC_FW/directory from the unzipped patch bundle. -
Select the
rom.ima_encfile and click Open.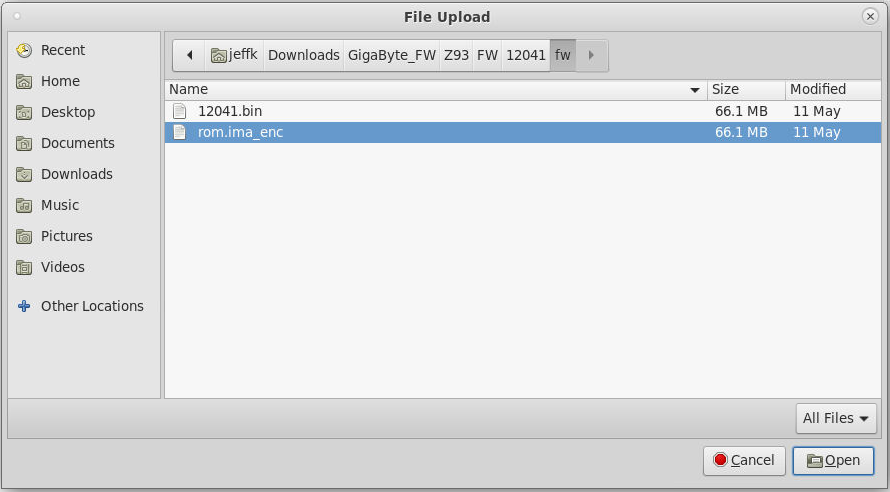
-
-
Back in the Firmware Update screen, click Start firmware update.
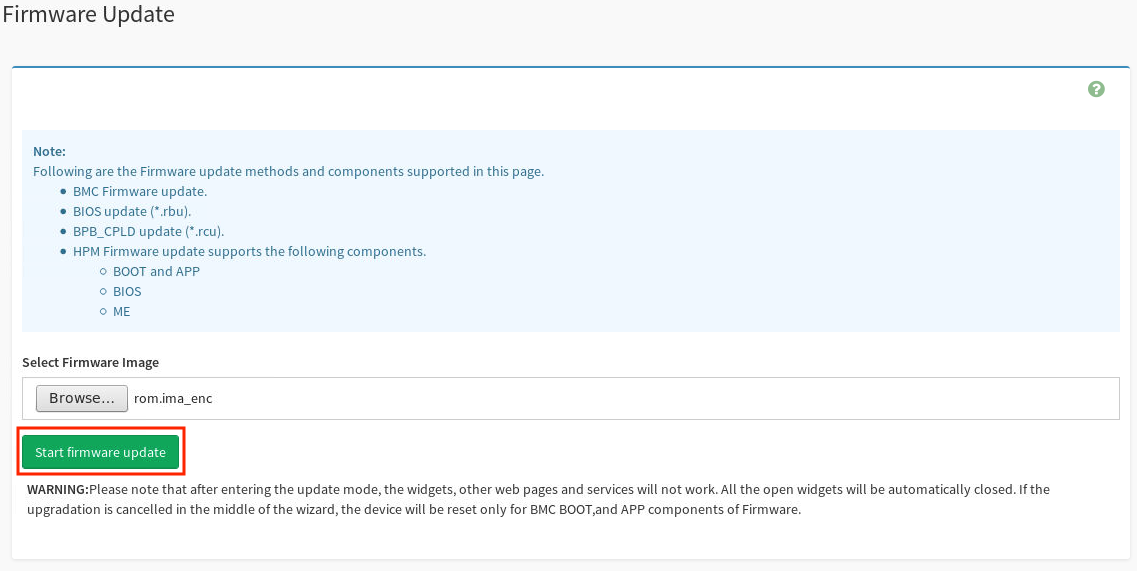
-
Below the the button that you just clicked, select the Preserve all Configuration checkbox to use the preserved configuration you saved.
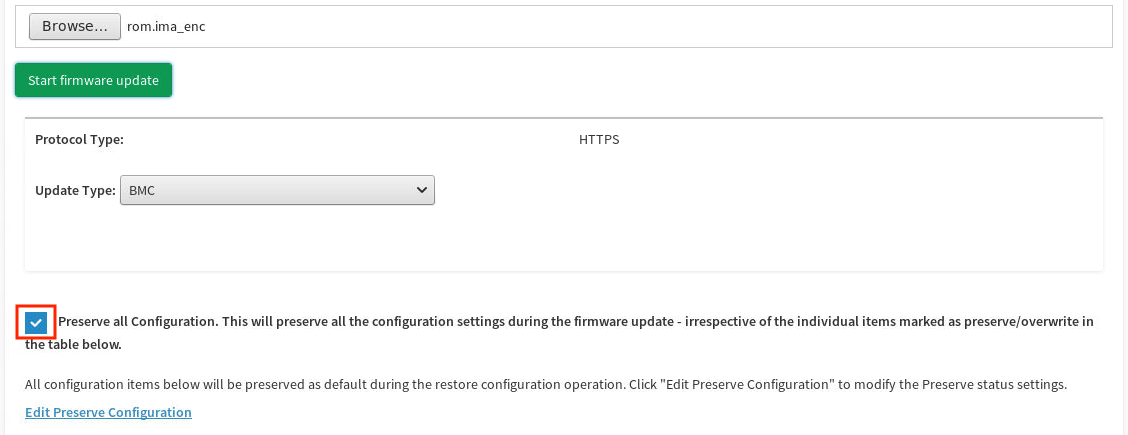
-
Scroll to the bottom of the screen and click Proceed to Flash.
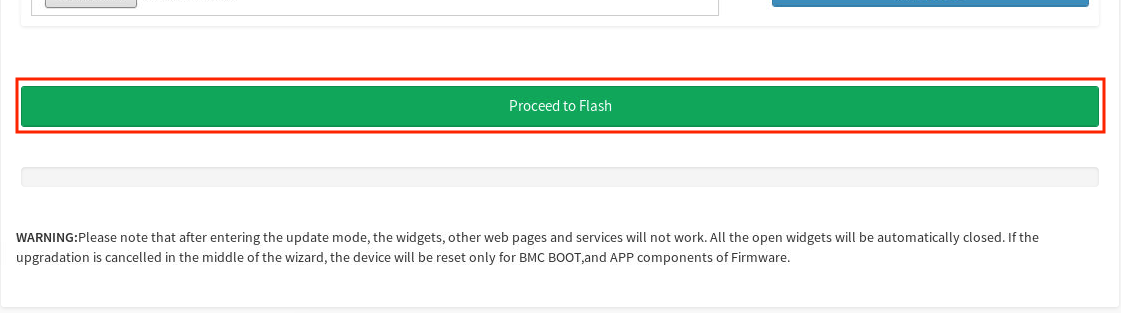
-
Click OK in the BMC update confirmation screen.

When the BMC update process has started, the BMC is not reachable for 5 to 10 minutes while the update is being applied. The DataScale SN30-H host module OS continues to run normally during the BMC update.
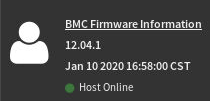
After 10 minutes, repeat step 2 to log in to the BMC WebUI, and confirm that the update was successful by checking the information in the upper left side of the dashboard. The BMC firmware version is identified as <XX.XX.X>.
5.3. Update the DataScale SN30-H host module BIOS
| After you enter the update mode, the widgets and other web pages and services will not work. All the open widgets will be automatically closed. If you cancel the upgrade in the middle of the process, the SN30-H host module will be reset only for the BMC BOOT and APP components of the firmware. Therefore, ensure the update process is not interrupted. |
| The SN30-H host module BIOS update requires a reboot of the system to apply the updated BIOS. Plan accordingly. |
To update the SN30-H host module BIOS, your system must meet the following requirements:
-
Access to the DataScale SN30-H host module’s BMC via the access network
-
One of the following supported web browsers:
-
Chrome (latest version)
-
Firefox (latest version)
-
Follow these steps to perform the update:
-
Open a web browser.
-
In the browser’s address bar, enter the IP address of the DataScale SN30-H host module’s BMC, enter your user credentials, and click Sign me in.
-
In the dashboard, select Maintenance.
-
In the Maintenance screen, select Firmware Update.
-
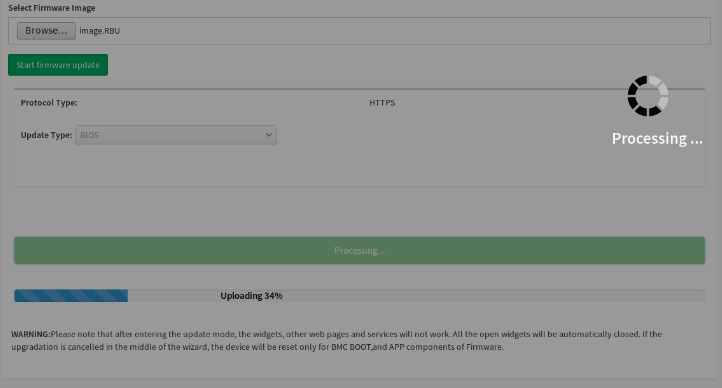
Find the
image.RBUfile:-
In the Firmware Update screen, click Browse.
-
Navigate to the
/Host_BIOS/RBU/directory of the uncompressed infrastructure patch bundle. -
Select the
image.RBUfile and click Open.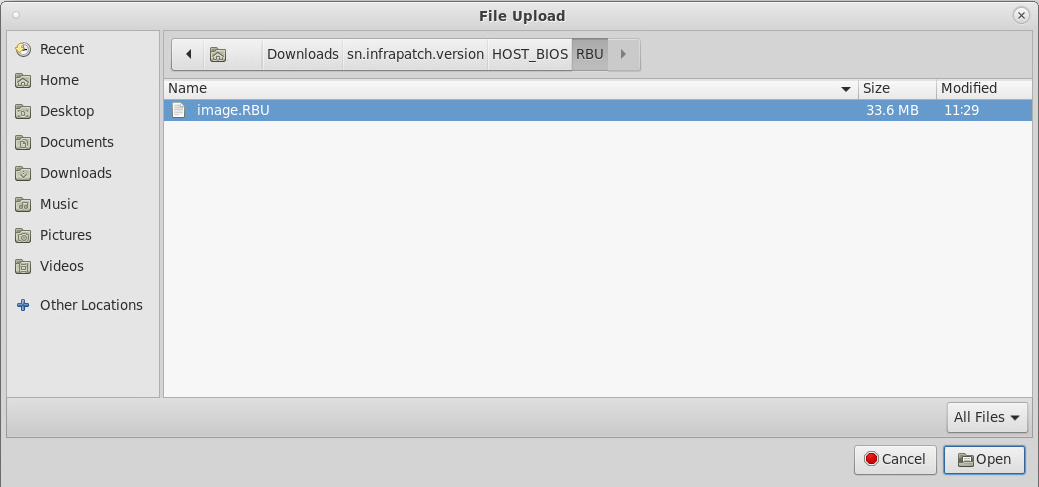
-
-
Back in the Firmware Update screen, click Start firmware update.
-
Below the button you clicked, select BIOS from the Update Type drop-down.
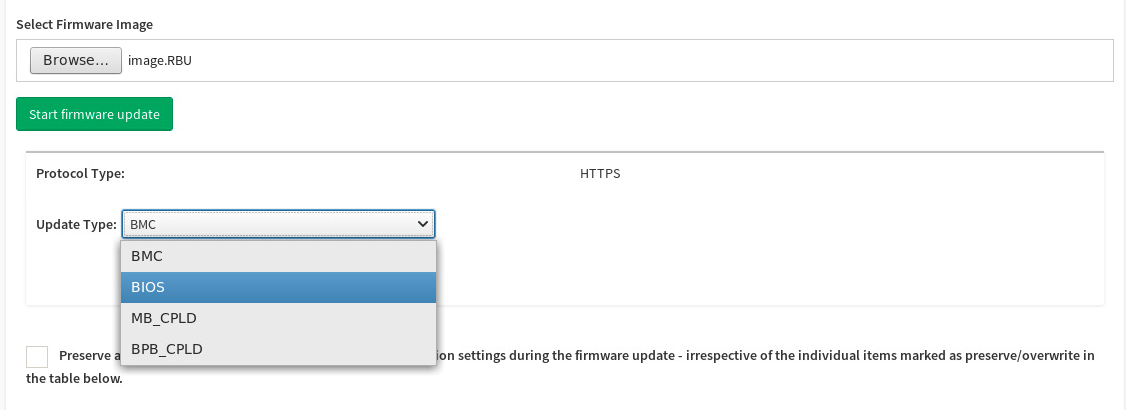
-
Click Proceed to Flash.
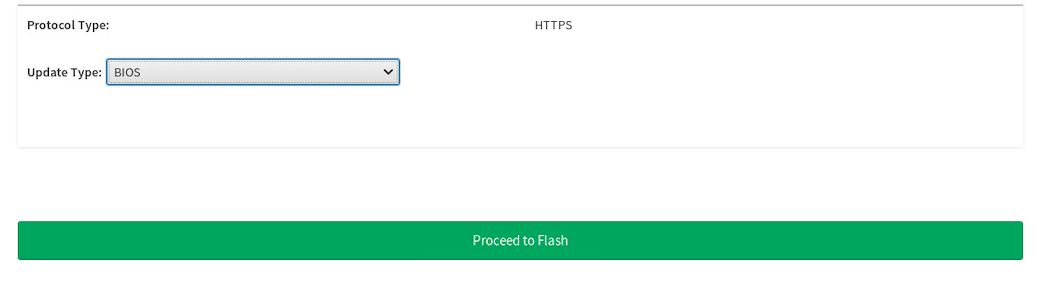
-
Click OK.
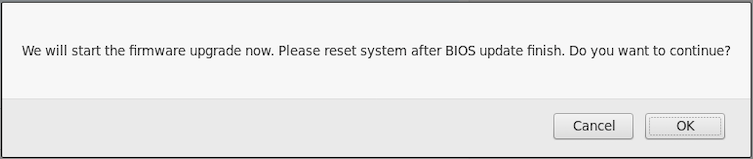
This initiates uploading the BIOS firmware update to the DataSale SN30-H host module, but it does not automatically apply the firmware update.
-
When the screen shows Uploading 100%, click Flash BIOS.
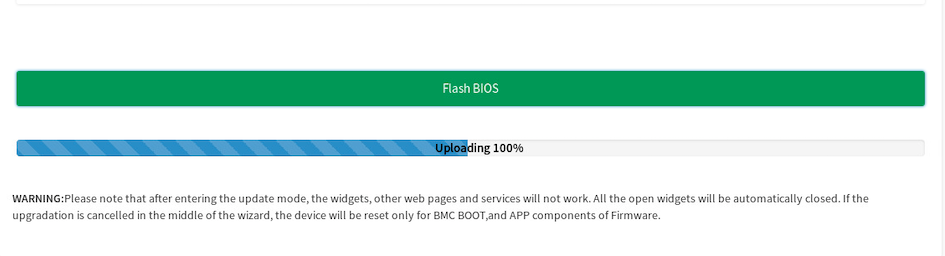
This initiates the BIOS update process.
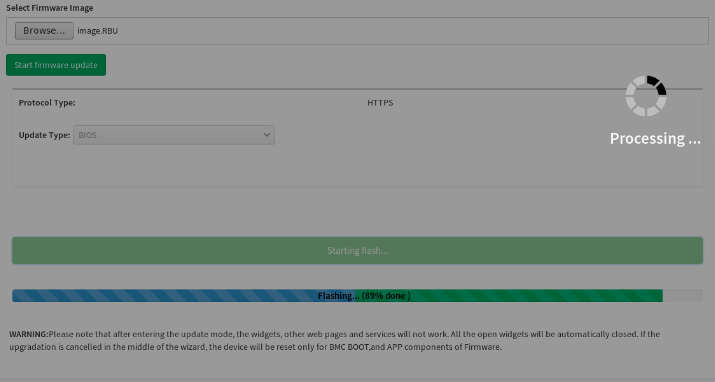
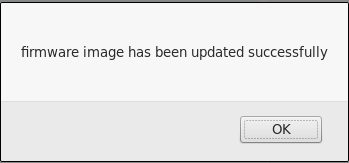
-
When the flash process is complete, a “firmware image has been updated successfully” message appears. Click OK to continue.
-
A "Firmware reset has been called" message appears. Click OK to log out of the SN30-H BMC WebUI.

5.3.1. Reset the host module OS
As a final step, you have to reset the host module OS.
-
After you are logged out of the SN30-H BMC, log in to the SN30-H OS.
$ ssh snuser1@<SN30-H_OS_IP_Address> snuser1@<SN30-H_OS_IP_Address>’s password: <snuser1 Password> -
From the command line, reset the SN30-H OS to complete the BIOS update.
$ sudo shutdown -r now [sudo] password for snuser1: <snuser1 Password> -
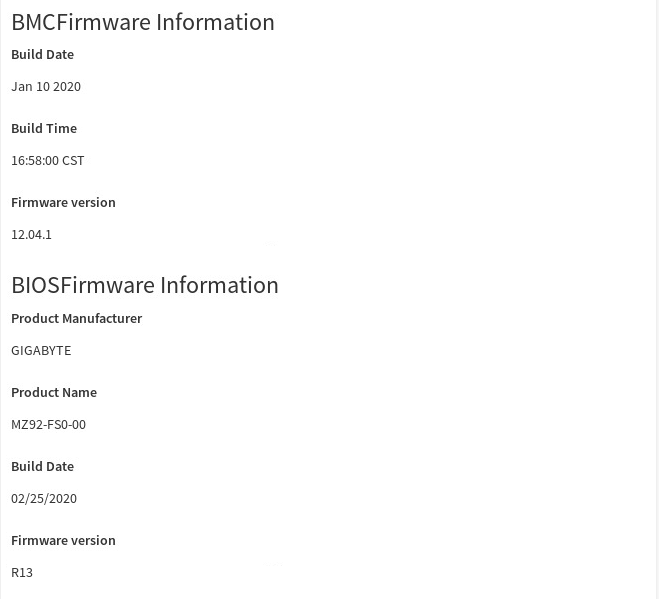
When the SN30-H host module is back online, confirm that the BIOS update has been applied, as follows:
-
Log in to the SN30-H BMC and select Maintenance from the left pane of the dashboard.
-
In the Maintenance screen, select Firmware Information.
-
Under BIOSFirmware Information check the BMCFirmware Information screen for the firmware version.
-
5.4. Recover the DataScale SN30-H BMC
If the DataScale SN30-H host module’s BMC is no longer responding or no longer accessible, or the DataScale SN30-H host module’s BMC password has been lost or forgotten, see Backing up and restoring components.
6. DataScale SN30 RDU module administration
Administrative tasks for the DataScale® SN30-2 RDU module’s BMC include the following:
-
Changing the root password
-
Generating a secure API login token for authentication
-
Updating the DataScale SN30-2 BMC and RDU controller (RDU-C) firmware
-
Configuring the DataScale SN30-2 BMC network
-
Configuring the DataScale SN30-2 BMC hostname
There is a built-in secure account on the DataScale SN30-2 BMC called snservice. It is used for password recovery of root if the password is forgotten. For more details on this account, refer to KB article #1049.
|
6.1. Change the root password
| SambaNova highly recommends that you change the default password for root to a more secure password. |
Passwords cannot be based on dictionary words and cannot include the # character. If you use a dictionary word, a BAD PASSWORD message results, and the password is not changed.
|
To change the default password for root on the DataScale SN30-2 BMC, follow these steps:
-
Log in to the DataScale SN30-2 BMC where you transferred the update files:
$ ssh root@<SN30-2_BMC_IP_Address> Password: <Enter root password> -
Run the
passwdcommand and enter a new password, as follows:root@xrdu:~# passwd New password: <New Password> Retype new password: <New Password> passwd: password updated successfully
6.2. Generate a secure API login token
You can generate a secure token for the DataScale SN30-2 BMC root user to prevent the need to use plain-text passwords in REST API calls.
-
Log in to the client system from which you want to run the REST API calls. The system must have network access to the DataScale SN30-2 BMC.
-
Run the following command to generate the token. Replace
<SN30-2_BMC_IP_Address>and<Password>with the appropriate values:$ export token=`curl -k -H "Content-Type: application/json" -X POST https://<SN30-2_BMC_IP_Address>/login -d '\{"username" : "root", "password" : "<Password>"}' | grep token | awk '\{print $2;}' | tr -d '"'` -
Confirm that a token has been generated for your session:
$ echo $token 1h0Dk9xjtjsOtBkMhgIN -
To validate that the token works from the client system, run the following cURL command. Replace
<SN30-2_BMC_IP_Address>with the correct DataScale SN30-2 BMC IP address.$ curl -k -H "X-Auth-Token: $token" https://<SN30-2_BMC_IP_Address>/xyz/openbmc_project/ { "data": "/xyz/openbmc_project/Ipmi", "/xyz/openbmc_project/certs", ... "/xyz/openbmc_project/user" ], "message": "200 OK", "status": "ok" }If you execute the cURL command correctly and output that’s similar to the example is generated, the token works correctly. You can now use the token with other API calls, for example, to power on and power off the DataScale SN30-2 RDU module.
6.3. Updating the DataScale SN30-2 BMC and RDU controller (RDU-C) firmware
Updating the DataScale SN30-2 BMC and RDU controller (RDU-C) firmware requires several tasks, which must be done in sequence.
6.3.1. Prepare the DataScale SN30-2 BMC primary partition for update
To prepare the primary partition and download the files, follow these steps:
-
Shut down the DataScale SN30-H host module in the system. This will ensure that there are no graphs running or any other load. See the Gracefully shutting down the DataScale SN30 rack procedure.
-
Shut down the DataScale SN30-2 RDU module. See the Gracefully shutting down the DataScale SN30 rack procedure.
-
Log in to the DataScale SN30-2 BMC and reboot the BMC to clear the BMC registers, as follows:
$ ssh root@<SN30-2_BMC_IP_Address>
Password: <Enter root password>

root@xrdu:~# reboot
This reboot process takes about 3-5 minutes to complete. You can progress to the next step to download the DataScale SN30-2 firmware update.
-
Download the DataScale SN30-2 firmware update file
sn<XRDU_version>-xrdu-sys-fw-<fw_version_number>.tar.gzfrom the SambaNovaext-xrdu-fwrepository, under the/latestsub-directory, to a system that has access to the network that the DataScale SN30-2 BMC is on. For details on accessing these required firmware files, see the KB Article #1063.
| Ensure you download the XRDU firmware specific to the DataScale SN30 and not the firmware specific to other DataScale versions. |
-
Uncompress the
sn<XRDU_version>-xrdu-sys-fw-<fw_version_number>.tar.gzfile. -
Copy the
.mtdand.mtd.md5firmware files from theobmc/directory to each of the DataScale SN30-2 BMCs that are to be updated. Place these files under the/dev/shm/ directoryon the SN30-2.$ scp /<uncompressed directory>/obmc/obmc-<version>* root@<SN30-2_BMC_IP_Address>:/dev/shm/ Password: <Enter root password>Confirm that the
.mtdand.mtd.md5files have been completely transferred to the BMC’s/dev/shm/directory.Ensure that the files copied over are from the rdu-128directory and not therdu-64directory. -
Log in to the DataScale SN30-2 BMC where the update files were transferred to.
$ ssh root@<SN30-2_BMC_IP_Address> Password: <Enter root password> root@xrdu:~# cd /dev/shm/ -
Confirm that the following two files are located in this directory:
-
obmc-rdu-<version>.mtd -
obmc-rdu-<version>.mtd.md5
root@xrdu:/dev/shm# ls obmc* obmc-<version>.mtd obmc-<version>.mtd.md5 -
6.3.2. Perform the update on the primary partition
After you confirm that the two files are available, perform the update as follows:
-
Run the update on the
obmc-rdu-<version>.mtdfirmware file.root@xrdu:~# obmcupdate -p primary -t bmc -f /dev/shm/obmc-rdu-<version>.mtdDo not run any other commands or disconnect the power supply at this time .
-
Confirm that the Erasing, Writing, and Verifying stages complete to 100%.
-
When all stages are completed, reboot the BMC with the new firmware.
root@xrdu:~# reboot -f -
After about 3 to 5 minutes, log in to the DataScale SN30-2 BMC.
$ ssh root@<SN30-2_BMC_IP_Address>
Password: <Enter root password>
The update reimages the DataScale SN30-2 BMC and the .ssh identification will likely have changed. You might be prompted to remove the old host entry in the .ssh/known_hostsfile on the client that was used tosshinto the system before. -
Confirm the update has been running and compare the version output to the DataScale SN30-2 BMC firmware patch applied, as follows:
root@xrdu:~# obmcupdate -i ***** RDU-C ***** RDU-C Release Version: <current version> RDU-C BuildDate: #.## #### DesignVer: ## BoardID: ##. ***** BMC ***** BMC Release Version: <updated version> BMC BUILD ID: <updated BMC buildid> BMC Flash: Primary BMC Flash Size: 128MB -
If there are any issues running the update, run the
obmcupdatecommand again.
If the update process continues to fail, contact SambaNova Support.
6.3.3. Update the DataScale SN30-2 BMC secondary/recovery partition
The re-imaging of the BMC removes the obmc-rdu-<version>.mtd and obmc-rdu-<version>.mtd.md5 files from /dev/shm/.
-
Exit out of the SN30-2 BMC and log back in to the client system where the BMC firmware files were uncompressed.
-
Copy the
obmc-rdu-<version>.mtdandobmc-rdu-<version>.mtd.md5firmware files back to the DataScale SN30-2 BMCs/dev/shm/directory.$ scp /<uncompressed directory>/obmc/obmc-<version>* root@<SN30-2_BMC_IP_Address>:/dev/shm/ Password: <Enter SN30-2 BMC root password> -
Confirm that these two files have been completely transferred to the BMC’s
/dev/shm/directory. -
Log back in to the DataScale SN30-2 BMC that was just updated:
$ ssh root@<SN30-2_BMC_IP_Address> Password: <Enter root password> -
Go to the
/dev/shm/directory on the DataScale SN30-2 BMC.root@xrdu:~# cd /dev/shm/ -
Confirm that the following two files are located in this directory:
-
obmc-rdu-<version>.mtd
-
obmc-rdu-<version>.mtd.md5
root@xrdu:/dev/shm# ls obmc*
obmc-rdu-<version>.mtd  obmc-rdu-<version>.mtd.md5
-
-
Run the update on the BMC recovery partition using the
obmc-rdu-<version>.mtdfirmware file.root@xrdu:~# obmcupdate -p recovery -t bmc -f /dev/shm/obmc-rdu-<version>.mtdDo not run any other commands or disconnect the power supply at this time.
-
Confirm that the Erasing, Writing, and Verifying stages complete to 100%.
-
If there are any issues running the update, run the update command once more. If the update process continues to fail, contact SambaNova Support.
When update is completed, you can update the DataScale SN30-2 RDU Controller (RDU-C) primary partition.
6.3.4. Update the DataScale SN30-2 RDU-C primary partition
After you’ve update both primary and secondary partition of the SN30-2 BMU, you can update the SN30-2 RDU-C.
-
Exit out of the SN30-2 BMC and log back in to the client system where the BMC and RDU-C firmware files were uncompressed.
-
Copy the following firmware files to the DataScale SN30-2 BMCs
/dev/shm/directory:-
rduc-<version>-primary.spi -
rduc-<version>-primary.spi.md5 -
rduc-<version>-recovery.spi -
rduc-<version>-recovery.spi.md5$ scp /<uncompressed directory>/rduc/rduc-<version>-* root@<SN30-2_BMC_IP_Address>:/dev/shm/ Password: <Enter SN30-2 BMC root password>
-
-
Log in to the DataScale SN30-2 BMC to which the update files were transferred.
$ ssh root@<SN30-2_BMC_IP_Address> Password: <Enter root password> -
Go to the
/dev/shm/directory on the DataScale SN30-2 BMC.root@xrdu:~# cd /dev/shm/ -
Confirm that the following files are located in this directory:
-
rduc-<version>-primary.spi
-
rduc-<version>-primary.spi.md5
-
rduc-<version>-recovery.spi
-
rduc-<version>-recovery.spi.md5
root@xrdu:/dev/shm# ls rduc*
rduc-<version>-primary.spi  rduc-<version>-primary.spi.md5  rduc-<version>-recovery.spi
rduc-<version>-recovery.spi.md5
-
-
Run the update using the
primary.spifirmware file to update the DataScale SN30-2 RDU-C primary partition.root@xrdu:/dev/shm# obmcupdate -p primary -t rduc -f /dev/shm/rduc-<version>-primary.spiDo not run any other commands or disconnect the power supply at this time.
-
Confirm that the update of the RDU-C has taken affect by running the
obmcupdate -icommand.root@xrdu:~# obmcupdate -i ***** RDU-C ***** RDU-C Release Version: <updated version> RDU-C BuildDate: #.## #### DesignVer: ## BoardID: ## ***** BMC ***** BMC Release Version: <updated version> BMC BUILD ID: <updated build id> BMC Flash: Primary BMC Flash Size: 128MBVerify that the RDU-C Release Version appears as the updated version.
6.3.5. Update the DataScale SN30-2 RDU-C secondary/recovery partition
-
To update the the DataScale SN30-2 RDU-C recovery partition, run the
obmcupdatecommand with therduc-<version>-recovery.spifirmware file.root@xrdu:/dev/shm# obmcupdate -p recovery -t rduc -f /dev/shm/rduc-<recovery>-recovery.spi -
If any issues occur during the update of the DataScale SN30-2 BMC or RDU-C, contact SambaNova support
After the DataScale SN30-2 BMC and RDU-C have successfully been updated, it is safe to power on the DataScale SN30-2 and then the SN30-H modules. See the Power on the DataScale SN30 rack procedure.
6.4. Configure the DataScale SN30-2 BMC network
When you change the IP address of the DataScale SN30-2 BMC, you have to update the IP_ADDRESS_SP# entries in the /platform/network.json files for the updated DataScale SN30-2 BMC and update other DataScale SN30-2 BMCs that are directly connected to the updated DataScale SN30-2 BMC in the node.
|
After changing the IP address and resetting the network service, currently connected ssh sessions are terminated or left in a hung state because the network IP connection has changed. Log in to the DataScale SN30-2 BMC using the new IP address.
|
DataScale SN30-2 BMC networking is configured as part of the DataScale SN30 rack delivery. It’s not usually necessary to modify the network configuration upon delivery, although there might be situations where the network has to be reconfigured later.
You can change the network settings by running the network-settings command, as shown below.
Table 5 describes the command options.
root@xrdu:~# network-settings [-h] -i [IPADDRESS] -n [NETMASK] -g [GATEWAY] -d [DNS] [{static,DHCP}]| Option | Function |
|---|---|
|
Specify the network mode. |
|
Show the help message and exit. |
|
IP address for static connection. |
|
Netmask number for static network mode (between 0 to 32). Use any number for DHCP. |
|
Gateway for static connection. |
|
DNS for static connection. |
-
Set the IP address configuration using the
network-settingscommand.Example 1: Set a static IP address of 10.10.0.15 on a /24 subnet with gateway address 10.10.0.1 and a DNS server on 10.0.0.13:
root@xrdu:~# network-settings -i "10.10.0.15" -n 24 -g "10.10.0.1" -d "10.0.0.13" static
Modifiying network settings ...
Toggling network settings ...
Example 2: Set the network mode to DHCP:
root@xrdu:~# network-settings -i "" -n 0 -g "" -d "" DHCP Modifiying network settings ... Toggling network settings ... -
After you successfully run the command, restart the network service to ensure that the configuration is set and running:
root@xrdu:~# systemctl restart systemd-networkd.serviceAt this point, the current
sshsession should have been terminated or be in a hung state. -
Open a new terminal and log in to the DataScale SN30-2 BMC:
$ ssh root@<SN30-2_New_BMC_IP_Address> Password: <Enter root password> -
To confirm the IP address configuration, run the
ip addresscommand. In the command output, the assigned IP address appears as the secondinetvalue undereth0.root@xrdu:~# ip address 1: lo: <LOOPBACK,UP,LOWER_UP> mtu 65536 qdisc noqueue qlen 1000 link/loopback 00:00:00:00:00:00 brd 00:00:00:00:00:00 inet 127.0.0.1/8 scope host lo valid_lft forever preferred_lft forever inet6 ::1/128 scope host valid_lft forever preferred_lft forever 2: eth0: <BROADCAST,MULTICAST,UP,LOWER_UP> mtu 1500 qdisc pfifo_fast qlen 1000 link/ether XX:XX:XX:XX:XX:XX brd ff:ff:ff:ff:ff:ff inet 169.254.192.89/16 brd 169.254.255.255 scope link eth0 valid_lft forever preferred_lft forever inet 10.10.0.15 brd 10.10.0.255 scope global dynamic eth0 valid_lft 40746sec preferred_lft 40746sec inet6...
6.5. Configure the DataScale SN30-2 hostname
To configure or modify the DataScale SN30-2 hostname, follow these steps:
-
Log in to the DataScale SN30-2 BMC:
$ ssh root@<SN30-2_BMC_IP_Address> Password: <Enter root password> -
Run the following command to configure or modify the DataScale SN30-2 hostname:
root@xrdu:~# hostnamectl set-hostname <hostname> -
To see the new hostname, log out and log back in to the DataScale SN30-2 BMC.
7. Monitor and debug the DataScale SN30 rack
The DataScale® SN30 rack supports standard methods to monitor and triage the system. This page includes some tasks you can perform, such as examining log files, and also explains how collect diagnostic information for use with SambaNova support.
7.1. Overview of tools and logs
Several tools and logs can help you resolve problems. Here’s an overview:
| Task | Tool | See |
|---|---|---|
Check the status of the DataScale SN30-2 RDU module |
xrdutool |
|
Configure SNMP alerts for third-party rack components. |
SNMP alerts |
|
Diagnose problems with logs. |
OS logs, BMC logs, compiler logs, application logs |
|
Check and manage SND, view SND logs. |
SND (SambaNova Daemon) |
|
Debug model compilation, running models, and third-party components |
Misc. tools and logs |
If you cannot resolve the issues yourself, create a support case and include diagnostic materials. See View SN30-H BMC diagnostic information and logs.
7.2. View xrdutool diagnostics and logs
You use the xrdutool tool and logs to diagnose a DataScale SN30-2 issue
and to collect information for SambaNova Support to triage an issue.
The tool gets the status of the DataScale SN30-2 RDU module that the tool is run on.
Use the tool to check the overall status of the DataScale SN30-2 RDU module and of the hosted RDUs and memory. Follow these steps to examine the output on the power and fault status of the DataScale SN30-2 board:
-
Log in to the DataScale SN30-2 RDU module’s BMC that is having problems:
$ ssh root@<BMC_IP_Address> Password: <Enter root password> -
Run the
xrdutoolcommand:root@xrdu:~# xrdutool status -
Examine the output, which gives a quick view into the state of the DataScale SN30-2 RDU module along with two RDUs and the RDU controller. The output:
-
Shows whether any faults have been detected.
-
Shows the power state of the DataScale SN30-2 RDU module and of the RDU.
-
Here’s an example:
Power is on
RDU-C Release Version: 4.4.0
RDU-C BuildDate: 10.17 1654   DesignVer: 69   BoardID: 60
XRDU_0: STATUS
--------------------------------------------------------
SYSTEM :  rdu3    rdu2    rdu1    rdu0    stby    ps      pex0    pex1    sys     p3v3        mss_op_state   mss_log_level
           1       1       1       1       1       1       1       1       1       1               4               1
--------------------------------------------------------
RDU_0/D_0  0935a00001f1d6a4 102007b367359895     RDU_0/D_1  09a6c000012eda24 605007b367359895     ON. Please verify rdu_pwr_status[0] value to determine faults
--------------------------------------------------------
ENABLES:  vddo    pvpp            pvdd    pvddq           pvtt            pavddh  pavdd   vddc
           1       1               1       1               1               1       1       1
PWRGOOD:  vddo    pvpp0   pvpp1   pvdd0    pvdd1  pvddq0  pvddq1  pvtt0   pvtt1   pavddh  pavdd   vddc0   vddc1   vddc2   vddc3
           1       1       1       1       1       1       1       1       1       1       1       1       1       1       1
--------------------------------------------------------
RDU_1/D_0  09e9a00001a5dc64 502807b367359895     RDU_1/D_1  08e8200000bedd24 107007b367359895     ON. Please verify rdu_pwr_status[1] value to determine faults
--------------------------------------------------------
ENABLES:  vddo    pvpp            pvdd    pvddq           pvtt            pavddh  pavdd   vddc
           1       1               1       1               1               1       1       1
PWRGOOD:  vddo    pvpp0   pvpp1   pvdd0    pvdd1  pvddq0  pvddq1  pvtt0   pvtt1   pavddh  pavdd   vddc0   vddc1   vddc2   vddc3
           1       1       1       1       1       1       1       1       1       1       1       1       1       1       1
--------------------------------------------------------
PEX_0:   fpga_p0v8_pex_pgd2   pg_p1v25_pex   pg_p1v8_pex_pll   fpga_pg_p1v8_pex
               1               1               1               1
--------------------------------------------------------
PEX_1:   fpga_p0v8_pex_pgd2   pg_p1v25_pex   pg_p1v8_pex_pll   fpga_pg_p1v8_pex
               1               1               1               1
--------------------------------------------------------
rduc_pwr_status[0] = 0x7fff
rduc_pwr_status[1] = 0x7fff
pex_pwr_status[0] = 0x7f
pex_pwr_status[1] = 0x7f
power_status_aggregate = 0x7fff
Board Type: 3
NUM_RDUS: 2
NUM_DIE_PER_RDU: 2
NUM_DIES: 4
In addition to collecting diagnostic information from the SN30-2 RDU module directly, you can get health status of all the SN30-2 RDU modules in the SN30-8 node by using the SambaNova Fault Management (SNFM) utility that comes pre-installed on the host. See the SambaNova Fault Management (SNFM) User Guide in the SambaNova Runtime documentation in the SambaNova documentation portal (https://docs.sambanova.ai).
For details on diagnosing a DataScale SN30-2 RDU module’s BMC and on collecting the required diagnostic and log material, see KB article #1024, "DataScale SN30-2 Diagnostic Collection", in the SambaNova Support portal.
7.3. Set up SNMP alerts
To configure SNMP alerts for non-SambaNova components in the DataScale SN30 rack, see the vendor-specific documentation.
7.4. Viewing system logs
You can use the following log files to identify and resolve issues with the system or an application:
-
OS logs
-
BMC logs
-
SambaNova compiler logs
-
Application logs
7.4.1. OS logs
SambaNova does not alter the logs or log directories for Red Hat Enterprise Linux or Ubuntu. The /var/log/ directory contains most of the logs and other log tools such as journalctl.
7.4.3. SambaNova compiler logs
Additional logs for the compilers are available in a user-specified directory that was specified at the time the models were compiled. These logs are fairly low level and are requested by SambaNova Support to troubleshoot issues. For details, see Collect diagnostic materials for SambaNova Support.
You can use different compiler log verbosity settings to debug issues. See the SambaFlow Runtime document for details.
7.4.4. Runtime logs
The following log files related to SambaNova are in the /var/log/sambaflow/runtime/ directory:
|
Logs related to SambaNova graph operations. Events received by the graph process and graph-specific events (including errors) that are not logged to |
|
SambaNova daemon (SND) system logs. Summary of RDU resources and hardware error events. |
Additional log events such as kernel logs (from the RDU driver module) go to dmesg(1).
| You can use different log verbosity settings to get more logging details for the SambaFlowTM Runtime and other SambaFlow components. See "Changing Runtime Log Levels" in the SambaNova Runtime Guide. |
7.5. SambaNova daemon (SND) diagnostics
The SambaNova daemon (SND) is running on the DataScale SN30-H host module and manages several critical pieces of the SambaNova operation. The SND is responsible for:
-
Loading and unloading the RDU drivers
-
Initializing RDU system resources
-
Managing hardware faults for the RDU system
-
Enabling the debugging of the RDU system’s hardware resources
The SND is required to run graphs and models because:
-
The SND handles the RDU drivers and the initialization of RDU resources.
-
The SND is aware of issues with RDU resources and can avoid problematic resources.
The SND starts automatically:
-
At boot time of the DataScale SN30-H OS and starts the discovery and initialization of the RDUs. This is why it is important to power on the DataScale SN30-2 RDU modules first, before powering on the SN30-H host module.
-
When the SambaFlow package is installed. In this case, the SND waits a few minutes after the installation for the RDU system discovery and initialization processes to complete.
7.5.1. Check SND status
To check the status of the SND, run the systemctl status snd command. Below is sample output showing what the command might return:
$ sudo systemctl status snd
● snd.service - SN Devices Service
     Loaded: loaded (/lib/systemd/system/snd.service; enabled; vendor preset: enabled)
    Drop-In: /etc/systemd/system/snd.service.d
             └─override.conf
     Active: active (running) since Wed 2022-10-19 07:10:10 PDT; 3h 24min ago
   Main PID: 5263 (snd)
      Tasks: 10 (limit: 629145)
     Memory: 164.9M
     CGroup: /system.slice/snd.service
             └─5263 /opt/sambaflow/bin/snd
7.5.2. Start, stop, and restart SND
You can start, stop, and restart the SND with the following commands:
To start the SND:
$ sudo systemctl start sndTo stop the SND:
$ sudo systemctl stop sndTo restart the SND:
$ sudo systemctl restart snd7.5.3. Use SND for debugging
The SND CLI provides physical visibility into the entire DataScale SN30-8 system. This allows complete access to the RDU system for debugging, triage, and validation efforts.
The SND is also responds to error events that occur on the RDU and on the entire DataScale SN30-2 RDU module.
All logs from the SND are written to /var/log/sambaflow/runtime/snd.log.
This log provides a summary of the RDU resources available to the system
and includes any hardware error events that occur.
The information is useful for diagnosing and resolving hardware issues.
7.6. Debugging DataScale SN30 issues
Troubleshooting might require that you debug issues with the following DataScale SN30 rack components:
-
Compilation of models
-
Running of models
-
Third-party components
7.7. Debug model compilation
For problems that occur while compiling models, run the following command and examine the logs that are generated in the user-specified output directory:
$ python <model_script.py> compile --output-folder=<output_directory>You can set different levels of logging verbosity when you compile a model. See Collect diagnostic materials for SambaNova Support for best practice when creating a support case.
7.7.1. Debug running models
For problems that occur while running models, use these resources:
-
The
/var/log/sambaflow/runtime/log filesThese logs provide an initial glance into an issue that is occurring while running a model. If a problem does occur and is reproducible, enable more logging verbosity for SambaFlow Runtime. See the "Changing Runtime Log Levels" section of the SambaNova Runtime Guide for details.
-
The SambaNova Fault Management (SNFM) tool
The SNFM tool provides a framework to
-
Monitor, log, and clear various faults associated with a DataScale SN30-2 RDU module
-
Provide corrective actions to recover from these faults.
This capability is built into the SambaNova daemon (SND) and installed as part of SambaFlow. See "SambaNova Fault Management (SNFM) User" in the SambaNova Runtime Guide for details.
7.7.2. Debug third-party components
For operational issues with the third-party components in the DataScale SN30 rack, see the vendor-specific documentation. For issues that require additional support or for questions related to troubleshooting, open a support case through SambaNova Support. See KB article #1017, "SambaNova Systems Support Best Practices," at https://support.sambanova.ai.
| Do not open a case directly with the product vendor. |
7.8. Collect diagnostic materials for SambaNova Support
When you open a support case, provide details on the issue that has occurred, and initial diagnostic materials. For collecting diagnostic materials, See the following KB articles in the SambaNova Support portal:
-
DataScale SN30-2 Diagnostic Collection: KB article #1024
-
DataScale SN30-H BMC Diagnostic Collection: KB article #1039
-
DataScale SN30-H (Red Hat Enterprise Linux) Diagnostic Collection: KB article #1039
-
DataScale SN30-H (Ubuntu) Diagnostic Collection: KB article #1039
-
Ethernet Data Switch Diagnostic Collection: KB Article #1053
-
Access Switch Diagnostic Collection: KB article #1053
-
Serial Console Server Diagnostic Collection: KB article #1121
-
PDU Diagnostic Collection: KB article #1120
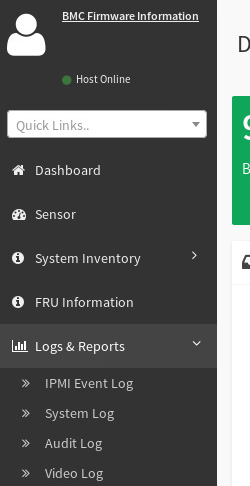
7.9. View SN30-H BMC diagnostic information and logs
To quickly identify a system’s status and view diagnostic information and logs for the DataScale SN30-H BMC, follow these steps:
-
Log in to the BMC’s Web UI and view the BMC dashboard.
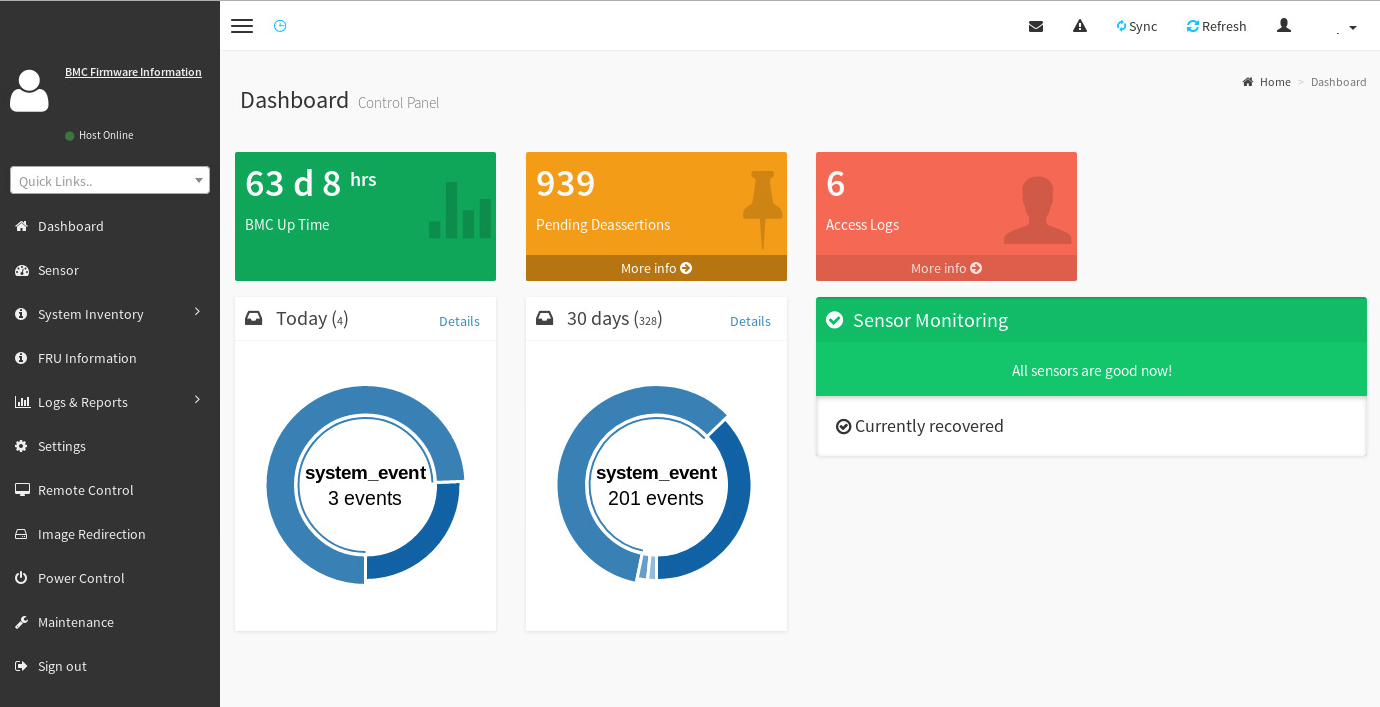
-
For details on logs and pending events/deassertions, click the More info link in each box.
-
To find more logs and reports, click Logs & Reports in the left pane and select a log.
See KB article #1039, “Diagnostic Data Collection Tool(samba_diag),” in the SambaNova Support portal (https://support.sambanova.ai) for details on:
-
Diagnosing a DataScale SN30-H host module’s BMC
-
Diagnosing the DataScale SN30-H host module in general
-
Collecting the required diagnostic materials and logs.
8. Back up and restore components
Use your site-specific guidelines and tools for backing up and restoring components of the DataScale® SN30 rack.
If you change the standard configuration of the networking equipment that is shipped to you, save the configuration changes you make to the devices. For details, see the SambaNova Day 1 Document and the KB articles listed below. You can find KB articles in the SambaNova Support portal at https://support.sambanova.ai.
8.1. Recover the Juniper access and data switch
For the process to recover the Juniper access switch and data switch, see the following KB articles:
-
Juniper Switch Password Recovery: KB article #1056
-
Juniper Switch Factory Reset Recovery: KB article #1056
-
Juniper Switch Saving Running Configuration: KB article #1056
8.2. Recover the Latronix serial console server
For the process to recover the Lantronix serial console server, including recovering the sysadmin password, see the following KB articles:
-
Lantronix Serial Console Server Password Recovery: KB article #1059
-
Lantronix Serial Console Server Factory Reset Recovery: KB article #1059
-
Lantronix Serial Console Server Saving Running Configuration: KB article #1059
8.3. Recover the DataScale SN30-H host module
If the DataScale SN30-H OS needs to be recovered, and the SN30-H host boot partitions are not damaged, contact SambaNova Support. Recovering the SN30-H OS to factory baseline might be possible and a faster recovery option than using the recovery ISOs.
For the processes to recover the DataScale SN30-H host module, see the following KB articles:
-
DataScale SN30-H OS Recovery Using the Recovery ISO – Ubuntu: KB article #1051
-
DataScale SN30-H OS Recovery Using the Recovery ISO – Red Hat: KB article #1099
-
DataScale SN30-H BMC Password Recovery: KB article #1021
-
DataScale SN30-H BMC Non-Corruption Recovery: KB article #1038
8.4. Recover the DataScale SN30-2 RDU module
For the process to recover the DataScale SN30-2 RDU module, refer to the following KB article:
-
SambaNova DataScale SN30-2 BMC Password Recovery: KB article #1049
8.5. Upload recovery configuration files
For the process to upload configuration files used as part of the recovery process for some of these components, see the following KB articles:
-
Uploading Configuration Files for Recovery: KB article #1055
-
Listing and Downloading Configuration Files for Recovery: KB article #1044
For questions concerning any of these recovery KB articles or for anything that is not covered here, open a support case through the SambaNova Support portal (https://support.sambanova.ai).