Foundation Services Rack administration
Copyright © 2020-2023 by SambaNova Systems, Inc. All contents are subject to a licensing agreement with SambaNova Systems, Inc. Any disclosure, reproduction, distribution, reverse engineering, or any other use made without the advance written permission of SambaNova Systems, Inc. is unauthorized and strictly prohibited. All rights of ownership and enforcement are reserved.
1. Get started with DataScale Foundation Services Rack administration
This SambaNova DataScale® Foundation Services Rack administration document targets Foundation Services Rack v1.
This page gets you started:
-
Learn about SambaNova support, SambaNova documentation, and other resources.
-
Get an overview of the Foundation Services Rack components.
| See the Foundation Services Rack hardware installation documentation for details on hardware installation requirements and tasks. |
1.1. SambaNova support
SambaNova customers that have valid support contracts can contact support and obtain product support documentation through the SambaNova support portal at https://support.sambanova.ai.
1.2. SambaNova documentation
As part of hardware installation, you might need SambaNova documentation, SambaNova KBs, and third-party documentation.
-
SambaNova product documentation: https://support.sambanova.ai.
-
SambaNova knowledge base (KB) articles: https://support.sambanova.ai.
1.3. Third-party documentation
For operational issues with the third-party components in the Foundation Services Rack, see the following vendor-specific product documentation. If you need additional support or have troubleshooting questions related to troubleshooting, open a support case through SambaNova Support. See KB article #1017, "SambaNova Systems Support Best Practices," at https://support.sambanova.ai.
| Do not open a support case with the product vendor. Direct all support requests to SambaNova Support first. |
-
Lantronix® SLC8000 serial console server:
https://cdn.lantronix.com/wp-content/uploads/pdf/900-704-RZ-SLC-UG-release.pdf -
Juniper EX4300 access switch:
https://www.juniper.net/documentation/product/en_US/ex4300 -
Juniper QFX5130 Ethernet high-bandwidth data switch (for the data network):
https://www.juniper.net/documentation/product/us/en/qfx5130/ -
Vertiv UU30010L (switched PDU):
https://www.vertiv.com/globalassets/products/critical-power/power-distribution/vertiv-geist-power-distribution-upgradeable-installeruser-guide.pdf
1.4. Overview of Foundation Services Rack hardware
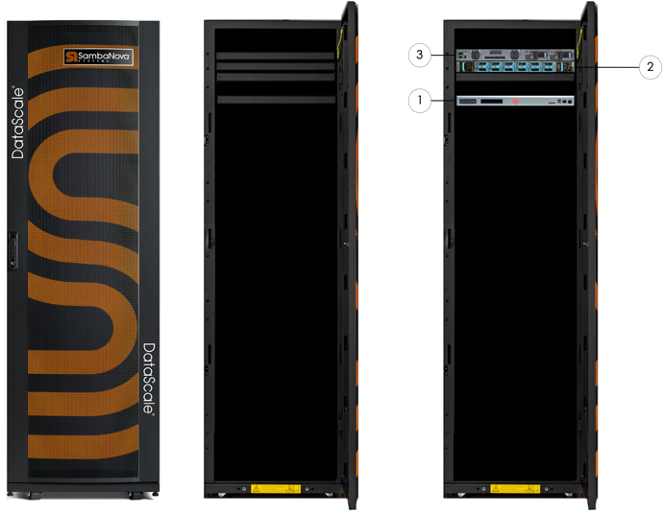
The Foundation Services Rack is a self-contained standard 42 rack unit (RU) datacenter rack. The Foundation Services Rack provides a centralized networking location for intra-connectivity of multiple SambaNova DataScale® racks and uplink connectivity to the customer’s network. The centralized networking that the Foundation Services Rack provides ensures a known level of performance for the high-speed data network and reduces the number of connections that the customer needs for the management and access networks. Network switches are installed at the top of the rack.

| No. | Component |
|---|---|
1 |
Lantronix® serial console server |
2 |
Juniper® QFX5130 Ethernet (fan side) |
3 |
Juniper EX4300 behind (fan side) |
2. Network administration
This page has information about network administration for the Foundation Services Rack.
-
Pointers to third-party documents for the network devices.
-
Instructions for changing passwords for the network devices.
Most users do not significantly change the configuration of the serial console server or the Juniper switches. These devices come pre-configured for each customer based on the information supplied in the site survey that was completed prior to shipment. This topic discusses only tasks that you’re likely to perform and includes example IP addresses.
For more information:
-
About general configuration and maintenance of the network devices in the Foundation Services Rack, see Third-party documentation.
-
About port connection details, see the Foundation Services Rack hardware installation document.
2.1. Default username and passwords
The following table shows several components in the Foundation Services Rack that have default passwords for users with administrative/root credentials.
| SambaNova highly recommends that you change these default passwords as soon as possible. See Section 2.2. |
| Component | Username | Default password |
|---|---|---|
Lantronix serial console server |
|
|
Juniper QFX5130 high-bandwidth Ethernet data switch |
|
|
Juniper EX4300 access switch |
|
|
VertivTM PDU |
|
|
| SambaNova highly recommends that you change the default passwords at first login. |
2.2. How to change passwords for switches
This section gives instruction for changing passwords on switches. See Section 2.1
2.2.1. Juniper EX4300 access switch and QFX5130 data switch
Change password for the Juniper EX4300 access switch and QFX5130 data switch:
-
Run the following commands:
$ ssh root@<Juniper_switch_IP_address> root@:RE:0% cli root> configure root# set system root-authentication plain-text-password New password: <type_password> Retype new password: <type_password> root# commit -
Log out of the switch by using the
exitcommand 3 times (exit config mode, exit operational mode, exit the Linux CLI) -
Log back in with the new password.
2.3. Patch releases for network devices
SambaNova provides a periodic patch release for these network devices.
Customers can download these patches from the SambaNova ext-infra-patch repository.
See KB article #1062 "Listing and downloading available SambaNova firmware" for details.
Patch release notes explain any steps that differ from the standard steps described in the product administration documentation.
| SambaNova does not qualify all firmware releases from device manufacturers. Apply only SambaNova approved firmware updates. |
3. Foundation Services Rack power management
For proper operation of the Foundation Services Rack and to prevent issues, be sure you power on and power off the system appropriately and in the correct sequence, as described on this page.
3.1. Warnings and general notes
The following notices apply to the Foundation Services Rack.
| Some components within the rack work at high voltage. To prevent personal injury and voiding of the warranty, do not attempt to service components except where noted. |
| To protect the Foundation Services Rack from interference and to prevent damage to its components, keep the front and rear rack doors closed during standard operation. |
| To prevent Foundation Services Rack components from overheating, keep the front and rear of the rack clear of obstructions to allow proper airflow. |
| Before powering on the Foundation Services Rack, read Foundation Services Rack hardware installation documentation (at https://docs.sambanova.ai) to ensure that you understand any known issues or limitations. |
| Do not power off or reboot the Foundation Services Rack components during any firmware update procedure. Doing so might damage the Foundation Services Rack components, and damaged components might not be recoverable. Perform a shutdown or reboot only after a firmware update has been completed. |
| When the PDUs are physically connected to the datacenter’s power receptacles and power is applied to the rack, all Foundation Services Rack components begin to power on. The fans of these components initially run at full speed but eventually ramp down after the BMCs finish their boot sequence. Power is not immediately applied to the rack components because the breakers on the PDUs are turned off. You must manually turn on these breakers to begin feeding power to the Foundation Services Rack components. |
| Some devices in the Foundation Services Rack take longer than others to complete their power on boot sequence. Those devices may prevent access to other devices that boot faster until all devices have fully booted. |
3.2. Power on the Foundation Services Rack
-
To power on the rack, turn on the six circuit breakers for each PDU.
When the PDUs are plugged into the datacenter power and you close the circuit breakers, power is automatically applied to the Foundation Services Rack components.
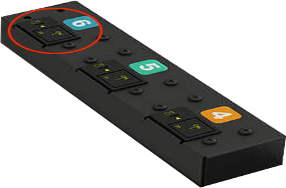
Figure 1 shows what a PDU circuit breaker group looks like and shows breaker switch 6 circled. Each PDU has a bank of three circuit breakers grouped together.

The networking equipment in the Foundation Services Rack completely boots when power is applied. There is no need to manually power on these devices.
SambaNova uses networking equipment from other suppliers. See Third-party documentation.
3.3. Gracefully shutting down the Foundation Services Rack
The switches and Serial Console Server are stateless devices and should not be harmed by unexpected shutdowns. However, to prevent the devices from logging unexpected power downs and showing that information when you power back up, it’s best to power off any devide from the GUI or CLI if available.
| Power off the Juniper EX4300 switch last. Access to some other devices requires that the switch is working. |
-
Shut down the Juniper QFX5130 high-bandwidth data switch, the Lantronix SLC8000 serial console server, and the Juniper EX4300 access.
-
When you power down the entire Foundation Services Rack, shut down the Juniper EX4300 access switch last, because that switch provides the network access to the system via the 1GbE network.
See the product-specific documentation listed under Third-party documentation for information on how to shut down each of these network devices.
| After shutting down these switches, you can no longer access the PDUs to cycle outlets because their network switch is down. You have to break and manually remake the relevant breakers from the physical PDU to properly cycle power. Alternatively, you can access the PDUs via their serial ports and use their CLIs. |
4. Monitor and debug the Foundation Services Rack
The Foundation Services Rack supports standard methods for monitoring and triaging the system. This page includes some tasks you can perform, such as examining log files, and also explains how to collect diagnostic materials for use with SambaNova support.
| If you cannot resolve the issues yourself, create a support case and include diagnostic materials. |
4.1. Set up SNMP alerts
To configure SNMP alerts for non-SambaNova components in the Foundation Services Rack, see the vendor-specific documentation.
4.2. Debug third-party components
For operational issues with the third-party components in the Foundation Services Rack, see the vendor-specific documentation. For issues that require additional support or for questions related to troubleshooting, open a support case through SambaNova Support. See KB article #1017, "SambaNova Systems Support Best Practices," at https://support.sambanova.ai.
| Do not open a case directly with the product vendor. |
4.3. Collect diagnostic materials for SambaNova Support
When you open a support case, provide details on the issue that has occurred, and initial diagnostic materials. For collecting diagnostic materials, see the following KB articles in the SambaNova Support portal:
-
Ethernet Data Switch Diagnostic Collection: KB Article #1053
-
Access Switch Diagnostic Collection: KB article #1053
-
Serial Console Server Diagnostic Collection: KB article #1121
-
PDU Diagnostic Collection: KB article #1120
5. Back up and restore components
Use your site-specific guidelines and tools for backing up and restoring components of the Foundation Services Rack.
If you change the standard configuration of the networking equipment that is shipped to you, save the configuration changes you make to the devices. For details, see the KB articles listed below. Customers can access KB articles in the SambaNova Support portal at https://support.sambanova.ai.
5.1. Recover the Juniper access and data switch
For the process to recover the Juniper access switch and data switch, see the following KB articles:
-
Juniper Switch Password Recovery: KB article #1056
-
Juniper Switch Factory Reset Recovery: KB article #1056
-
Juniper Switch Saving Running Configuration: KB article #1056
5.2. Recover the Latronix serial console server
For the process to recover the Lantronix serial console server, including recovering the sysadmin password, see the following KB articles:
-
Lantronix Serial Console Server Password Recovery: KB article #1059
-
Lantronix Serial Console Server Factory Reset Recovery: KB article #1059
-
Lantronix Serial Console Server Saving Running Configuration: KB article #1059
5.3. Upload recovery configuration files
For the process to upload configuration files used as part of the recovery process for some of these components, see the following KB articles:
-
Uploading Configuration Files for Recovery: KB article #1055
-
Listing and Downloading Configuration Files for Recovery: KB article #1044
For questions concerning any of these recovery KB articles or for anything that is not covered here, open a support case through the SambaNova Support portal (https://support.sambanova.ai).