Train jobs
Create a train job
You can fine-tune existing models by creating a training job. Training jobs are long running jobs with their completion time being heavily dependent on the hyperparameters set and the frequency of evaluation. The platform will perform the required data processing, such as tokenization, behind the scenes. You can select either a platform provided dataset or your own dataset.
|
Starting with release 24.1.1, SambaStudio allows you to specify the SambaNova Systems' Reconfigurable Dataflow Units™ (RDUs) generation version to use for training jobs. RDUs can be specified for both GUI and CLI workflows. Contact your administrator for more information on RDU configurations specific to your SambaStudio platform. |
Create a training job using the GUI
Create a training job using the GUI for fine-tuning by following the steps below. After creating your train job, adjust the job’s share settings to share your train job with other users and tenants.
-
Create a new project or use an existing one.
-
From a project window, click New job. The Select a job type window (Figure 1) will appear.
-
Select Training under Select a job type, as shown in Figure 1 and click Continue. The Create a training job window will open.
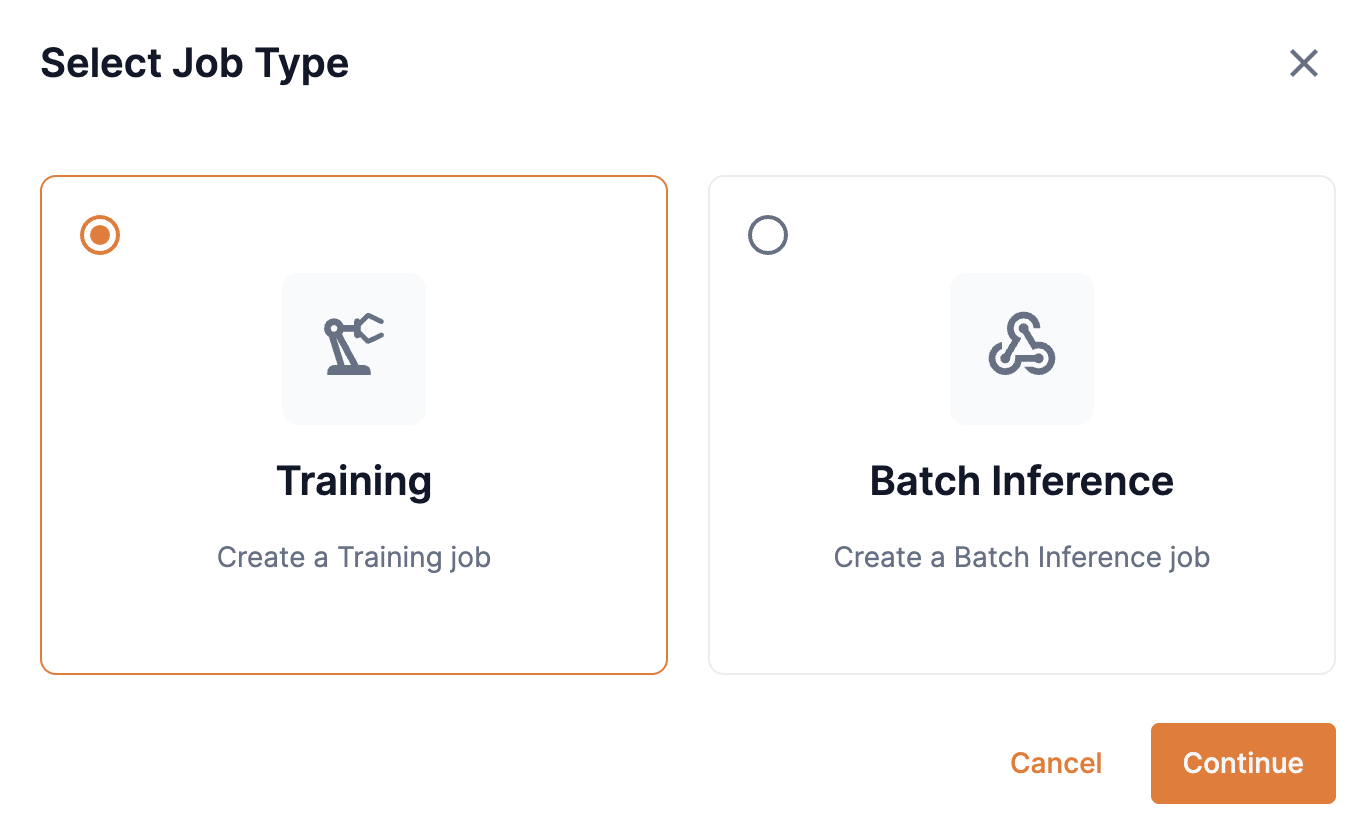 Figure 1. Select job type
Job details pane
The Job details pane in the Create a training job window is the top pane that allows you to setup your training job.
-
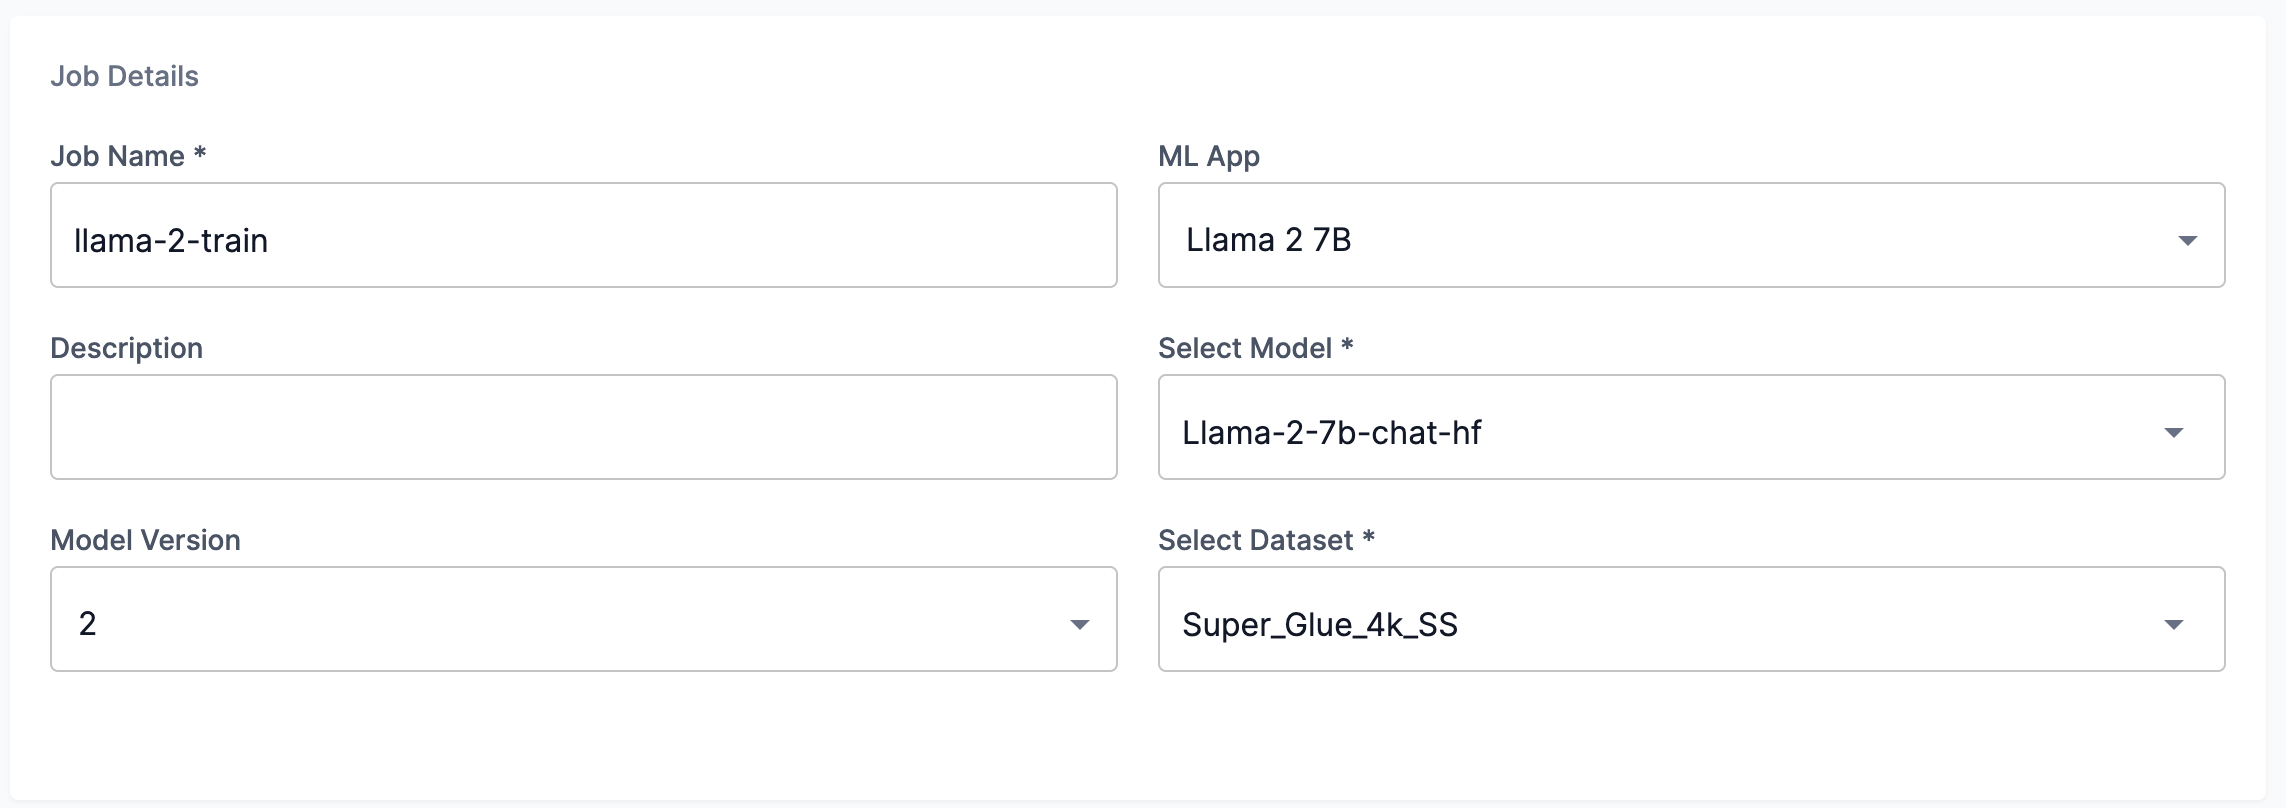
Enter a name for the job into the Job name field, as shown in Figure 2.
-
Select the ML App from the ML App drop-down, as shown in Figure 2.
The ML App selected will refine the models displayed, by corresponding model type, in the Select model drop-down.
-
From the Select model drop-down in the Job details pane (Figure 2), choose My models, Shared models, SambaNova models, or Select from Model Hub.
The available models displayed are defined by the previously selected ML App drop-down. If you wish to view models that are not related to the selected ML App, select Clear from the ML App drop-down. Selecting a model with the ML App drop-down cleared, will auto populate the ML App field with the correct and corresponding ML App for the model.
-
My models displays a list of models that you have previously added to the Model Hub.
-
Shared models displays a list of models that have been assigned a share role.
-
SambaNova models displays a list of models provided by SambaNova.
-
Select from Model Hub displays a window with a list of downloaded models that correspond to a selected ML App, as shown in Figure 3, or a list of all the downloaded models if an ML App is not selected. The list can be filtered by selecting options under Field of application, ML APP, Architecture, and Owner. Additionally, you can enter a term or value into the Search field to refine the model list by that input. Select the model you wish to use and confirm your choice by clicking Choose model.
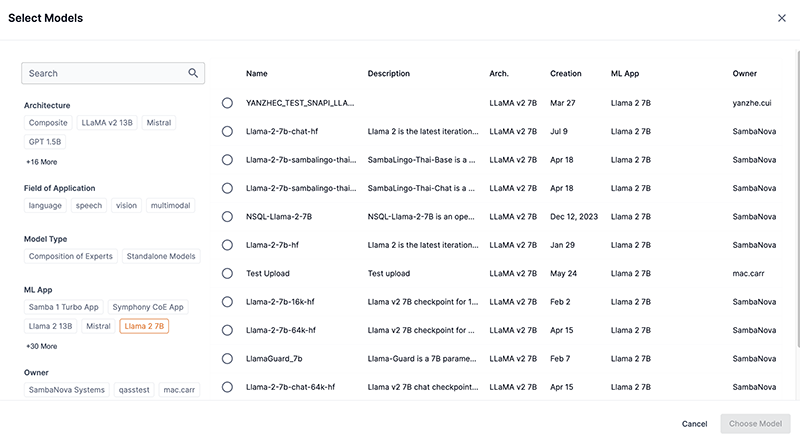 Figure 3. Select from Model Hub
-
-
In the Job details pane, select the version of the model to use from the Model version drop-down, as shown in Figure 2.
-
From the Select dataset drop-down in the Job details pane (Figure 2), choose My datasets, SambaNova datasets, or Select from datasets.
Be sure to select a dataset that is prepared with the appropriate max_seq_length for your chosen model. For example, 13B 8K SS models are compatible with datasets using max_seq_length=8192. 13B 2K SS models are compatible with datasets using max_seq_length=2048.
-
My datasets displays a list of datasets that you have added to the platform and can be used for a selected ML App.
-
SambaNova datasets displays a list of downloaded SambaStudio provided datasets that correspond to a selected ML App.
-
Select from datasets displays a window with a detailed list of downloaded datasets that can be used for a selected ML App, as shown in Figure 4. The My datasets and SambaNova checkboxes filter the dataset list by their respective group. The ML App drop-down filters the dataset list by the corresponding ML App. Select the dataset you wish to use and confirm your choice by clicking Choose dataset.
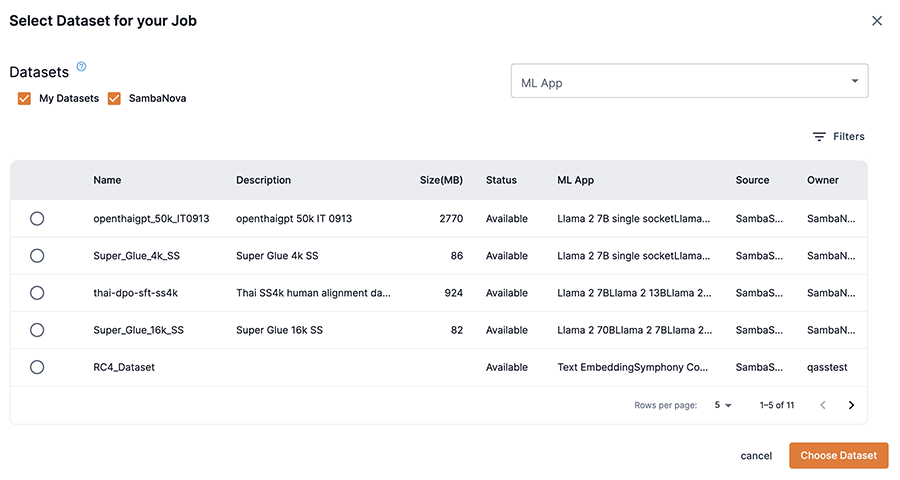 Figure 4. Select from datasets
-
RDU requirements pane
The RDU requirements pane in the Create a training job window will display after selecting a model, as shown in Figure 5. This pane allows you to configure how the available RDUs are utilized.
|
Contact your administrator for more information on RDU configurations specific to your SambaStudio platform. |
- RDU generation drop-down
-
The RDU generation drop-down allows users to select an available RDU generation version to use for a training job. If more than one option is available, the SambaStudio platform will default to the recommended RDU generation version to use based on your platform’s configuration and the selected model. You can select a different RDU generation version to use, if available, than the recommended option from the drop-down.
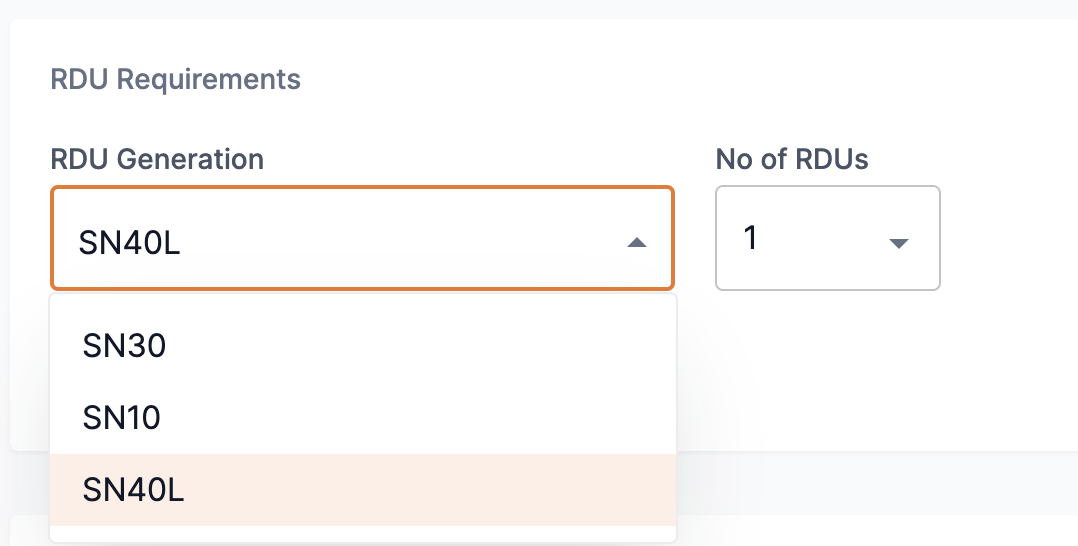 Figure 5. RDU generation
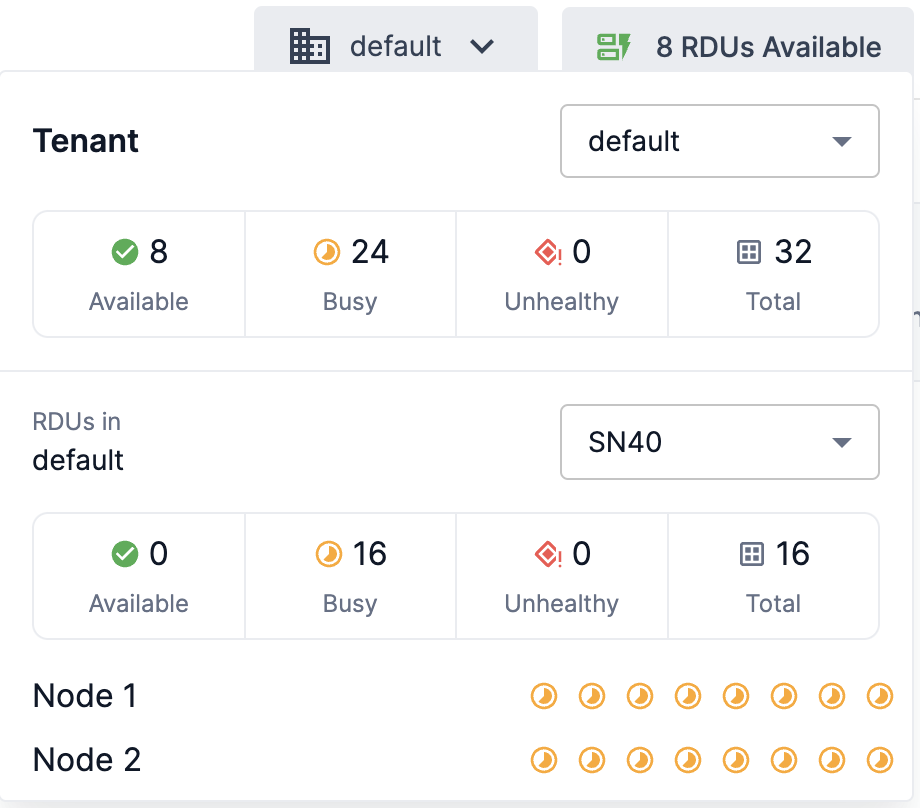
Your job will require the number of available RDUs to be equal to or greater than the number selected in the No of RDUs drop-down to start its training run. The top menu bar displays the current available RDUs for the selected tenant. Click the RDUs Available menu to view the RDUs Available summary and see detailed information for the selected tenant.
- No of RDUs drop-down
-
Models that support multiple RDUs for training will display the No of RDUs drop-down. This drop-down provides the ability to select the number of supported RDUs to utilize based on the selected tenant and model requirements. If you select more than one RDU, the RDUs must be available on the same node.
For any given model, the smallest RDU option describes the number of RDUs required for a training worker as part of the data parallel training setup.
|
Increasing the number of RDUs also increases the global batch size (GBS). Please see Training hyperparameter considerations for more information. |
-
Using the meta-llama-3-8b model as an example, the smallest option represents that 1 RDU is required per worker, as shown in Figure 6.
-
Selecting 1 from the No of RDUs drop-down will assign 1 worker.
-
Selecting 8 from the No of RDUs drop-down will assign 8 workers.
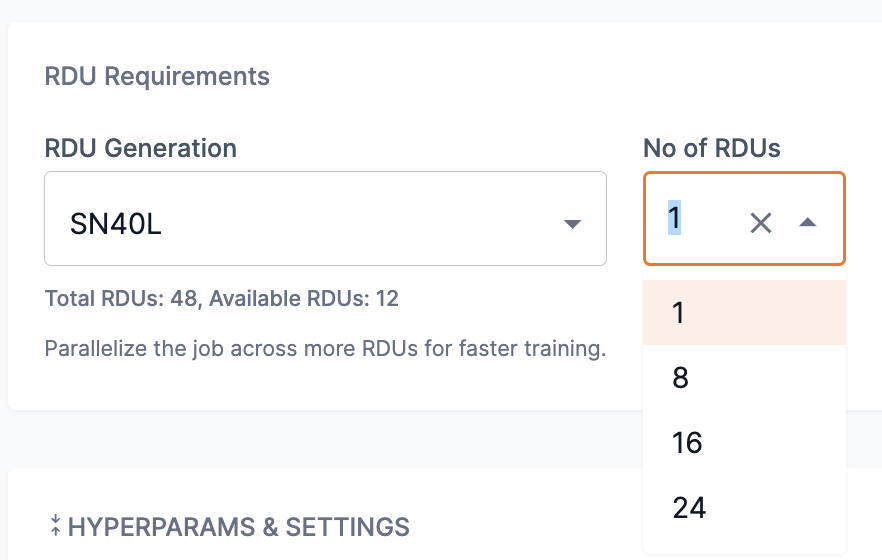 Figure 6. Number of RDUs for meta-llama-3-8b
-
-
Using the meta-llama-3-70b model as an example, the smallest option represents that 4 RDUs are required per worker, as shown in Figure 7.
-
Selecting 4 from the No of RDUs drop-down will assign 1 worker.
-
Selecting 8 from the No of RDUs drop-down will assign 2 workers.
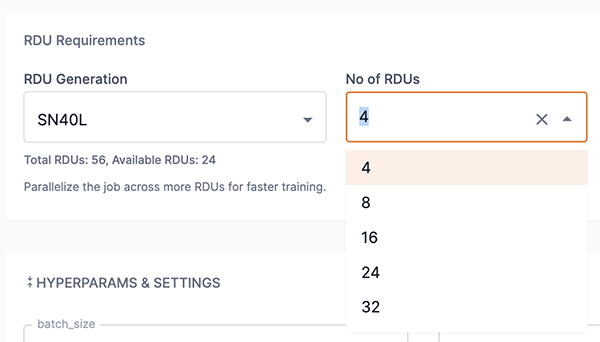 Figure 7. Number of RDUs for meta-llama-3-70b
-
Hyperparams & settings pane
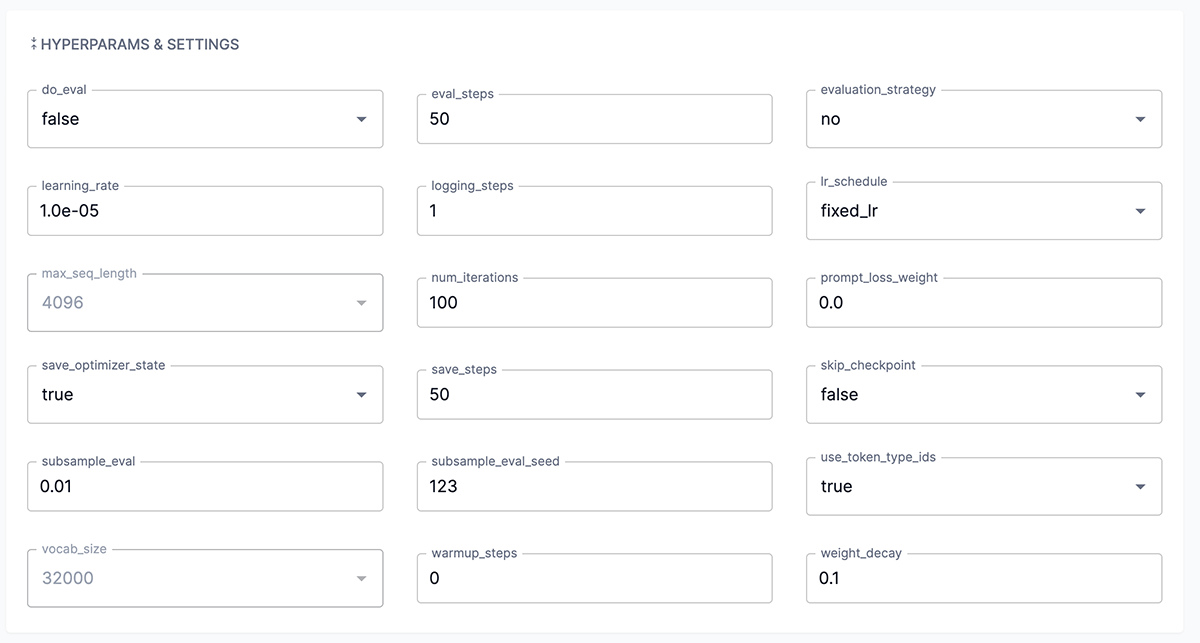
The Hyperparams & settings pane (Figure 8) in the Create a training job window allows you to adjust the settings to govern your training job, or you can use the default values. You can expand the pane by clicking the double arrows.
|
To generate evaluation metrics for your checkpoints, the eval_steps and save_steps hyperparameters must be set to the same value. This ensures that the evaluation is performed on the saved checkpoints. |
Run the train job

-
If the required amount of storage space is not available to create the job, the Insufficient storage message will display describing the Available space and the Required space to create the job. You will need to free up storage space or contact your administrator. Please choose one of the following options.
-
Click Cancel to stop the job from being created. Please free up storage space and then restart the Create a training job using the GUI process.
-
Click Proceed anyway to submit the job to be created. Please free up storage space, otherwise the job will fail to be created and not train.
A minimum of 10 minutes is required after sufficient storage space has been cleared before the job creation will successfully start.
-
Create a train job using the CLI
The example below demonstrates how to create a training job using the snapi job create command. The example below specifies the following:
-
A project to assign the job. Create a new project or use an existing one.
-
A name for the new job.
-
Use train for the --type input. This designates the job to be a training job.
-
A model to use for the model-checkpoint input. The dataset must be compatible with the model you choose.
-
A dataset to use for the dataset input.
-
The RDU architecture generation version to use of your SambaStudio platform configuration for the --arch input.
-
Run the snapi tenant info command to view the available RDU generation version(s) specific to your SambaStudio platform. Contact your administrator for more information on RDU configurations specific to your SambaStudio platform.
-
Run the snapi model info command to obtain the --arch input compatible for the selected model.
-
$ snapi job create \
   --project <project-name> \
   --job <your-new-job-name> \
   --type train \
   --model-checkpoint <model-name> \
   --dataset <dataset-name> \
--arch SN10|
Run snapi job create --help to display additional usage and options. |
Example snapi model info command
The example snapi model info command snippet below demonstrates where to find the compatible --arch input for the GPT_13B_Base_Model when used in a training job. The required value is located on the last line of the example snippet and is represented as 'train': { 'sn10'. Note that this example snippet contains only a portion of the actual snapi model info command response. You will need to specify:
-
The model name or ID for the --model input.
-
Use train for the --job-type input. This returns the 'train': { 'sn10' value, which would be entered as --arch SN10 into the snapi job create command.
Click to view the example snapi model info command snippet.
$ snapi model info \
--model GPT_13B_Base_Model \
--job-type train

               Model Info
             ============
ID                    : 61b4ff7d-fbaf-444d-9cba-7ac89187e375
Name                  : GPT_13B_Base_Model
Architecture          : GPT 13B
Field of Application  : language
Validation Loss       : -
Validation Accuracy   : -
App                   : 57f6a3c8-1f04-488a-bb39-3cfc5b4a5d7a
Dataset               : {'info': 'N/A\n', 'url': ''}
SambaNova Provided    : True
Version               : 1
Description           : This is a randomly initialized model, meant to be used to kick off a pre-training job.

Generally speaking, the process of pre-training is expensive both in terms of compute and data. For most use cases, it will be better to fine tune one of the provided checkpoints, rather than starting from scratch.


Created Time          : 2023-03-23 00:00:00 +0000 UTC
Status                : Available
Steps                 : 0
Hyperparameters              :
 {   'batch_predict': {},
    'deploy': {},
    'train': {   'sn10': {   'imageVariants': [],
Check the job status using the CLI
You can check the job status by running the snapi job info command several times. You should see the status change during the job’s training run. TRAINING indicates the job is performing the task. You will need to specify the following:
-
The name of the project the job is assigned.
-
The name of the job you wish to view.
$ snapi job info \
   --project <project-name> \
--job <job-name>|
Run snapi job info --help to display additional usage and options. |
Activity notifications
The Activity panel displays notifications relevant to a specific job and can be accessed from the job’s Training job details page.
-
Navigate to the Training job details page from the Dashboard or from its associated Project page. Click Activity at the top of the Training job details page to open the Activity panel.
 Figure 10. Activity at top of Train job details
 -
The Activity panel displays notifications specific to the corresponding train job.
-
Similar to the platform Notifications panel, notifications are displayed in a scrollable list and include a detailed heading, a tracking ID, and a creation timestamp.
-
Click Show tracking ID to view the tracking ID for the corresponding notification.
-
Click the copy icon to copy the tracking ID to your clipboard.
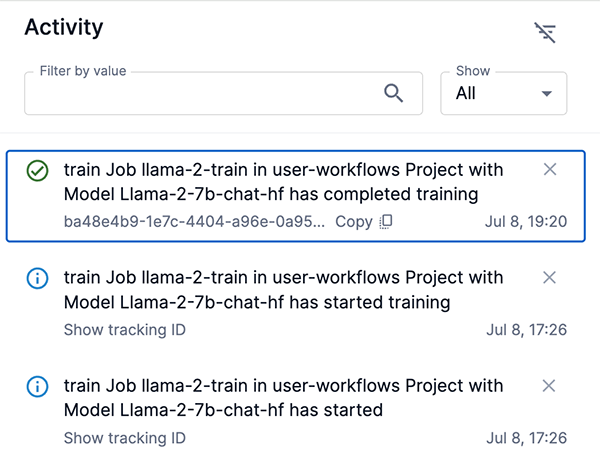 Figure 11. Train job Activity panel
-
NaN errors
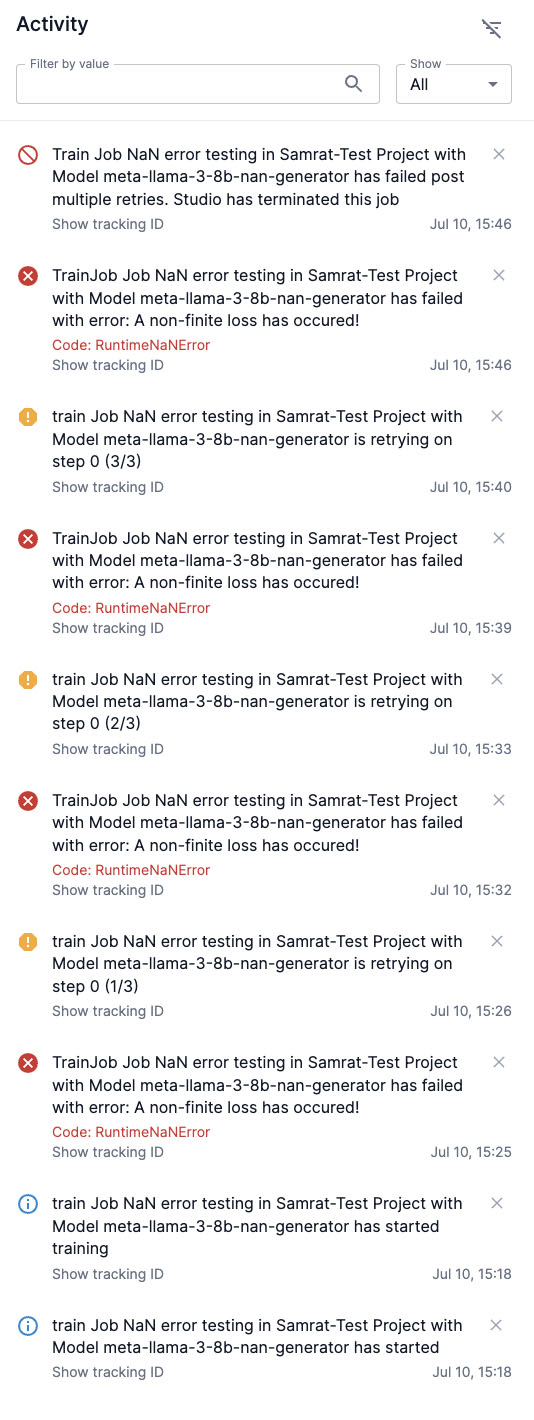
Occasionally, a NaN error might occur when creating a train job. If this happens, SambaStudio will perform the following steps.
-
Detect the error at that step in your train job.
-
Display the error as a notification in the Activity panel with a RuntimeNaNError code.
-
Automatically retry your train job from the last saved checkpoint up to three times with the following outcomes:
-
If any of the three retry attempts do not generate an error, your train job will proceed as usual.
-
If all three attempts generate an error, SambaStudio will terminate your train job, as shown in Figure 12.
-
Evaluate jobs
Evaluate your job by viewing detailed information about its performance using the GUI or CLI.
Evaluate the job using the GUI
During the job run, or after its completion, navigate to the Training job details page from the Dashboard or from its associated Project page to view job information and generated checkpoints. From this page you can evaluate a checkpoints' accuracy, loss, and other metrics to determine if the checkpoint is of sufficient quality to deploy.
View training job details using the GUI
You can view the following information in the Training job details page.

- Model
-
Displays the model name and architecture used for training, as shown in Figure 13.
- Model Version
-
Displays the version of the model that was used for the training job, as shown in Figure 13.
- Dataset
-
Displays the dataset used for training, as shown in Figure 13.
- Dataset Size
-
Displays the size of the dataset used for training, as shown in Figure 13.
- Created On
-
Displays the date when the training job was completed and created, as shown in Figure 13.
- Owner
-
Displays the username of the owner of the training job, as shown in Figure 13.
- Tracking ID
-
As shown in Figure 13, the Tracking ID provides a current ID that can be used to identify and report issues to the SambaNova Support team. Click the copy icon to copy the Tracking ID number to your clipboard.
-
A Tracking ID is created for each new job.
-
A new Tracking ID will be created if a stopped job is restarted.
-
Only jobs created with, or after, SambaStudio release 24.7.1 will display a Tracking ID.
-
- Details & Hyper Parameters
-
Expand the pane by clicking the expander arrow to display the training job parameters and settings, as shown in Figure 14. Hover over the info icon to view a brief description of the parameter/setting.
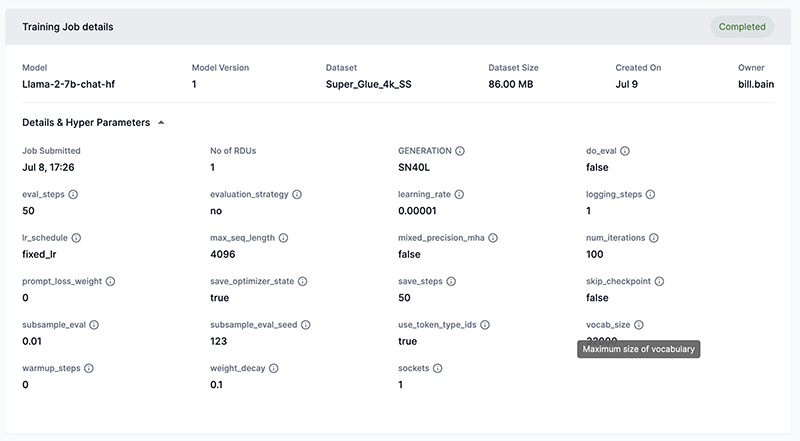 Figure 14. Training job details
- Metrics graph
-
Displays the various metrics generated during the training run.
-
Some models generate a Learning_rate graph. The learning rate graph depicts the learning rate hyperparameter during the training run, allowing you to monitor and optimize the balance between the quality of the final model with the required training time. The logging_steps parameter defines the number of plot points generated on the learning rate graph. For example, with logging steps set to 1, the learning rate graph will generate a point for each step. With logging steps set to 10, the learning rate graph will generate a point at every tenth step.
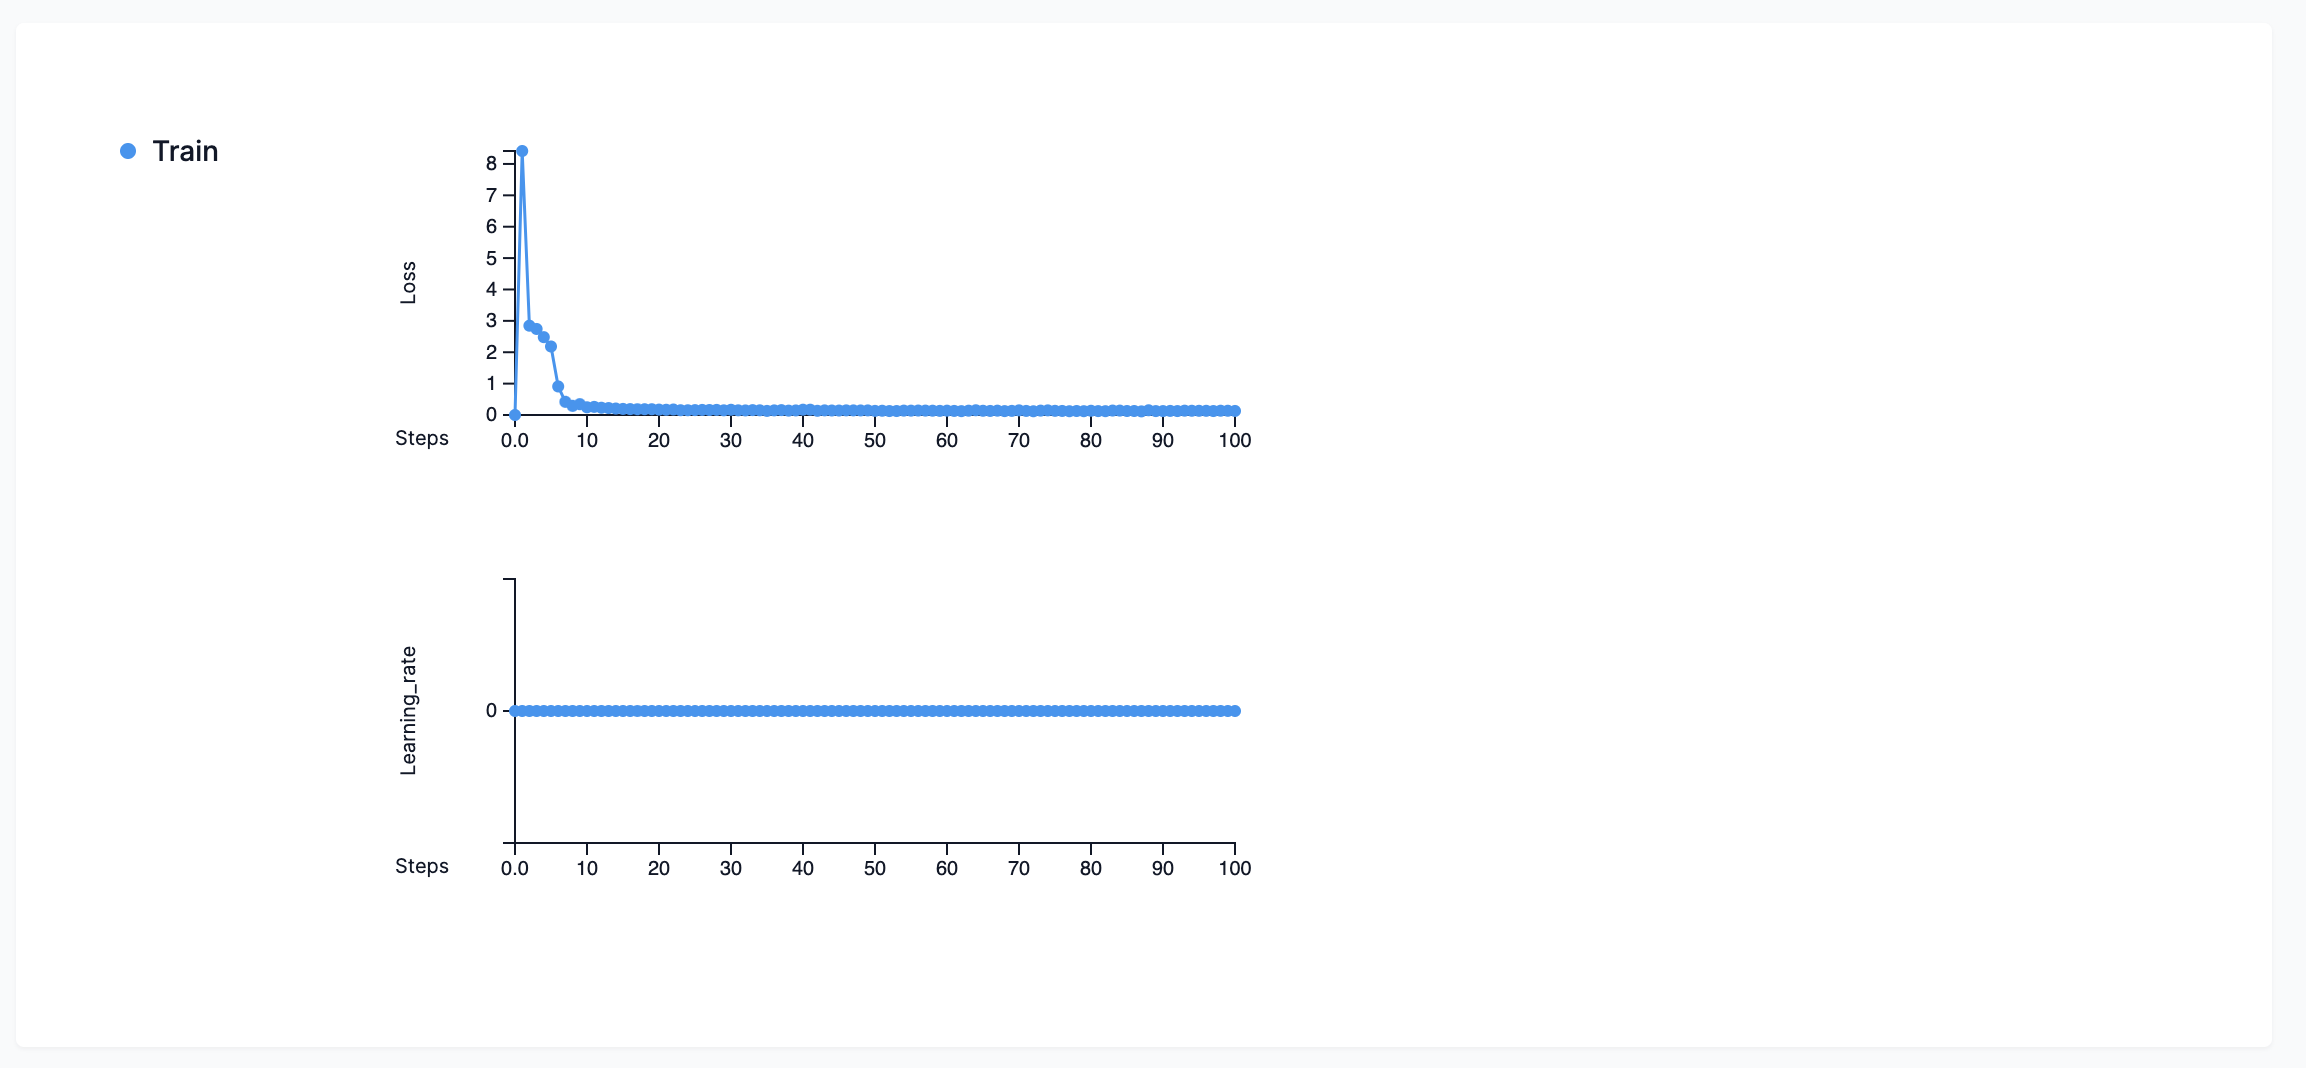 Figure 15. Example metrics graph
-
- Checkpoints table
-
The Checkpoints table displays generated checkpoints of your training run along with the associated metrics of the chosen model.
-
You can customize your view of the Checkpoints table by enabling/disabling columns, from the Columns drop-down, to help you focus on comparing metrics that are relevant to you.
-
Download a CSV file of your checkpoints by clicking Export and selecting Download as CSV from the drop-down. The CSV file will be downloaded to the location configured by your browser.
-
From the kebob menu (three dots) drop-down, you can click Create new job, Save to Model Hub, or Delete for all checkpoints.
 Figure 16. Checkpoints table
-
Evaluate the job using the CLI
Similar to the GUI, the SambaNova API (snapi) provides feedback on job performance via the CLI.
View job information using the CLI
The example below demonstrates the snapi job info command used to provide information about your job, including:
-
Job ID provides the platform assigned ID.
-
RDU Arch provides the RDU generation version used.
-
Project ID provides the platform assigned ID.
-
Status displays the status of the job during its training run.
-
The training settings used for the job.
You will need to specify the following:
-
The project that contains, or is assigned to, the job you wish to view information.
-
The name of the job you wish to view information.
$ snapi job info \
   --project <project-name> \
   --job <job-name>

               Job Info
             ============
Name               : <job-name>
Job ID             : b661c723-4b90-477d-ac81-de6b4151f602
Type               : train
RDU Arch           : sn10
Project ID         : 87deae92-570e-443f-8ae8-4521fb43ad09
Status             : TRAINING
App                : Generative Tuning 1.5B
Dataset            : GPT_1.5B_Training_Dataset
Input path         : common/datasets/ggt_sentiment_analysis/hdf5_single_avoid_overflow/hdf5
Model Checkpoint   : GPT_1.5B_GT_Base_Model
Hyper Parameters   : [{'param_name': 'batch_size', 'value': '16', 'description': 'Number of samples in a batch'}, {'param_name': 'do_eval', 'value': 'true', 'description': 'whether or not to do final evaluation'}, {'param_name': 'eval_steps', 'value': '50', 'description': "Period of evaluating the model in number of training steps. This parameter is only effective when evaluation_strategy is set to 'steps'."}, {'param_name': 'evaluation_strategy', 'value': 'steps', 'description': 'Strategy to validate the model during training'}, {'param_name': 'learning_rate', 'value': '7.5e-06', 'description': 'learning rate to use in optimizer'}, {'param_name': 'logging_steps', 'value': '10', 'description': 'Period of logging training loss in number of training steps'}, {'param_name': 'lr_schedule', 'value': 'cosine_schedule_with_warmup', 'description': 'Type of learning rate scheduler to use'}, {'param_name': 'max_seq_length', 'value': '1024', 'description': 'Sequence length to pad or truncate the dataset'}, {'param_name': 'num_iterations', 'value': '100', 'description': 'number of iterations to run'}, {'param_name': 'precision', 'value': 'bf16_all', 'description': 'Controls which operators will use bf16 v.s. fp32 precision'}, {'param_name': 'prompt_loss_weight', 'value': '0.1', 'description': 'Loss scale for prompt tokens'}, {'param_name': 'save_optimizer_state', 'value': 'true', 'description': 'Whether to save the optimizer state when saving a checkpoint'}, {'param_name': 'save_steps', 'value': '50', 'description': 'Period of saving the model checkpoints in number of training steps'}, {'param_name': 'subsample_eval', 'value': '0.01', 'description': 'Subsample for the evaluation dataset'}, {'param_name': 'subsample_eval_seed', 'value': '123', 'description': 'Random seed to use for the subsample evaluation'}, {'param_name': 'use_token_type_ids', 'value': 'true', 'description': 'Whether to use token_type_ids to compute loss'}, {'param_name': 'warmup_steps', 'value': '0', 'description': 'warmup steps to use in learning rate scheduler in optimizer'}, {'param_name': 'weight_decay', 'value': '0.1', 'description': 'weight decay rate to use in optimizer'}, {'param_name': 'selected_rdus', 'value': '1', 'description': 'Number of RDUs each instance of the model uses'}]
RDUs Needed        : 11111111
Parallel Instances : 8
Created Time       : 2024-01-25T23:11:48.270543+00:00
Updated Time       : 2024-01-25T23:11:49.726331+00:00
Result Path : None|
Run snapi job info --help to display additional usage and options. |
View metrics using the CLI
The example below demonstrates the snapi job metrics command used to provide job performance metrics. You will need to specify the following:
-
The project that contains, or is assigned to, the job you wish to view metrics.
-
The name of the job you wish to view metrics.
|
$ snapi job metrics \
   --project <project-name> \
   --job <job-name>

TRAINING
INDEX        TRAIN_LEARNING_RATE        TRAIN_LOSS        TRAIN_STEPS
  0                  0.0                   0.0                0.0
  1                  0.0                  2.4356              10.0
  2                  0.0                  2.0979              20.0
  3                  0.0                  2.0202              30.0
  4                  0.0                  1.9618              40.0
  5                  0.0                  1.9598              50.0
  6                  0.0                  1.9981              60.0
  7                  0.0                  1.9393              70.0
  8                  0.0                  1.9757              80.0
  9                  0.0                  2.0027              90.0
  10                 0.0                  1.9259             100.0

VALIDATION
INDEX        VAL_STEPS        VAL_LOSS        VAL_STEPS_PER_SECOND
  0             0.0            3.5927                0.1319
  1             50.0           3.8509                0.1319
2 100.0 3.8509 0.132|
Run snapi job metrics --help to display additional usage and options. |
View the checkpoints using the CLI
The snapi checkpoint list command allows you to view the list of generated checkpoints from your job. Any job dependent on a checkpoint will be identified in the DEPENDENT JOBS column, allowing you to identify checkpoints used to create a new training job. You will need to specify the following:
-
The project that contains, or is assigned to, the job you wish to view its generated checkpoints.
-
The name of the job you wish to view its generated checkpoints.
$ snapi checkpoint list \
   --project <project-name> \
   --job <job-name>
CHECKPOINT NAME                                 STEPS        LABELS        VALIDATION LOSS        VALIDATION ACCURACY        CREATED TIME                            DEPENDENT JOBS
3cf2bab6-0343-41d5-9b95-26da07e6201c-50         50           None          3.5927                 None                       2024-01-25T17:03:12.905315+00:00
3cf2bab6-0343-41d5-9b95-26da07e6201c-100 100 None 3.8509 None 2024-01-25T17:35:50.332483+00:00 gpt-13b-from-checkpoint|
Run snapi checkpoint list --help to display additional usage and options. |
View detailed checkpoint information using the CLI
The example below demonstrates the snapi checkpoint info command used to provide detailed information about a checkpoint. You will need to specify the name of the checkpoint, which you can obtain by running the snapi checkpoint list command.
|
'USER_MODIFIABLE': True indicates that the parameter is adjustable. |
Click to view the example snapi checkpoint info command.
$ snapi checkpoint info \
   --checkpoint-name 3cf2bab6-0343-41d5-9b95-26da07e6201c-100

             Checkpoint Info
             ===============
Name                : 3cf2bab6-0343-41d5-9b95-26da07e6201c-100
Application Field   : None
Architecture        : None
Time Created        : 2024-01-25T17:35:50.332483+00:00
Validation Loss     : 3.8509
Validation Acc      : None
ML App              : Generative Tuning 13B
Labels              : None
Job ID              : 3cf2bab6-0343-41d5-9b95-26da07e6201c
Steps               : 100
Dependent Jobs      :
Hyperparameters     : [   {   'CONSTRAINTS': {'values': ['true', 'false']},
        'DATATYPE': 'bool',
        'DESCRIPTION': 'whether or not to do final evaluation',
        'FIELD_NAME': 'do_eval',
        'MESSAGE': 'Value must be one of (True, False)',
        'TASK_TYPE': ['train'],
        'TYPE_SPECIFIC_SETTINGS': {   'train': {   'DEFAULT': 'true',
                                                   'USER_MODIFIABLE': True}}},
    {   'CONSTRAINTS': {'ge': '1'},
        'DATATYPE': 'int',
        'DESCRIPTION': 'Period of evaluating the model in number of training '
                       'steps. This parameter is only effective when '
                       "evaluation_strategy is set to 'steps'.",
        'FIELD_NAME': 'eval_steps',
        'MESSAGE': 'Value must be greater than or equal to 1',
        'TASK_TYPE': ['train'],
        'TYPE_SPECIFIC_SETTINGS': {   'train': {   'DEFAULT': '50',
                                                   'USER_MODIFIABLE': True}}},
    {   'CONSTRAINTS': {'values': ['no', 'steps', 'epoch']},
        'DATATYPE': 'str',
        'DESCRIPTION': 'Strategy to validate the model during training',
        'FIELD_NAME': 'evaluation_strategy',
        'MESSAGE': 'Value must be one of (no, steps, epoch)',
        'TASK_TYPE': ['train'],
        'TYPE_SPECIFIC_SETTINGS': {   'train': {   'DEFAULT': 'steps',
                                                   'USER_MODIFIABLE': True}}},
    {   'CONSTRAINTS': {'ge': '0'},
        'DATATYPE': 'float',
        'DESCRIPTION': 'learning rate to use in optimizer',
        'FIELD_NAME': 'learning_rate',
        'MESSAGE': 'Value must be greater than or equal to 0.0',
        'TASK_TYPE': ['train'],
        'TYPE_SPECIFIC_SETTINGS': {   'train': {   'DEFAULT': '7.5e-06',
                                                   'USER_MODIFIABLE': True}}},
    {   'CONSTRAINTS': {'ge': '1'},
        'DATATYPE': 'int',
        'DESCRIPTION': 'Period of logging training loss in number of training '
                       'steps',
        'FIELD_NAME': 'logging_steps',
        'MESSAGE': 'Value must be greater than or equal to 1',
        'TASK_TYPE': ['train'],
        'TYPE_SPECIFIC_SETTINGS': {   'train': {   'DEFAULT': '10',
                                                   'USER_MODIFIABLE': True}}},
    {   'CONSTRAINTS': {   'values': [   'polynomial_decay_schedule_with_warmup',
                                         'cosine_schedule_with_warmup',
                                         'fixed_lr']},
        'DATATYPE': 'str',
        'DESCRIPTION': 'Type of learning rate scheduler to use',
        'FIELD_NAME': 'lr_schedule',
        'MESSAGE': 'Value must be one of '
                   '(polynomial_decay_schedule_with_warmup, '
                   'cosine_schedule_with_warmup, fixed_lr)',
        'TASK_TYPE': ['train'],
        'TYPE_SPECIFIC_SETTINGS': {   'train': {   'DEFAULT': 'cosine_schedule_with_warmup',
                                                   'USER_MODIFIABLE': True}}},
    {   'CONSTRAINTS': {'values': ['2048', '8192']},
        'DATATYPE': 'int',
        'DESCRIPTION': 'Sequence length to pad or truncate the dataset',
        'FIELD_NAME': 'max_seq_length',
        'MESSAGE': 'Value must be one of (2048, 8192)',
        'TASK_TYPE': ['compile', 'infer', 'serve', 'train'],
        'TYPE_SPECIFIC_SETTINGS': {   'train': {   'DEFAULT': '2048',
                                                   'USER_MODIFIABLE': False}}},
    {   'CONSTRAINTS': {'ge': '1'},
        'DATATYPE': 'int',
        'DESCRIPTION': 'number of iterations to run',
        'FIELD_NAME': 'num_iterations',
        'MESSAGE': 'Value must be greater than or equal to 1',
        'TASK_TYPE': ['train'],
        'TYPE_SPECIFIC_SETTINGS': {   'train': {   'DEFAULT': '100',
                                                   'USER_MODIFIABLE': True}}},
    {   'CONSTRAINTS': {'ge': '0'},
        'DATATYPE': 'float',
        'DESCRIPTION': 'Loss scale for prompt tokens',
        'FIELD_NAME': 'prompt_loss_weight',
        'MESSAGE': 'Value must be greater than or equal to 0.0',
        'TASK_TYPE': ['train'],
        'TYPE_SPECIFIC_SETTINGS': {   'train': {   'DEFAULT': '0.1',
                                                   'USER_MODIFIABLE': True}}},
    {   'CONSTRAINTS': {'values': ['true', 'false']},
        'DATATYPE': 'bool',
        'DESCRIPTION': 'Whether to save the optimizer state when saving a '
                       'checkpoint',
        'FIELD_NAME': 'save_optimizer_state',
        'MESSAGE': 'Value must be one of (True, False)',
        'TASK_TYPE': ['train'],
        'TYPE_SPECIFIC_SETTINGS': {   'train': {   'DEFAULT': 'true',
                                                   'USER_MODIFIABLE': True}}},
    {   'CONSTRAINTS': {'ge': '1'},
        'DATATYPE': 'int',
        'DESCRIPTION': 'Period of saving the model checkpoints in number of '
                       'training steps',
        'FIELD_NAME': 'save_steps',
        'MESSAGE': 'Value must be greater than or equal to 1',
        'TASK_TYPE': ['train'],
        'TYPE_SPECIFIC_SETTINGS': {   'train': {   'DEFAULT': '50',
                                                   'USER_MODIFIABLE': True}}},
    {   'CONSTRAINTS': {'values': ['true', 'false']},
        'DATATYPE': 'bool',
        'DESCRIPTION': 'whether or not to skip the checkpoint',
        'FIELD_NAME': 'skip_checkpoint',
        'MESSAGE': 'Value must be one of (True, False)',
        'TASK_TYPE': ['train'],
        'TYPE_SPECIFIC_SETTINGS': {   'train': {   'DEFAULT': 'false',
                                                   'USER_MODIFIABLE': True}}},
    {   'CONSTRAINTS': {'ge': '0'},
        'DATATYPE': 'float',
        'DESCRIPTION': 'Subsample for the evaluation dataset',
        'FIELD_NAME': 'subsample_eval',
        'MESSAGE': 'Value must be greater than or equal to 0.0',
        'TASK_TYPE': ['train'],
        'TYPE_SPECIFIC_SETTINGS': {   'train': {   'DEFAULT': '0.01',
                                                   'USER_MODIFIABLE': True}}},
    {   'CONSTRAINTS': {'ge': '1'},
        'DATATYPE': 'int',
        'DESCRIPTION': 'Random seed to use for the subsample evaluation',
        'FIELD_NAME': 'subsample_eval_seed',
        'MESSAGE': 'Value must be greater than or equal to 1',
        'TASK_TYPE': ['train'],
        'TYPE_SPECIFIC_SETTINGS': {   'train': {   'DEFAULT': '123',
                                                   'USER_MODIFIABLE': True}}},
    {   'CONSTRAINTS': {'values': ['true', 'false']},
        'DATATYPE': 'bool',
        'DESCRIPTION': 'Whether to use token_type_ids to compute loss',
        'FIELD_NAME': 'use_token_type_ids',
        'MESSAGE': 'Value must be one of (True, False)',
        'TASK_TYPE': ['train'],
        'TYPE_SPECIFIC_SETTINGS': {   'train': {   'DEFAULT': 'true',
                                                   'USER_MODIFIABLE': True}}},
    {   'CONSTRAINTS': {'values': ['50260', '307200']},
        'DATATYPE': 'int',
        'DESCRIPTION': 'Maximum size of vocabulary',
        'FIELD_NAME': 'vocab_size',
        'MESSAGE': 'Value must be one of (50260, 307200)',
        'TASK_TYPE': ['compile', 'infer', 'serve', 'train'],
        'TYPE_SPECIFIC_SETTINGS': {   'train': {   'DEFAULT': '50260',
                                                   'USER_MODIFIABLE': False}}},
    {   'CONSTRAINTS': {'ge': '0'},
        'DATATYPE': 'int',
        'DESCRIPTION': 'warmup steps to use in learning rate scheduler in '
                       'optimizer',
        'FIELD_NAME': 'warmup_steps',
        'MESSAGE': 'Value must be greater than or equal to 0',
        'TASK_TYPE': ['train'],
        'TYPE_SPECIFIC_SETTINGS': {   'train': {   'DEFAULT': '0',
                                                   'USER_MODIFIABLE': True}}},
    {   'CONSTRAINTS': {'ge': '0'},
        'DATATYPE': 'float',
        'DESCRIPTION': 'weight decay rate to use in optimizer',
        'FIELD_NAME': 'weight_decay',
        'MESSAGE': 'Value must be greater than or equal to 0.0',
        'TASK_TYPE': ['infer', 'serve', 'train'],
        'TYPE_SPECIFIC_SETTINGS': {   'train': {   'DEFAULT': '0.1',
                                                   'USER_MODIFIABLE': True}}}]
Params              : {'invalidates_checkpoint': {'max_seq_length': 2048, 'vocab_size': 50260}}
Create training jobs from checkpoints
Creating a new training job directly from a checkpoint enables faster development and experimentation. New training jobs can be created from existing checkpoints using the GUI or the CLI. Follow the instructions described in the corresponding section to learn how.
Create a training job from a checkpoint using the GUI
When creating a new training job directly from a checkpoint using the GUI, the ML App and Select model fields are auto-populated based on the original training job’s selections.
|
Jobs created from checkpoints using the GUI will always start at step 0. To start the job at the step of the checkpoint, please use the CLI procedure and include the --load-state option. |
Follow the steps below to create a new training job from a checkpoint.
-
From the job’s Checkpoints table, click the kebob menu (three dots) in the column of the checkpoint.
-
Select Create new job from the drop-down. The Create a new job from checkpoint window will open.
 Figure 17. Checkpoints drop-down
 -
Enter a name for the job into the Job name field.
-
Choose a dataset, or use the original job’s dataset, from the Select dataset drop-down.
-
The RDU generation drop-down allows users to select an available RDU generation version to use for a training job. If more than one option is available, the SambaStudio platform will default to the recommended RDU generation version to use based on your platform’s configuration and the selected model. You can select a different RDU generation version to use, if available, than the recommended option from the drop-down.
-
Models that support multiple RDUs for training will display the No of RDUs drop-down. This drop-down provides the ability to select the number of supported RDUs to utilize based on the selected tenant and RDU generation. Assigning more RDU’s will result in faster training. If you select more than one RDU, the RDUs must be available on the same node.
Contact your administrator for more information on RDU configurations specific to your SambaStudio platform.
-
Set the hyperparameters to govern your training job or use the default values. Expand the Hyperparameters & settings pane by clicking the blue double arrows to set hyperparameters and adjust settings.
-
Click Run job to submit the new training job to be created.
-
If the required amount of storage space is not available to create the job, the Insufficient storage message will display describing the Available space and the Required space to create the job. You will need to free up storage space or contact your administrator. Please choose one of the following options.
-
Click Cancel to stop the job from being created. Please free up storage space and then restart the Create a training job from a checkpoint using the GUI process.
-
Click Proceed anyway to submit the job to be created. Please free up storage space, otherwise the job will fail to be created and not train.
A minimum of 10 minutes is required after sufficient storage space has been cleared before the job creation will successfully start.
-
-
Create a training job from a checkpoint using the CLI
To create a new training job from a checkpoint, you will first need to identify the checkpoint you wish to use by running the snapi checkpoint list command. You then use the snapi job create command to create the new job from the identified checkpoint. You will need to specify the following:
-
A project to assign the job. Create a new project or use the project from the originating job.
-
A name for your new job.
-
Use train as the job type. This designates the job to be a training job.
-
Use the identified checkpoint name you want to start the training job from for the model-checkpoint input.
-
A dataset to use for the dataset input.
-
The RDU architecture generation version to use of your SambaStudio platform configuration for the --arch input.
-
Run the snapi tenant info command to view the available RDU generation version(s) specific to your SambaStudio platform. Contact your administrator for more information on RDU configurations specific to your SambaStudio platform.
-
Run the snapi model info command to obtain the --arch input compatible for the selected model.
-
-
To start the new training job from the step of the identified checkpoint, include the --load-state option, which loads the entire state of the checkpoint.
-
If the --load-state option is not included, the training job will start at step 0.
-
$ snapi job create \
   --project <project-name> \
   --job <job-name> \
   --type train \
   --model-checkpoint 3cf2bab6-0343-41d5-9b95-26da07e6201c-100 \
   --dataset <dataset-name> \
   --arch SN10 \
   --load-state
Successfully created job id: 4682335f-469a-4409-92df-66d92466cc69.|
Run snapi job create --help to display additional usage and options. |
Save/add checkpoints to the Model Hub
Once you’ve identified a checkpoint to use for inference or further fine-tuning, follow the steps below to save a checkpoint to the Model Hub using the GUI, or add a checkpoint to the model list using the CLI.
Save a checkpoint to the Model Hub using the GUI
Follow the steps below to save a checkpoint to the Model Hub and create a new model card for it.
|
Models are set to private by default and are not shared. After saving your checkpoint to the Model Hub, adjust the model share settings to share your model with other users and tenants. |
-
From the Checkpoints table, click the kebob menu (three vertical dots) in the column of the checkpoint you wish to save.
-
Select Save to Model Hub from the drop-down. The Add a checkpoint to Model Hub box will open.
 Figure 18. Checkpoints drop-down
 -
Enter a name in the Model name field. This name will be the new model card name.
-
From the Type drop-down, choose the model type you wish to create.
-
Click Add to Model Hub to create the model card and save the checkpoint.
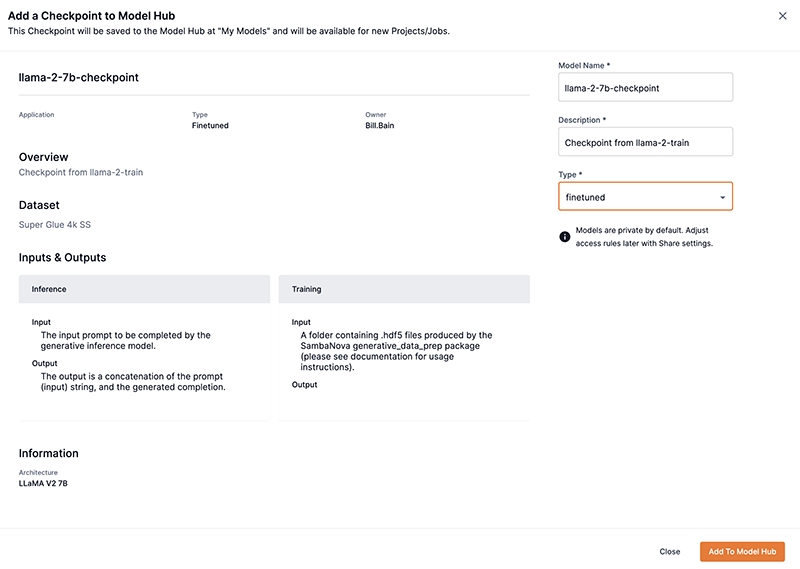 Figure 19. Add to model hub
-
If the required amount of storage space is not available to save the checkpoint, the Insufficient storage message will display describing the Available space and the Required space to save the checkpoint. You will need to free up storage space or contact your administrator. Please choose one of the following options.
-
Click Cancel to stop the save a checkpoint process. Please free up storage space and then restart the Save a checkpoint to the Model Hub using the GUI process.
-
Click Proceed anyway to save the checkpoint. Please free up storage space, otherwise the save a checkpoint to the Model Hub process will fail.
A minimum of 10 minutes is required after sufficient storage space has been cleared before the checkpoint will start successfully saving to the Model Hub.
-
-
Add a checkpoint to the model list using the CLI
To add a checkpoint to the model list, you will first need to identify the checkpoint you wish to add by running the snapi checkpoint list command. You then use the snapi model add command to add the identified checkpoint to the model list. You will need to specify the following:
-
The project that contains, or is assigned to, the job and checkpoint you wish to add to the model list.
-
The name of the job that contains the checkpoint you wish to add to the model list.
-
Use the identified checkpoint name you want to add to the model list for the model-checkpoint input.
-
Enter a new name that will appear in the model list for the model-checkpoint-name input.
-
Provide the checkpoint type as either finetuned or pretrained.
$ snapi model add \
   --project <project-of-checkpoint. \
   --job <job-of-checkpoint> \
   --model-checkpoint 3cf2bab6-0343-41d5-9b95-26da07e6201c-100 \
   --model-checkpoint-name <new-name-for-model-list> \
   --checkpoint-type finetuned
Successfully added <new-name-for-model-list>|
Run snapi model add --help to display additional usage and options. |
View and download logs
Job logs can help you track progress, identify errors, and determine the cause of potential errors. You can view and download logs by using OpenSearch, the GUI, or the CLI.
View and download logs using the OpenSearch Dashboard
SambaStudio provides integration with the OpenSearch platform . This allows you to visualize and analyze logs in the OpenSearch Dashboard.
|
Please be aware of the following when interacting with the OpenSearch Dashboard:
|
Navigate to a training job’s detail page created in SambaStudio 24.5.1 or later and click Check logs in OpenSearch. The OpenSearch Dashboard will open in a new browser window displaying the log information of the project associated with the job, including all endpoints and jobs of that project.
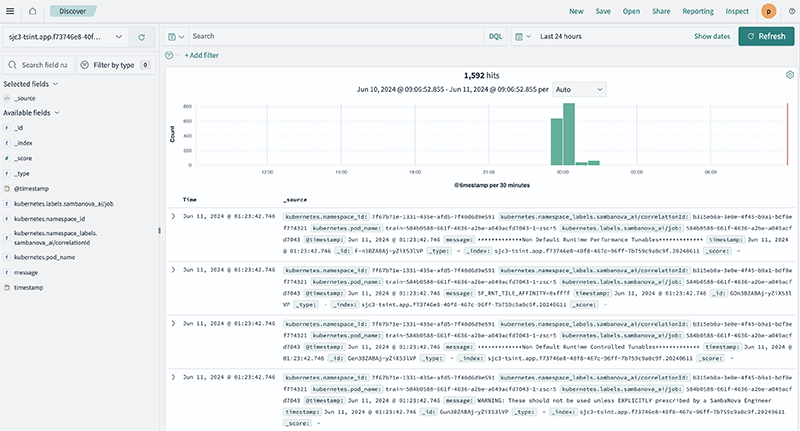
Add filters
You can quickly refine the logs displayed in the OpenSearch Dashboard by adding a filter.
-
Select an available id in the left menu and add it as a filter.
-
You can create a filter using a tracking id to refine the dashboard display.
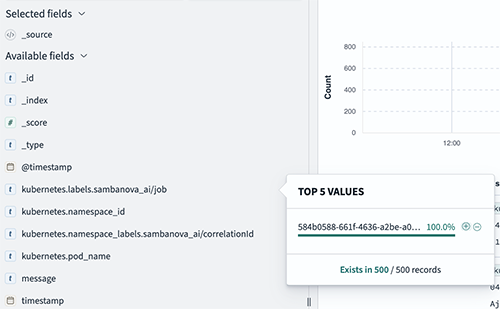 Figure 22. Example tracking id filter in OpenSearch Dashboard
Save and download reports
You can save and download reports defined by criteria you have set in the OpenSearch dashboard.
-
Click Save in the top menu. The Save search box will open.
-
Enter a title into the field and click Save
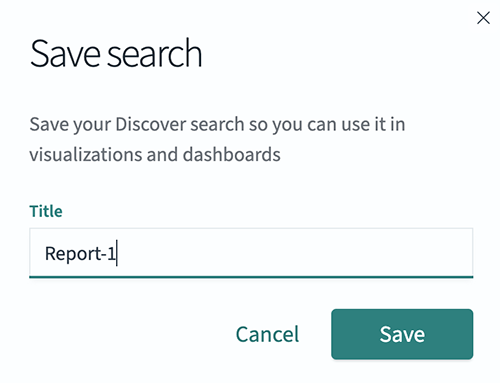 Figure 23. Example OpenSearch Dashboard save search
 -
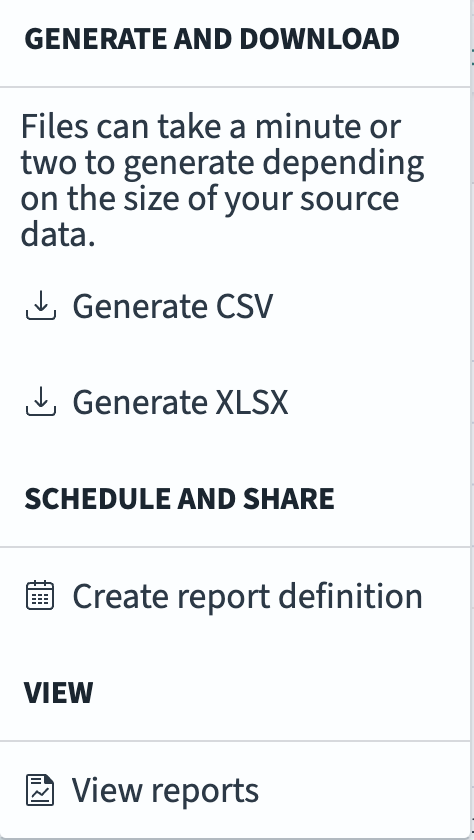
Refresh the page and click Reporting in the top menu to open the Generate and download drop-down. Select a format (Generate CSV is recommended) to generate the report.
-
OpenSearch Dashboard will generate your report and download the file to the location configured by your browser.
View and download logs using the GUI
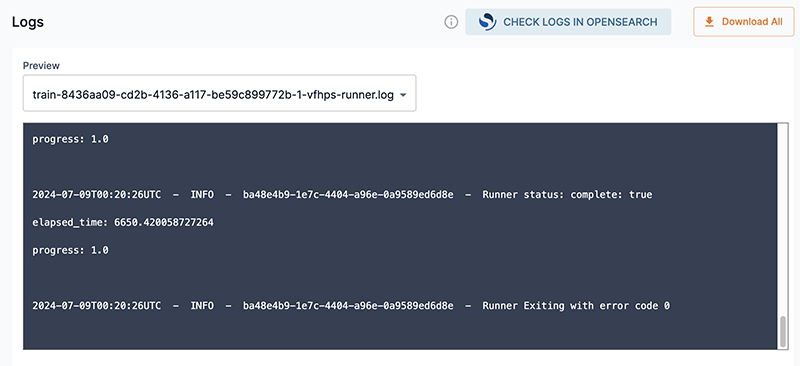
The Logs section of the GUI allows you to preview and download logs of your training session.
|
Logs can be visible in the platform earlier than other data, such as metrics, checkpoints, and job progress. |
-
From the Preview drop-down, select the log file you wish to preview.
-
The Preview window displays the latest 50 lines of the log.
-
To view more than 50 lines of the log, use the Download all feature to download the log file.
-
-
Click Download all to download a compressed file of your logs. The file will be downloaded to the location configured by your browser.
 Figure 24. Logs
View and download logs using the CLI
Similar to viewing logs using the GUI, you can use the SambaNova API (snapi) to preview and download logs of your training session.
View the job log file names
The example below demonstrates the snapi job list-logs command. Use this command to view the job log file names of your training job. This is similar to using the Preview drop-down menu in the GUI to view and select your job log file names. You will need to specify the following:
-
The project that contains, or is assigned to, the job you wish to view the job log file names.
-
The name of the job you wish to view the job log file names.
$ snapi job list-logs \
   --project <project-name> \
   --job <job-name>
train-0fb0568c-ca8e-4771-b7cf-e6ef156d1347-1-ncc9n-runner.log
train-0fb0568c-ca8e-4771-b7cf-e6ef156d1347-1-ncc9n-model.log|
Run snapi job list-logs --help to display additional usage and options. |
Preview a log file
After you have viewed the log file names for your training job, you can use the snapi job preview-log command to preview the logs corresponding to a selected log file. The example below demonstrates the command. You will need to specify the following:
-
The project that contains, or is assigned to, the job you wish to preview the job log file.
-
The name of the job you wish to preview the job log file.
-
The job log file name you wish to preview its logs. This file name is returned by running the snapi job list-logs command, which is described above.
$ snapi job preview-log \
   --project <project-name> \
   --job <job-name> \
   --file train-0fb0568c-ca8e-4771-b7cf-e6ef156d1347-1-ncc9n-runner.log
2023-08-10 20:28:46  -  INFO  -  20be599f-9ea7-44ea-9dc5-b97294d97529  -  Runner starting...

2023-08-10 20:28:46  -  INFO  -  20be599f-9ea7-44ea-9dc5-b97294d97529  -  Runner successfully started

2023-08-10 20:28:46  -  INFO  -  20be599f-9ea7-44ea-9dc5-b97294d97529  -  Received new train request

2023-08-10 20:28:46  -  INFO  -  20be599f-9ea7-44ea-9dc5-b97294d97529  -  Connecting to modelbox at localhost:50061

2023-08-10 20:28:54  -  INFO  -  20be599f-9ea7-44ea-9dc5-b97294d97529  -  Running training

2023-08-10 20:28:54  -  INFO  -  20be599f-9ea7-44ea-9dc5-b97294d97529  -  Staging dataset

2023-08-10 20:28:54  -  INFO  -  20be599f-9ea7-44ea-9dc5-b97294d97529  -  initializing metrics for modelbox:0

2023-08-10 20:28:54  -  INFO  -  20be599f-9ea7-44ea-9dc5-b97294d97529  -  initializing checkpoint path for modelbox:0

2023-08-10 20:31:35  -  INFO  -  20be599f-9ea7-44ea-9dc5-b97294d97529  -  Preparing training for modelbox:0

2023-08-10 20:31:35 - INFO - 20be599f-9ea7-44ea-9dc5-b97294d97529 - Running training for modelbox|
Run snapi job preview-log --help to display additional usage and options. |
Download the logs
Use the snapi download-logs command to download a compressed file of your training job’s logs. The example below demonstrates the command. You will need to provide the following:
-
The project that contains, or is assigned to, the job you wish to download the compressed log file.
-
The name of the job you wish to download the compressed log file.
$ snapi job download-logs \
   --project <project-name>> \
   --job <job-name>
Successfully Downloaded: <job-name> logs|
The default destination for the compressed file download is the current directory. To specify a destination directory, use the --dest option. Run snapi job download-logs --help for more information and to display additional usage and options. |