Compile, fine-tune, and perform inference with a Hugging Face GPT model
This tutorial shows how you can work with a pretrained GPT-2 model from Hugging Face.
| We are using a small model because the main goal of the tutorial is to come up to speed quickly. Smaller models have shorter compile, fine-tune, and inference times. You can follow the same process with larger NLP models. |
Like all pretrained models, this model already knows things that it learned by training on a large dataset or from human input. The pretrained weights capture general patterns and knowledge from the training data, making the model capable of performing certain tasks without starting from scratch. For example, this model knows how to understand English.
About this tutorial
You can learn about the tutorial on these pages:
-
This page, included as a README in the GitHub repo and as a file in the doc set, explains how to compile, train, and perform inference on RDU.
-
First you compile for training. Compilation generates a PEF file to pass to the training run.
-
Next you do a training run. As part of the training run, you generate checkpoints that you can use use for inference.
-
Finally, you do an inference run using
generative_inference.py. The inference run performs sentiment analysis on new data, and you can examine how well the model worked
-
-
Two other doc pages explain the code.
-
The Code elements of the training program page examines the code that supports compiling and training a model for RDU. As part of training, you can generate checkpoints.
-
The Code elements of the inference program page explains compiling for inference and performing an inference run.
-
Prepare your environment
To prepare your environment, you:
-
Check your Python version
-
Check your SambaFlow installation.
-
Download the tutorial files from GitHub.
-
Download the data files from the internet.
-
Prepare the dataset for training.
Check your Python version
Running the tutorial requires Python 3.9 or later.
| SambaNova host systems run an earlier version of Python with this version of SambaFlow, so you have to either run the tutorial locally, or install Python 3.9 for the user who runs the tutorial. |
Check your SambaFlow installation
You must have Sambaflow 1.17 installed to run this example and any of the tutorial examples.
-
To check if the package is installed, run this command:
-
For Ubuntu Linux
$ dpkg -s sambaflow -
For Red Hat Enterprise Linux
$ rpm -qi sambaflow
-
-
Examine the output and verify that the SambaFlow version that you are running matches the documentation you are using.
-
If you see a message that
sambaflowis not installed, contact your system administrator.
Clone the tutorials repository
Before you start, clone the SambaNova/tutorials GitHub repository, as instructed in the README.
The following command-line examples assume that you cloned the repository into your home directory:
$ cd $HOME
$ git clone https://github.com/sambanova/tutorials.git
$ cd tutorials/generative_nlp
After a SambaFlow upgrade, you might have to do a git pull again if your model no longer works.
|
The generative_nlp tutorial includes the following folders and files:
-
At the top level, you see the README and the following files:
-
generative_train.pyis the Python code for training the model, which is discussed in Code elements of the training program. -
generative_inference.pyis the Python code for running inference on the trained model. Discussed in Code elements of the inference program.
-
-
The
configurationfolder includes files to support training and inference.-
gpt2_small_config.jsonhas some configuration information. The file overrides certain Hugging Face settings to improve performance on RDU. You pass the file to a compilation command with the--config-nameargument. -
gpt2_patch.pyhas some Python code that is currently needed to run a Hugging Face model on RDU. NOTE: This patch code will no longer be needed in a future release.
-
-
The
utilsfolder includes some utility code:-
datasets.pyhas the code for generating datasets. and has two main APIs:PretrainingGenerativeDatasetis for training jobs andGenerativeDatasetis for inference jobs. -
checkpoint_utils.pyincludessave_checkpointandload_checkpointfunctions that are used by the training and inference code.
-
Download the dataset
In this tutorial you use the Stanford Sentiment Treebank dataset to fine-tune the pretrained GPT-2 model. The dataset (English only) consists of movie evaluations and labels that indicate if the evaluation is positive or negative. Here’s the description from Hugging Face:
The Stanford Sentiment Treebank is a corpus with fully labeled parse trees that allows for a complete analysis of the compositional effects of sentiment in language. The corpus is based on the dataset introduced by Pang and Lee (2005) and consists of 11,855 single sentences extracted from movie reviews. It was parsed with the Stanford parser and includes a total of 215,154 unique phrases from those parse trees, each annotated by 3 human judges.
Using sentiment analysis for this tutorial makes it easy to evaluate inference later.
To prepare the dataset, follow these steps:
-
To begin, you must ensure that the Hugging Face
datasetspackage is installed in your Python environment:pip install datasets -
Use the following sample code to download the SST2 dataset using Hugging Face’s
Dataset.load_dataset()functionality. The code will then preprocess the data into JSONL format for use in the next section of data preparation.
sst2_load
import json
import os
import datasets


def preprocess_dataset_to_list(dataset) -> list[dict]:
    """
    Process HF SST2 Dataset object into standard Python list of dictionaries:

    datapoint = [{"prompt":generate_prompt, "completion":generate_completion}, ...]
    new_dataset = [datapoint1, datapoint2, ...]
    """
    new_dataset = []

    for index in range(len(dataset)):
        new_datapoint: dict = {"prompt": None, "completion": None}

        text: str = dataset[index]["sentence"]
        label: int = dataset[index]["label"]

        generate_prompt = f"SENTIMENT ANALYSIS: {text} QUESTION: Is this sentence positive or negative?\n\n"

        generate_completion = None

        if label == 0:
            generate_completion = "negative"
        elif label == 1:
            generate_completion = "positive"

        new_datapoint["prompt"] = generate_prompt
        new_datapoint["completion"] = generate_completion

        new_dataset.append(new_datapoint)

    return new_dataset


def save_list_to_jsonl(dataset_list, file_name: str) -> None:
    """
    Save preprocessed HF SST2 dataset as JSONL for consumption in SN generative data prep.
    """
    assert "jsonl" in file_name, "File extension is not jsonl"

    if os.path.isfile(file_name):
        print(f"{file_name} already exists")
        return

    print(f"Writing {file_name}...")

    with open(file_name, "w") as writer:
        for item in dataset_list:
            json.dump(item, writer)
            writer.write("\n")


if __name__ == "__main__":
    # Load Dataset
    sst2 = datasets.load_dataset(
        "sst2",
    )

    # Split DatasetDict into base Datasets
    train_dataset = sst2["train"]
    valid_dataset = sst2["validation"]
    test_dataset = sst2["test"]

    # Preprocess
    preprocessed_train_dataset = preprocess_dataset_to_list(train_dataset)
    preprocessed_valid_dataset = preprocess_dataset_to_list(valid_dataset)
    preprocessed_test_dataset = preprocess_dataset_to_list(test_dataset)

    # Write
    save_list_to_jsonl(preprocessed_train_dataset, "preprocessed_train_dataset.jsonl")
    save_list_to_jsonl(preprocessed_valid_dataset, "preprocessed_valid_dataset.jsonl")
    save_list_to_jsonl(preprocessed_test_dataset, "preprocessed_test_dataset.jsonl")
Prepare the dataset
Preparing the dataset consists of two steps:
Step 1: Download the software package
SambaNova has provided a software package to help prepare data for use in generative models: SambaNova Generative Dataset Preparation. To begin, you must install the package per these installation instructions. Please make note of the requirements.
Details on how Generative Data Preparation works are available at the links above, but essentially what it does is take data in plain text or JSONL format and processes it into HDF5 files that can be consumed by generative models. The package efficiently handles the shuffling, splitting, and tokenizing of any size of dataset.
Step 2: Run the conversion commands
To help you get started with this tutorial, here’s a command for processing a JSONL file (such as that generated by sst2_load) to an HDF5 file:
process_jsonl_hdf5
#!/bin/bash

DATA_PREP_PYTHONPATH=/path/to/gendataprep/package

PYTHONPATH=$DATA_PREP_PYTHONPATH:$PYTHONPATH python -m generative_data_prep pipeline \
--input_file_path=/path/to/JSONL \
--output_path=/path/to/output/HDF5 \
--pretrained_tokenizer=gpt2 \
--input_packing_config=single::drop \
--max_seq_length=1024 \
--shuffle on_RAM \
--dev_ratio 0.1
This command generates files for train and dev splits and a log file detailing what was done to process the data. Files associated with the tokenizer are also placed here.
Files on Hugging Face
The tutorial uses a pretrained GPT-2 model from Hugging Face, available at https://huggingface.co/gpt2.
Training
Training a model on a SambaNova system consists of two steps:
-
First, you compile the model.
-
The PyTorch model, via the SambaNova Python API, goes through the graph compiler to transform the original model into a series of RDU kernel dataflow graphs.
-
The kernel compiler transforms each kernel dataflow graph into a bitfile, and compiles these bitfiles together into a PEF file that can run on RDU.
See SambaFlow compiler overview for background information.
-
-
Then you use the compiled model to run training. You specify:
-
The PEF file generated at the compilation step.
-
The dataset.
-
Existing checkpoints (if you have any).
-
The directory to store new checkpoints. The checkpoints are usually saved after a number of training steps. They can be used either to continue training after a pause or to run inference.
-
Compile for training
Before you compile for training, you need:
-
A configuration file that amends the Hugging Face model to optimize if for running on RDU. For this tutorial, that file is
gpt2_small_config.json -
The model Python code file
generative_train.py, which you downloaded from GitHub.
To compile for training, run these commands:
$ cd ~/tutorials/generative_nlp
$ mkdir -p out
$ export OUTPUT_FOLDER=out

$ SN_NUM_THREADS=32 python3 generative_train.py compile \
--max_seq_length 1024 \
--batch-size 16 \
--config_name configuration/gpt2_small_config.json \
--weight_decay 0.1  \
--max_grad_norm_clip 1.0 \
--model_name_or_path gpt2 \
--pef-name=train \
--output-folder=$OUTPUT_FOLDER \
--log-level=error \
--num-tiles 4 \
--resources-scaling-factors 0.8 0.8 0.8
Some of the arguments are required by the compiler:
-
num-tiles. Use 4 tiles on SN30 systems (0.5 RDU) for this tutorial. -
pef-name. Name of the PEF file that the compiler will generate.
Some of the arguments are expected by the model itself (and defined inside the model’s code)
-
max_seq_length. Maximum sequence length for the model. To fine-tune GPT-2 with the SST2 data, use 1024. -
batch-size. Number of data samples that are processed in a single forward and backward pass. -
config-name. Name of a configuration file. In this tutorial, the configuration file overwrites the default configuration of the Hugging Face model. -
weight_decay. Supports regularization by introducing a penalty to the loss function and encouraging smaller weights in the model. -
max_grad_norm_clip. Limits the gradient norm clipping. -
model_name_or_path. Name of the model.
As compilation proceeds, you’ll see detailed messages on the command line. You can ignore most of those messages. See SambaNova messages and logs for some background.
At the end of compilation, you should see a message that a PEF file was generated.
Fine-tune the model
Before you run training to fine-tune this model, you need:
-
A dataset that’s compatible with the model.
-
A configuration file that amends the Hugging Face model configuration to optimize it for RDU.
-
The model Python code,
generative_train.pyin this tutorial. You use the samegenerative_train.pyfile for compilation and training. You will later use a different file to run inference.
SambaFlow has a run command that supports both training runs and inference runs.
-
By default,
runperforms a training run. -
Specify
--inferencefor an inference run, discussed further below.
Run the following command to start the training session:
First, set the variables. Don’t copy these commands, the values depend on your environment:
$ export PEF=<path/to/pef>
$ export DATADIR=<path/to/dataset>
Run the training script:
$ SAMBA_SEED=256 python3 generative_train.py run \
--max_seq_length 1024 \
--batch-size 16 \
--config_name configuration/gpt2_small_config.json \
--weight_decay 0.1 \
--max_grad_norm_clip 1.0 \
--data_dir $DATADIR/generative_tuning_sst2/hdf5/ \
--checkpoint_name $OUTPUT_FOLDER/train_movie_review_checkpoint.pt \
--model_name_or_path gpt2 \
--steps 800 \
--min_eval_acc 0.87  \
--log-level error \
--pef $PEF
Most of the arguments are set to the same value during compilation and training. The following arguments are required or expected during training:
-
pef: Thepefargument is required for training. It specifies a PEF file, which was the output of compilation.
Certain arguments are expected by this GPT-2 model (and defined in the model’s code). Many of these arguments are used by most models.
-
data_dir. Location of the dataset. Some pre-processing is usually necessary. -
checkpoint_name. If you restart training from a checkpoint, name of the checkpoint.-
Each training run saves a checkpoint file that’s named after the number of steps (e.g.
800.pt) -
To failure proof your training run, run in batches and pass in a checkpoint to refine your model.
-
-
steps. Number of steps to run. Each step is a complete iteration through forward, backward, and optimization. -
min_eval_acc. Argument to use during a test run. During a test run, you pass in the trained model and a dataset that includes labels. Your code can then check if the outputs map to the expected outputs and ensure that this model meets this minimum evaluation accuracy.
Inference
The inference step consists of two steps, compilation for inference and the actual inference run.
Compile for inference
Compilation for inference only does the forward pass, and is therefore faster than compilation for training.
Also the resulting PEF file is smaller.
You compile for inference by specifying --inference. See How model compilation works.
To compile for inference, run the following command:
$ SN_NUM_THREADS=32 python3 generative_inference.py compile \
--inference  \
--max_seq_length 1024 \
--batch-size 1 \
--config_name configuration/gpt2_small_config.json \
--model_name_or_path gpt2 \
--arch sn20 \
--pef-name=inference \
--output-folder=$OUTPUT_FOLDER \
--log-level=error  \
--num-tiles 4 \
--resources-scaling-factors 0.8 0.8 0.8
The arguments are almost the same as for compilation for training, with the following differences:
-
--inference. Perform an inference run. -
--o0. Use the o0 compiler optimization level. See Compiler argument reference for some background.
At the end of the compilation output you will see the PEF file name that you should use at the next step.
If you didn’t change the arguments, the file name will be inference/inference.pef.
Run inference
When you run inference, you use pass in a checkpoint from your training run and a dataset
that your model hasn’t seen before.
Just as for training, you specify that dataset with data_dir but point to the validation dataset (not the training dataset).
Run the following command:
$ export PEF="inference/inference.pef"
$ export DATADIR=$HOME/datasets/sst2
$ CONVFUNC_DEBUG_RUN=1 DISALLOW_VISUALIZE=True SAMBA_SEED=256 python3 generative_inference.py run \
--inference \
--data_dir $DATADIR/finalized_prediction_inputs.jsonl \
--max_tokens_to_generate 20 \
--batch-size 1 \
--max_seq_length 1024 \
--config_name configuration/gpt2_small_config.json \
--checkpoint_name $OUTPUT_FOLDER/train_movie_review_checkpoint.pt \
--model_name_or_path gpt2 \
--log-level=error \
--pef $PEF
Most arguments are familiar, but a few are new or have a different meaning.
-
max_tokens_to_generate. Returns the specified number of results. For example, 20 means return 20 evaluations and corresponding generated labels. -
checkpoint_name. Name of the checkpoint to run inference with. -
pef. Points to the PEF file that was generated during compilation for inference.
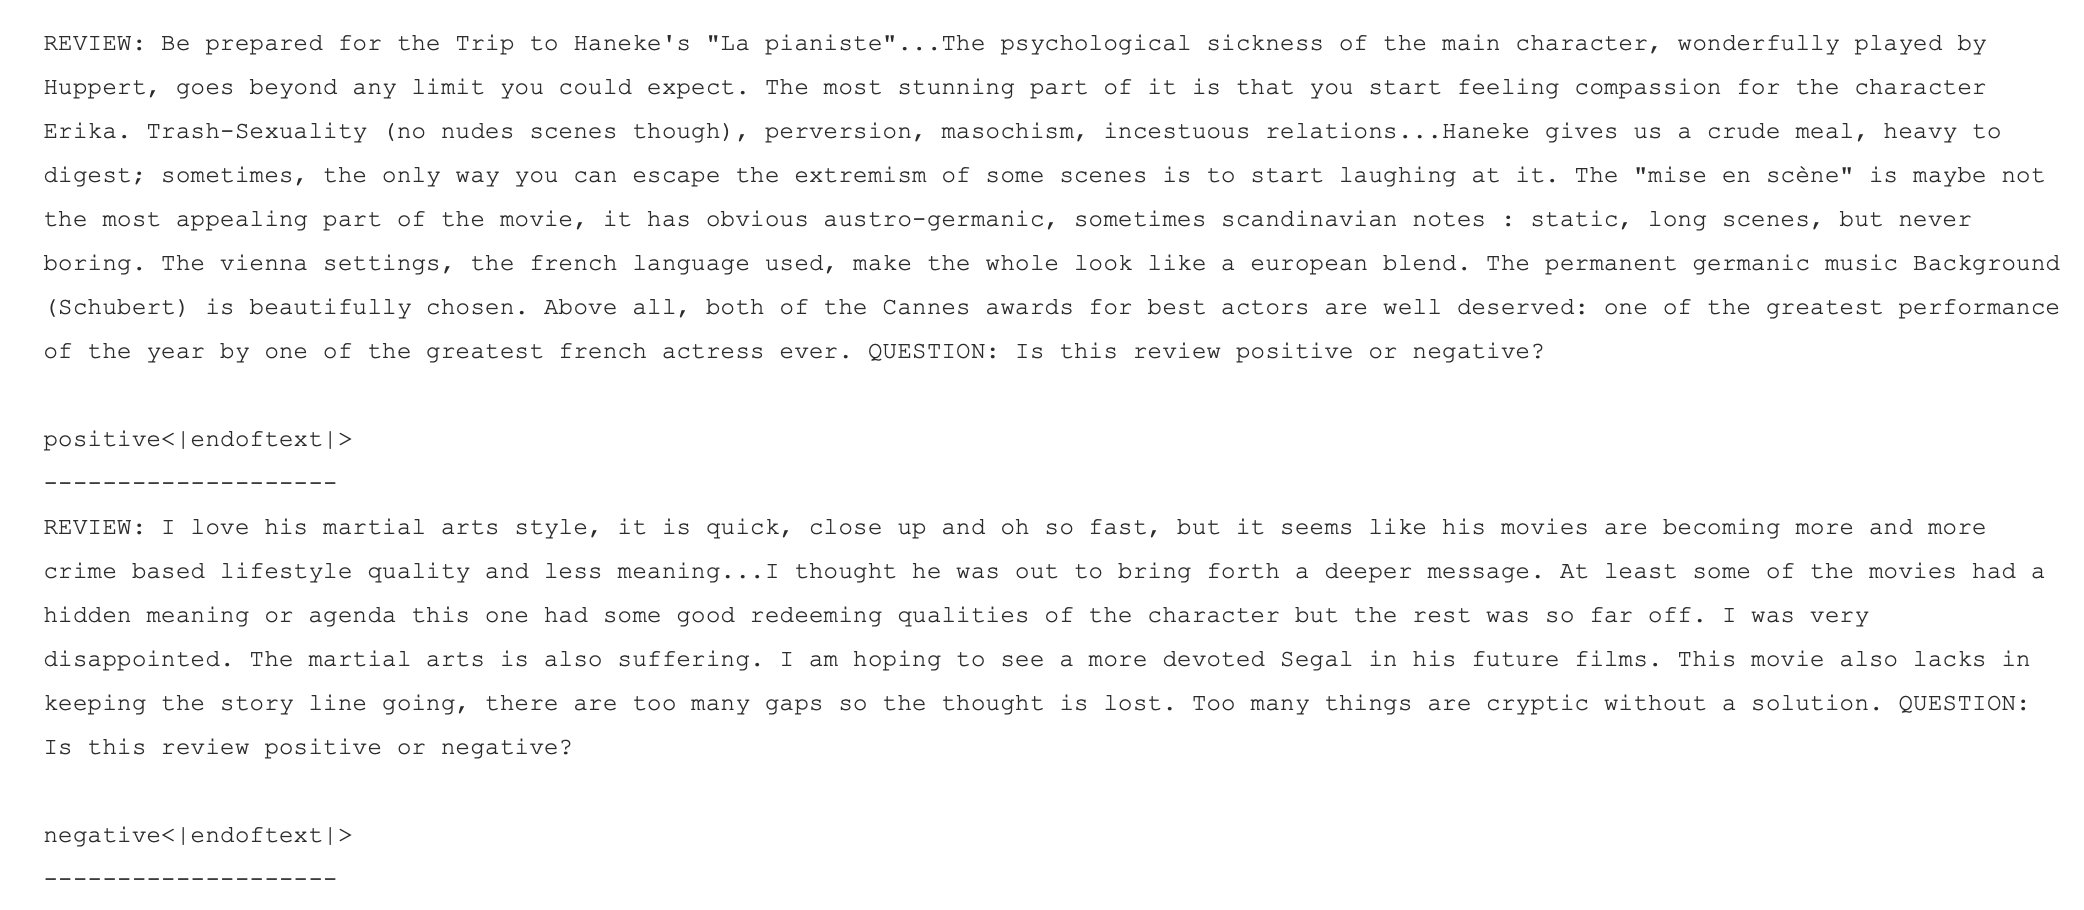
At the end of the inference run, have a look at the text that’s returned and the corresponding evaluation to see how well your model performed. Here’s a screenshot of an example.