Datasets
SambaStudio provides several commonly used datasets to train your models. Additionally, you can add your own datasets and view information for the available datasets in the platform.
This document describes how to:
|
All paths used in SambaStudio are relative paths to the storage root directory |
View a list of datasets using the GUI
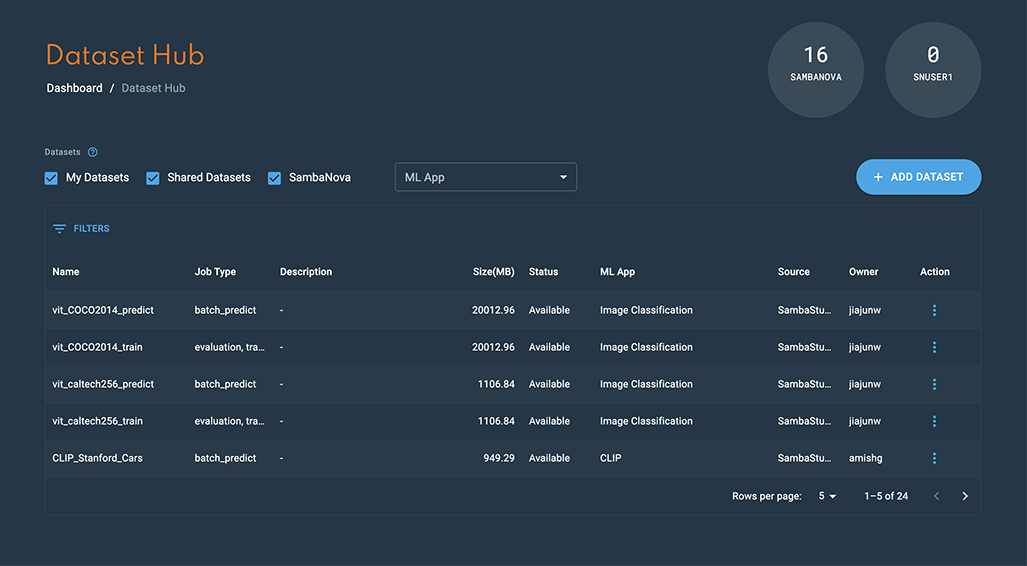
The Dataset Hub provides an interface for managing datasets by displaying a detailed list of datasets. Click Datasets from the left menu to navigate to the Dataset Hub window.
The My datasets, Shared datasets, and SambaNova checkboxes filter the dataset list by their respective group. The ML App drop-down filters the dataset list by the corresponding ML App. The Dataset Hub table provides the following information:
-
Name displays the dataset name.
-
Job type displays the job associated with the dataset when added to SambaStudio.
-
Description displays the identifying description of the dataset.
-
Size(MB) displays the total storage size of the dataset in megabytes (MB).
-
Status displays the current status of the dataset.
-
Available designates that the dataset has been downloaded by an organization administrator and is available for all user roles to use.
-
Available to download designates that the dataset can be downloaded by an organization administrator.
-
-
ML App displays the ML App(s) associated with the dataset.
-
Source displays the source used to add the dataset.
-
Owner identifies the dataset owner.
-
Actions provides additional interactions to the dataset via a drop-down menu.
View a list of datasets using the CLI
Run the snapi dataset list command to view the list of datasets by name. The example below shows the GPT_13B_Training_Dataset and GPT_1.5B_Training_Dataset datasets and their associated attributes.
$ snapi dataset list

GPT_13B_Training_Dataset
========================

PATH              : common/datasets/squad_clm/ggt_2048/hdf5
APPS              : ['57f6a3c8-1f04-488a-bb39-3cfc5b4a5d7a']
USER              : None
STATUS            : Available
TIME CREATED      : 2023-01-16T00:00:00


GPT_1.5B_Training_Dataset
=========================

PATH              : common/datasets/ggt_sentiment_analysis/hdf5_single_avoid_overflow/hdf5
APPS              : ['e681c226-86be-40b2-9380-d2de11b19842']
USER              : None
STATUS            : Available
TIME CREATED : 2021-08-26T00:00:00|
Run snapi dataset list --help to display additional options. |
View information for a dataset using the CLI
Run the snapi dataset info command to view detailed information for a specific dataset, including its Dataset ID. You will need to provide the name of the dataset.
The example below shows detailed information for the GPT_13B_Training_Dataset dataset.
$ snapi dataset info \
    --dataset GPT_13B_Training_Dataset

             Dataset Info
             ============
Dataset ID           : 894dd158-9552-11ed-a1eb-0242ac120002
Name                 : GPT_13B_Training_Dataset
Path                 : common/datasets/squad_clm/ggt_2048/hdf5
Apps                 : ['57f6a3c8-1f04-488a-bb39-3cfc5b4a5d7a']
Created Time         : 2023-01-16T00:00:00
Metadata             : None
Dataset Source       : SambaStudio
Status               : Available
Job Type             : ['train']
Field of Application : language
Description          : A SambaNova curated collection of datasets that cover Q&A and structured data
File Size (MB)       : 1.0
Download datasets using the GUI
SambaStudio provides the ability for organization administrators (OrgAdmin) to download SambaStudio provided datasets to their environment. This allows datasets with a source of SambaStudio to be downloaded and used when new SambaStudio datasets are available. The status Available to download will display for datasets that can be downloaded by an organization administrator. Once downloaded, all user roles will have access to the dataset when creating training jobs or batch inference jobs.
The steps below describe how an organization administrator can download a dataset.
-
From the Dataset Hub list, click the kebob (three vertical dots) menu for the dataset you wish to download.
-
Click Download from the drop-down menu.
 Figure 2. Dataset download drop-down
-
The Downloading a dataset box will open.
-
-
Click Yes to download the dataset.
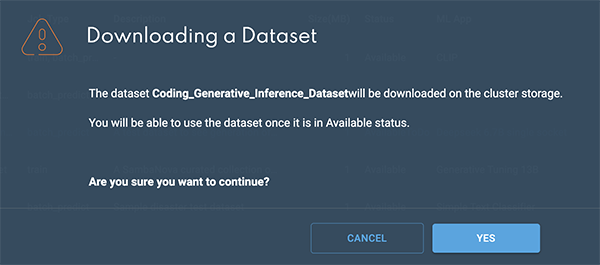 Figure 3. Downloading a dataset box
Add a dataset using the GUI
There are three options for adding datasets to the platform using the GUI. For all three options, you will first need to:
-
Click Datasets from the left menu to navigate to the Dataset Hub window.
-
Click the Add dataset button.
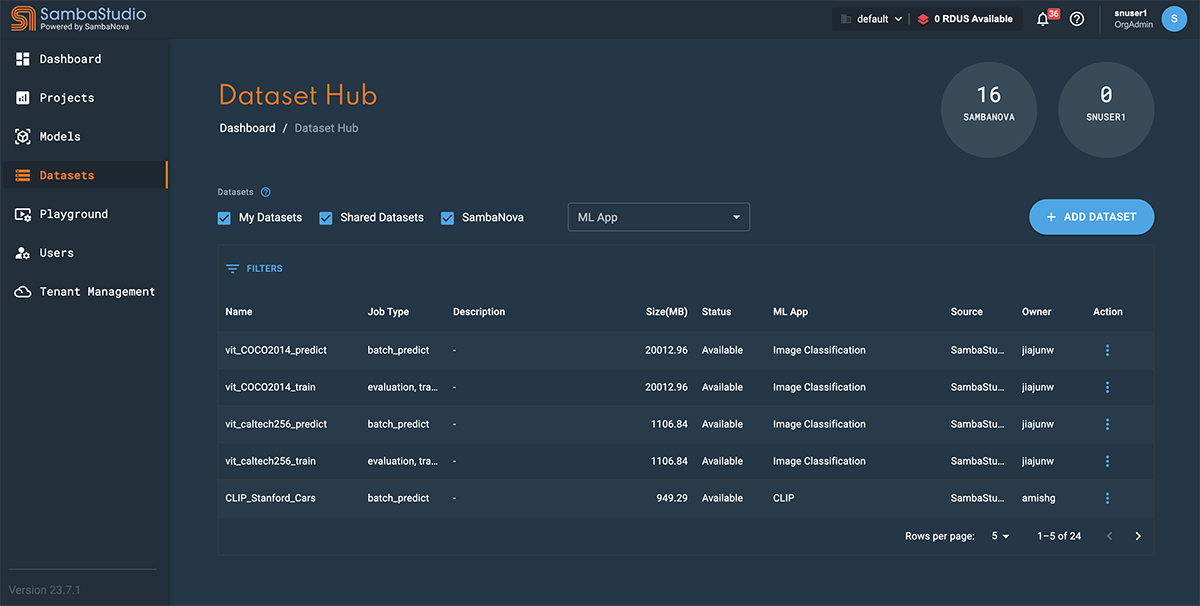 Figure 4. Dataset Hub with left menu
-
The Add a dataset window will open, as shown in Figure 5.
-
-
In the Dataset name field, input a name for your dataset.
Including your dataset size in the name (corresponding to the
max_seq_lengthvalue used) will help you select the appropriate dataset when creating a training job. -
From the Job type dropdown, select whether the dataset is to be used for Train/Evaluation or Batch predict.
-
The Share settings drop-down provides options for which tenant to share your dataset.
-
Share with <current-tenant> allows the dataset to be shared with the current tenant you are using, identified by its name in the drop-down.
-
Share with all tenants allows the dataset to be shared across all tenants.
-
Dataset will be shared with all users in <current-tenant> identifies that the dataset will be shared with other users in the tenant you are using.
If the Dataset will be shared with all users in <current-tenant> option is displayed, the Share with <current-tenant> and Share with all tenants options described above will not be available. Share with all tenants is an optional feature of SambaStudio. Please contact your administrator or SambaNova representative for more information.
-
-
From the Applicable ML Apps drop-down, select the ML App(s) that you wish the dataset to be associated. Multiple ML Apps can be selected.
Be sure to select appropriate ML Apps that correspond with your dataset, as the platform will not warn you of ML Apps selected that do not correspond with your dataset.
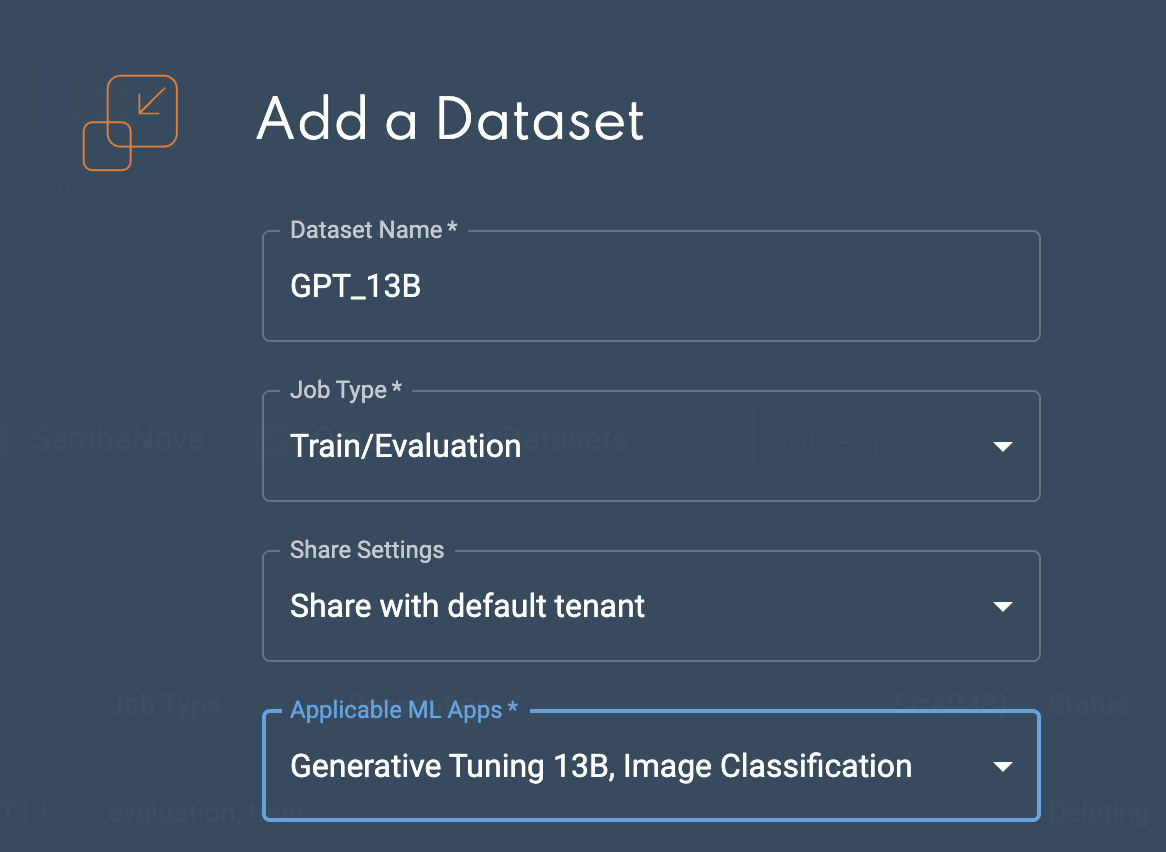 Figure 5. Add a dataset
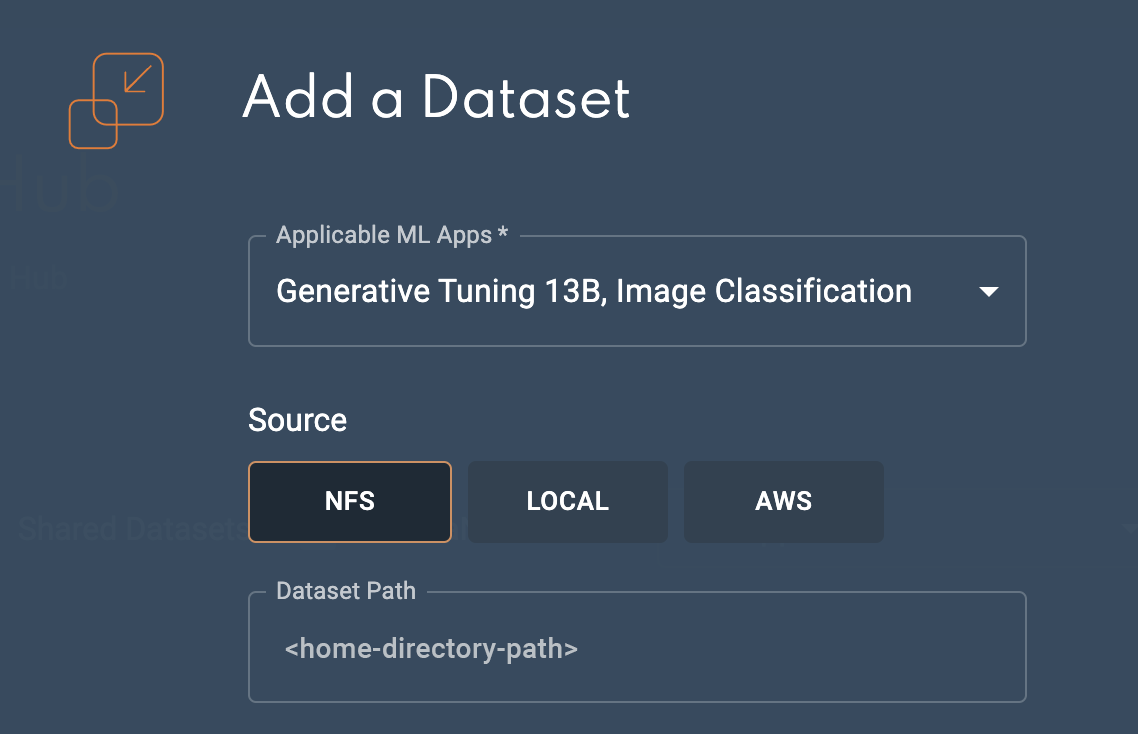
Option 1: Add a dataset from NFS
Follow the steps below to add a dataset from NFS using the GUI.
-
Click the NFS button.
-
The Dataset path field defaults to the home directory path. You can provide the relative path to where the dataset is located.
-
Click Add dataset to submit the dataset to the Dataset Hub.
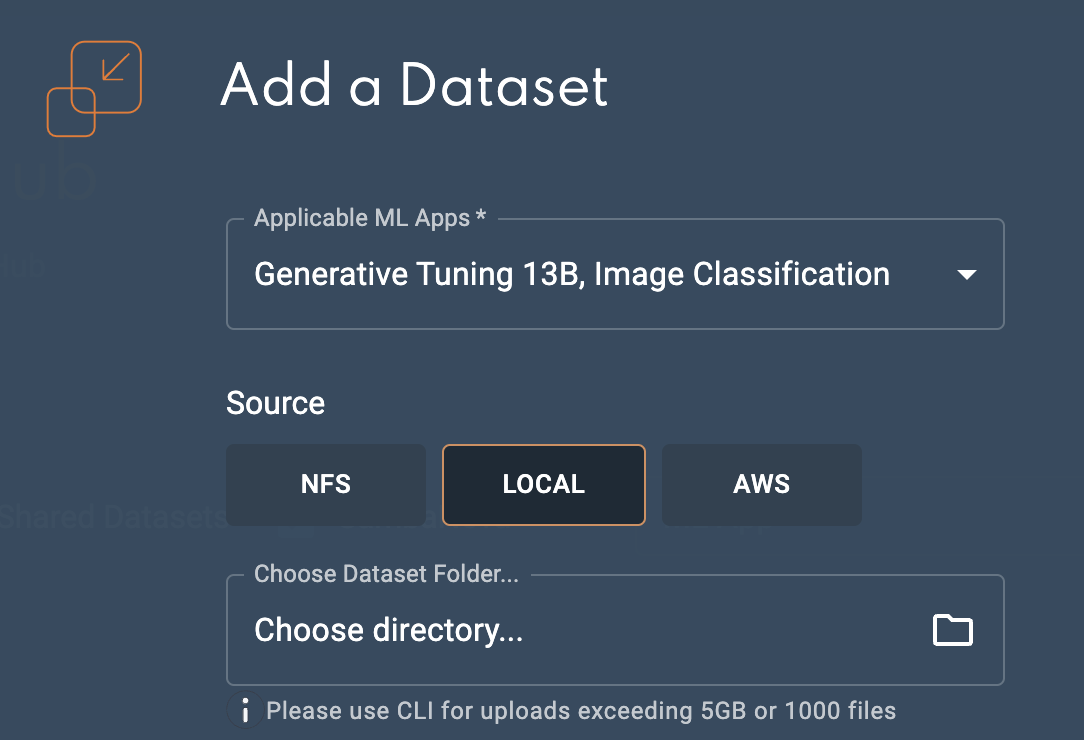
Option 2: Add a dataset from a local machine
Follow the steps below to upload a dataset from a local directory on your machine using the GUI.
|
The recommended maximum dataset size for uploading from a local machine is 5 gigabytes (GB). Please use the CLI for datasets that are greater than 5GB or contain more than 1000 files. |
-
Click the Local button.
-
Navigate to the folder on your local machine by clicking Choose directory in the Choose dataset folder field.
-
Click Upload to submit the dataset files for upload.
-
You can select a different dataset to use prior to clicking Add dataset by clicking Choose directory again.
-
-
Click Add dataset to submit the dataset to the Dataset Hub.
Option 3: Import from AWS S3
Follow the steps below to import your dataset from AWS S3.
|
-
Click the AWS button.
-
In the Bucket field, input the name of your S3 bucket.
-
In the Access key ID field, input the unique ID provided by AWS IAM to manage access.
-
Enter your Secret access key into the field. This allows authentication access for the provided Access Key ID.
-
Enter the AWS Region that your S3 bucket resides into the Region field.
-
Input the relative path to the dataset in the S3 bucket into the Folder field. This folder should include the required dataset files for the task (for example, the labels, training, and validation files).
-
Click Add dataset to submit the dataset to the Dataset Hub.
An Access key, Secret access key, and user access permissions are required for AWS S3 import.
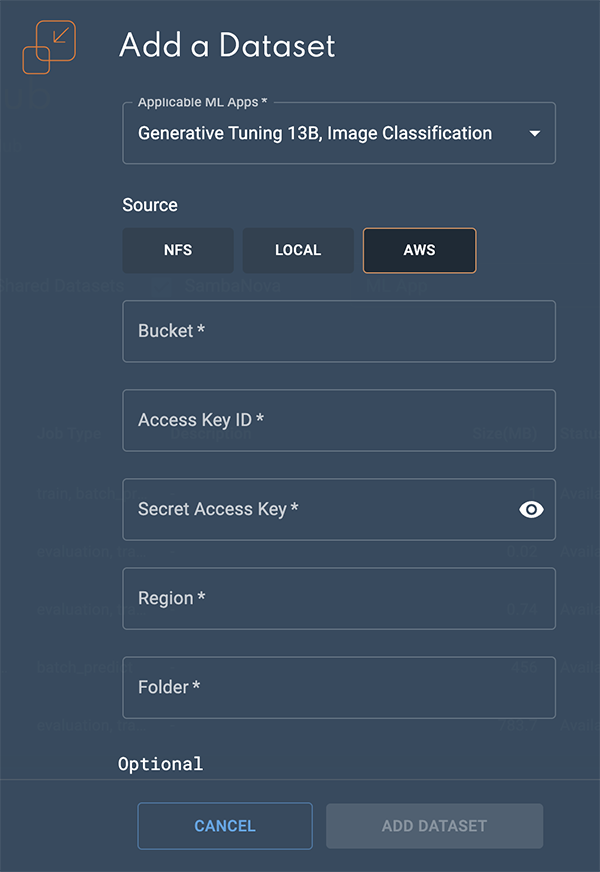 Figure 8. Import from AWS S3
Insufficient storage message
If the required amount of storage space is not available to add the dataset, the Insufficient storage message will display describing the Available space and the Required space to add the dataset. You will need to free up storage space or contact your administrator. Please choose one of the following options.
-
Click Cancel to stop the add a dataset process. Please free up storage space and then restart the add a dataset process.
-
Click Proceed anyway to add the dataset. Please free up storage space, otherwise the add a dataset process will fail.
|
A minimum of 10 minutes is required after sufficient storage space has been cleared before the dataset will start successfully saving to the Dataset Hub. |

Add a dataset using the CLI
Similar to the GUI, SambaStudio provides options to add datasets from multiple source locations using the snapi dataset add command. For each option, you will first need to Get the App ID for your dataset to be associated.
|
|
When running the snapi dataset add command for all GPT language models, ensure that dataset-path points to the output directory from the generative_data_prep command. The output should specifically point to the file path you passed in as the argument for the --output_path flag during data preparation. See the Generative data preparation README |
Get the App ID for your dataset
Prior to adding a dataset using the CLI, you will need to get the required App ID for the ML App (app) you want the dataset to be associated. Multiple App IDs (ML Apps) can be specified when adding a dataset. Run the snapi app list command to view a list of all App IDs. The example snapi app list command below displays the Generative Tuning 13B ML App (app) and its App ID of 57f6a3c8-1f04-488a-bb39-3cfc5b4a5d7a.
$ snapi app list
Generative Tuning 13B
=====================================================
Name                : Generative Tuning 13B
ID                  : 57f6a3c8-1f04-488a-bb39-3cfc5b4a5d7a
Playground          : True
Prediction Input    : text
Option 1: Add a dataset from a local machine
The example snapi dataset add command below demonstrates how to add a dataset from a local directory on your machine. The following is specified in our example:
-
The name of the dataset is local_machine.
-
The job type is train.
-
The App ID (
app-ids) associated with the dataset is 57f6a3c8-1f04-488a-bb39-3cfc5b4a5d7a. -
For adding a dataset from your local machine, the source_type will need to be specified as localMachine.
-
For adding a dataset from your local machine, the source_file will need to define the source path on your local machine, which is /Users/<user-name>/Documents/dataset/source.json in our example.
-
The field of application (application_field) of the dataset is language.
-
The language of the dataset is english.
-
The description added for the dataset is simple_gt_13b_local_machine.
$ snapi dataset add \
    --dataset-name local_machine \
    --job_type train \
    --app-ids 57f6a3c8-1f04-488a-bb39-3cfc5b4a5d7a \
    --source_type localMachine \
    --source_file /Users/<user-name>/Documents/dataset/source.json \
    --application_field language \
    --language english \
    --description simple_gt_13b_local_machine
In our example, we used a .json file for the source_file, however .yaml files are also supported. The example below demonstrates the source.json file.
{
    "source_path": "/Users/<user-name>/Documents/dataset"
}
Option 2: Add a dataset from NFS
Prior to adding a dataset from NFS using the snapi dataset add command, the dataset will need to be uploaded to the NFS server using the path below. Ensure the permissions of the dataset directory are set to 755. Contact your administrator for more information.
<NFS_root>/daasdir/<user-directory>/<datasetdir>/
|
An example implementation of the above path is /home/daasdir/user1/GPT_DC/, where:
|
The example snapi dataset add command below demonstrates how to add a dataset from NFS. The following is specified in our example:
-
The name of the dataset is local_NFS.
-
The job type is train.
-
The App ID (app-ids) associated with the dataset is 57f6a3c8-1f04-488a-bb39-3cfc5b4a5d7a.
-
For adding a dataset from NFS, the source_type will need to be specified as local.
-
For adding a dataset from NFS, the source_file will need to define the local source path on NFS, which is /Users/<user-name>/Documents/dataset/source_local.json in our example.
-
The field of application (application_field) of the dataset is language.
-
The language of the dataset is english.
-
The description added for the dataset is simple_gt_13b_local_NFS.
$ snapi dataset add \
    --dataset-name local_NFS \
    --job_type train \
    --app-ids 57f6a3c8-1f04-488a-bb39-3cfc5b4a5d7a \
    --source_type local \
    --source_file /Users/<user-name>/Documents/dataset/source_local.json \
    --application_field language \
    --language english \
    --description simple_gt_13b_NFS
In our example, we used a .json file for the source_file, however .yaml files are also supported. The example below demonstrates the source_local.json file.
{
    "source_path": "common/datasets/gt_13b_train"
}
Option 3: Add a dataset from AWS S3
The example snapi dataset add command below demonstrates how to add a dataset from AWS S3.
The following is specified in our example:
-
The name of the dataset is AWS_upload.
-
The job type is train.
-
The App ID (app-ids) associated with the dataset is 57f6a3c8-1f04-488a-bb39-3cfc5b4a5d7a.
-
For adding a dataset from AWS, the source_type will need to be specified as aws.
-
In our example for adding a dataset from AWS, the source_file calls our aws_source.json file. This files provides the configurations for the various AWS settings.
-
In our example for adding a dataset from AWS, the metadata-file calls our dataset_metadata.json file. This file describes the dataset metadata file paths.
-
The field of application (application_field) of the dataset is language.
-
The language of the dataset is english.
-
The description added for the dataset is simple_gt_13b_AWS.
$ snapi dataset add \
    --dataset-name AWS_upload \
    --job_type train \
    --app-ids 57f6a3c8-1f04-488a-bb39-3cfc5b4a5d7a \
    --source_type aws \
    --source_file aws_source.json \
    --metadata-file dataset_metadata.json \
    --application_field language \
    --language english \
    --description simple_gt_13b_AWS
In our example, we used a .json file for the source_file, however .yaml files are also supported. The example below demonstrates the aws_source.json file.
{
    "bucket":             "<input-name-of-S3-bucket>",
    "folder":             "<relative-path>/simple_gt_13b_train/",
    "access_key_id":      "<unique-AWS-IAM-key>",
    "secret_access_key":  "<your-secret-access-key>",
    "region":             "<AWS-region-your-S3-bucket-resides>"
}
Metadata file for datasets
A metadata file can be used to provide the path to your validation, train, and test datasets. Both .json and .yaml formats are supported.
The example below demonstrates the dataset_metadata.json metadata file we used in our example for Option 3: Add a dataset from AWS S3.
{
    "labels_file": "labels_file.txt",
    "train_filepath": "train.csv",
    "validation_filepath": "validation.csv",
    "test_filepath": "test.csv"
}
The example below demonstrates a .yaml metadata file used for validation, train, and test datasets.
$ cat dataset_metadata.yaml

validation_filepath: validation.csv
train_filepath: train.csv
labels_file: labels_file.txt
test_filepath: test.csv
Dataset share settings
Providing access to datasets within SambaStudio is accomplished by assigning a share role in the Share settings window. Access to datasets can be assigned by the owner/creator of the dataset (a User), tenant administrators (TenantAdmin) to datasets within their tenant, and organization administrators (OrgAdmin) to datasets across all tenants.
|
SambaNova owned datasets cannot have their share settings assigned. |
From the dataset list, click the kebob icon (three vertical dots) in the Action column of the dataset you wish to share and select Share settings to access the Share settings window.

The Share settings window is divided into two sections, General access and Share with specific users. Slide the toggle to the right to enable and define share settings for either section. This allows dataset access to be defined and regulated based on the criteria described below.
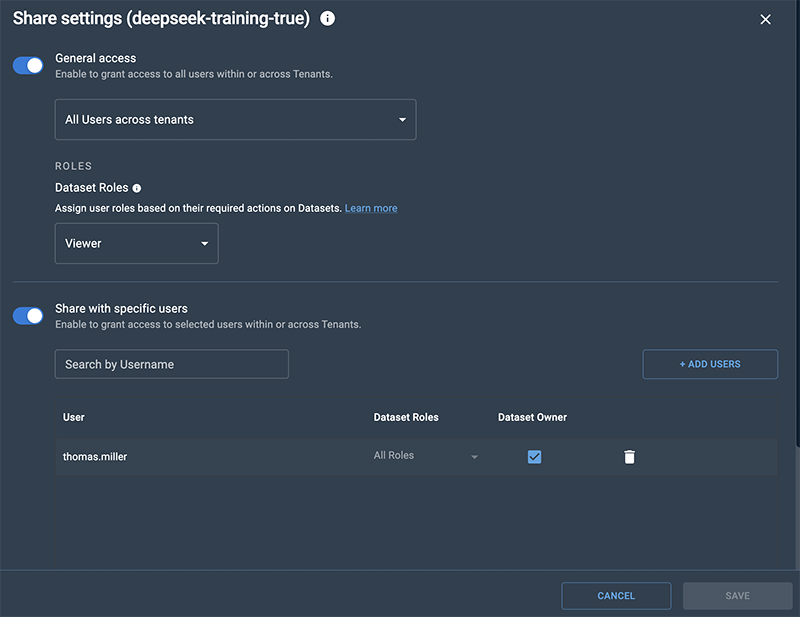
General access
You can provide access to a dataset based on the users in tenants. Once you have defined the general access to your dataset based on tenants, you can set access to a dataset based on the share role of Viewer.
- Viewer
-
A Viewer has the most restrictive access to SambaStudio artifacts. Viewers are only able to consume and view artifacts assigned to them. Viewers cannot take actions that affect the functioning of an artifact assigned to them.
|
Hover over the info icon to view the actions available for the Viewer share role of dataset. 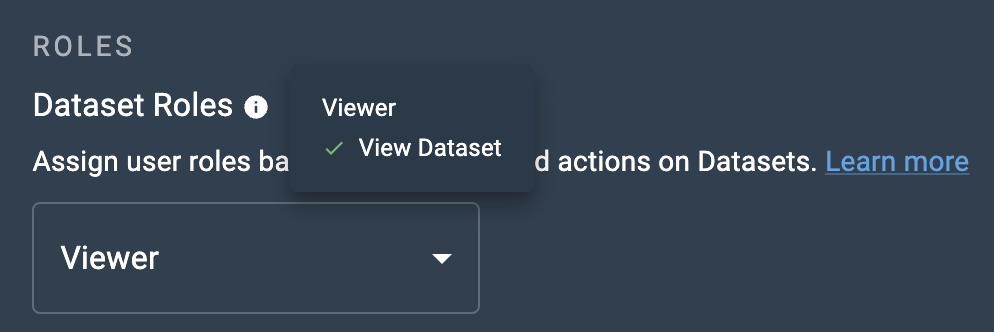
Figure 12. Dataset share role actions
|
-
Slide the toggle to the right to enable and define access to the dataset based on tenants and their defined users.
-
From the drop-down, select one of the following options:
-
All users within tenant: This allows all users in the same tenant as the dataset to access it.
-
All users across tenants: This allows all users across all tenants in the platform to access the dataset.
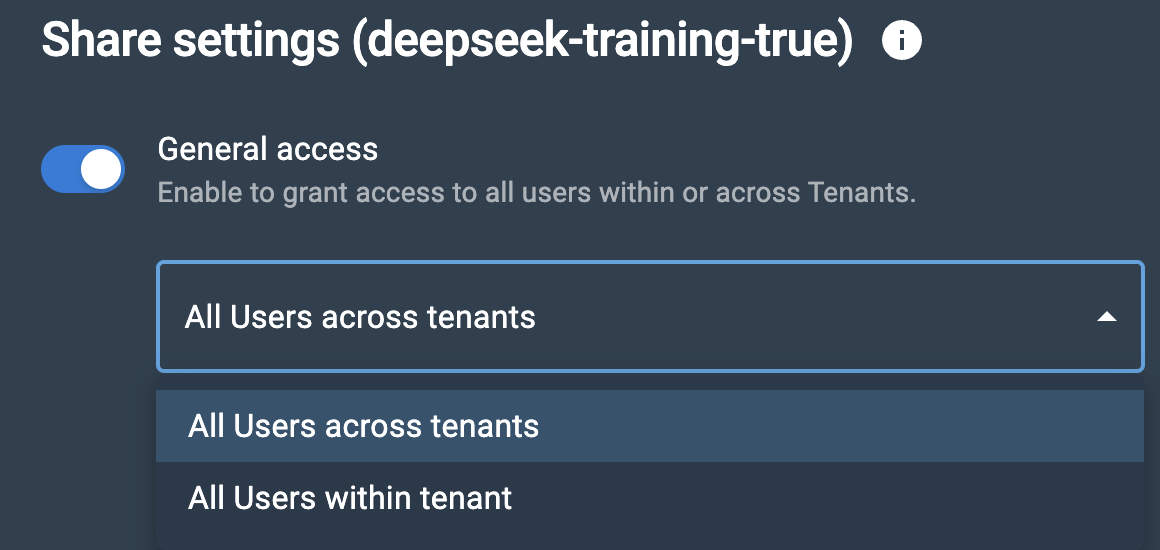 Figure 13. Dataset tenant access drop-down
-
-
Select an option of Viewer or No access from the Dataset roles drop-down to set the access to it.
-
No access forbids access to the dataset.
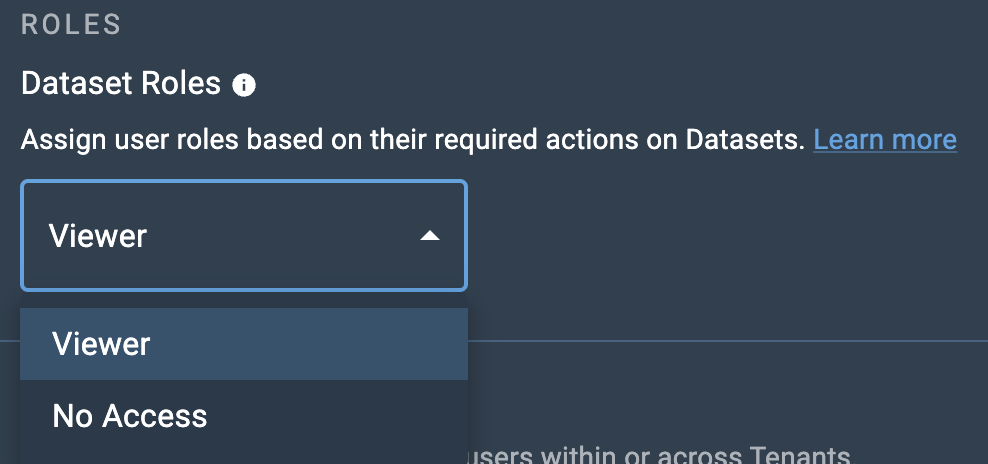 Figure 14. Dataset roles drop-down
-
-
Click Save at the bottom of the Share settings window to update your General access share settings.
 Figure 15. Share settings save
Disable general access
-
To disable general access to a dataset in all tenants throughout the platform, slide the General access toggle to the left.
 Figure 16. Disable general access
 -
Click Save at the bottom of the Share settings window to update your General access share settings.
 Figure 17. Share settings save
Share with specific users
Specific users can be set as Viewer and allowed access to a dataset based on the Viewer share role rights. Additionally, No access can be set for specific users. Follow the steps below to send an invitation to users and set their share role access.
|
OrgAdmin and TenantAdmin user roles have access to datasets based on their rights and cannot be assigned a different share role. |
-
Slide the Share with specific users toggle to the right to enable and define user access for the dataset.
-
Click Add users to open the Add new users box.
-
From the Usernames drop-down, select the user(s) for which you wish to share your dataset. You can type an input to locate the user. Multiple usernames can be selected.
-
You can remove a user added to the drop-down by clicking the X next to their name or by setting the cursor and pressing delete.
-
-
Select an option of Viewer or No access from the Dataset roles drop-down to set the user’s access.
-
Hover over the info icon to view the actions available for Viewer share role of datasets.
-
-
Click Add users to close the Add new users box.
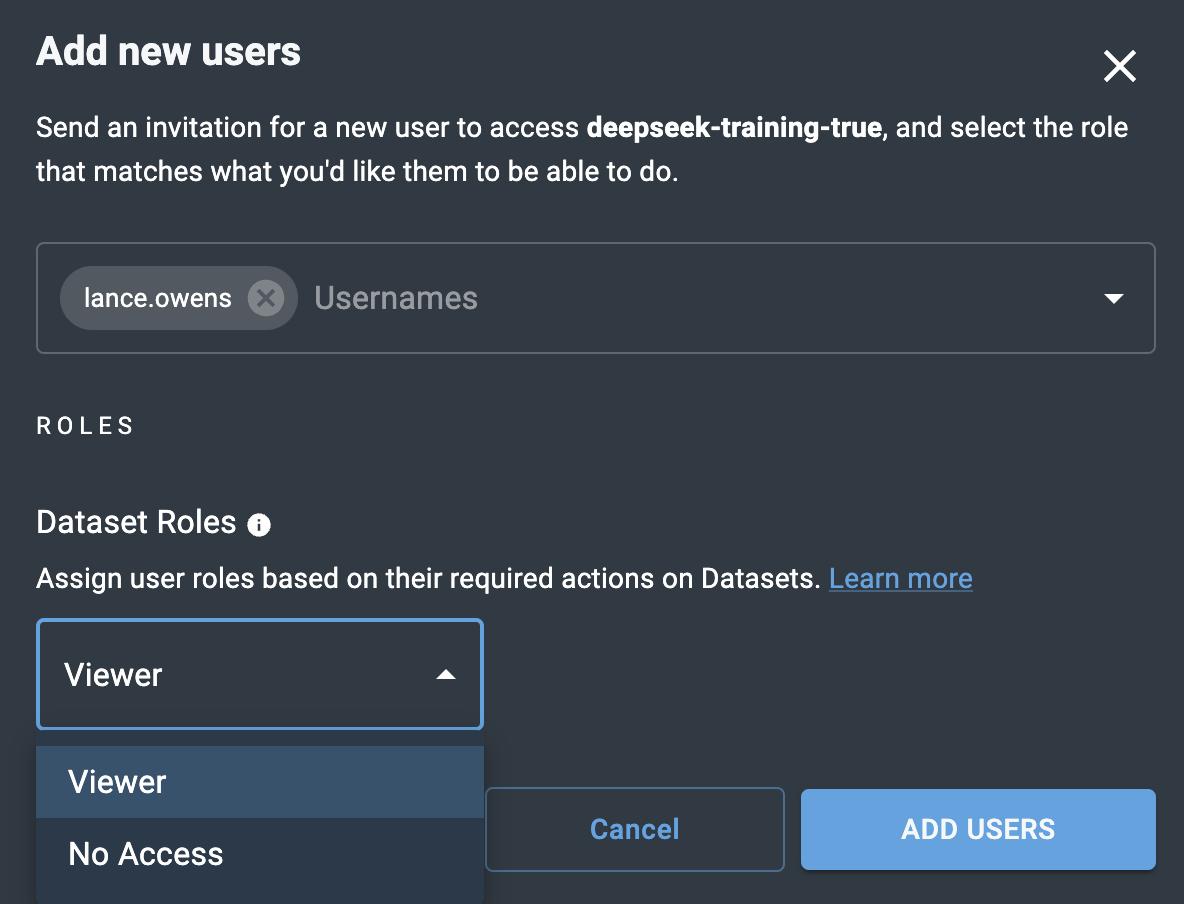 Figure 18. Add new user
 -
You can assign a user as an owner of the dataset by selecting the box in the Dataset owner column.
-
An owner inherits the actions of all roles. Setting a user as an owner overrides previous role settings.
 Figure 19. Assign user as dataset owner
-
-
Click Save at the bottom of the Share settings window to send the invitation to your selected users and update your share settings.
 Figure 20. Share settings save
Remove users
You can remove a user that you have shared your dataset with for all users or for specific users.
- Remove sharing for all users
-
-
To remove share access to your dataset for all users, slide the Share with specific users toggle to the left to disable sharing.
 Figure 21. Disable share with specific users toggle
 -
Click Save at the bottom of the Share settings window to update your share settings.
 Figure 22. Share settings save
-
- Remove sharing for a specific user
-
-
From the Share with specific users list, click the trash icon next to the user you wish to stop sharing your dataset.
 Figure 23. Remove user from share list
 -
Click Save at the bottom of the Share settings window to update your share settings.
 Figure 24. Share settings save
-
Delete a dataset using the GUI
Follow the steps below to delete a dataset using the SambaStudio GUI.
|
When a dataset is deleted by a user, the name of the deleted dataset cannot be used to create a new dataset by the same user. The name of the deleted dataset can be used by another user to create a dataset. |
-
From the Dataset Hub window, click the three dots under the Actions column for the dataset you wish to delete.
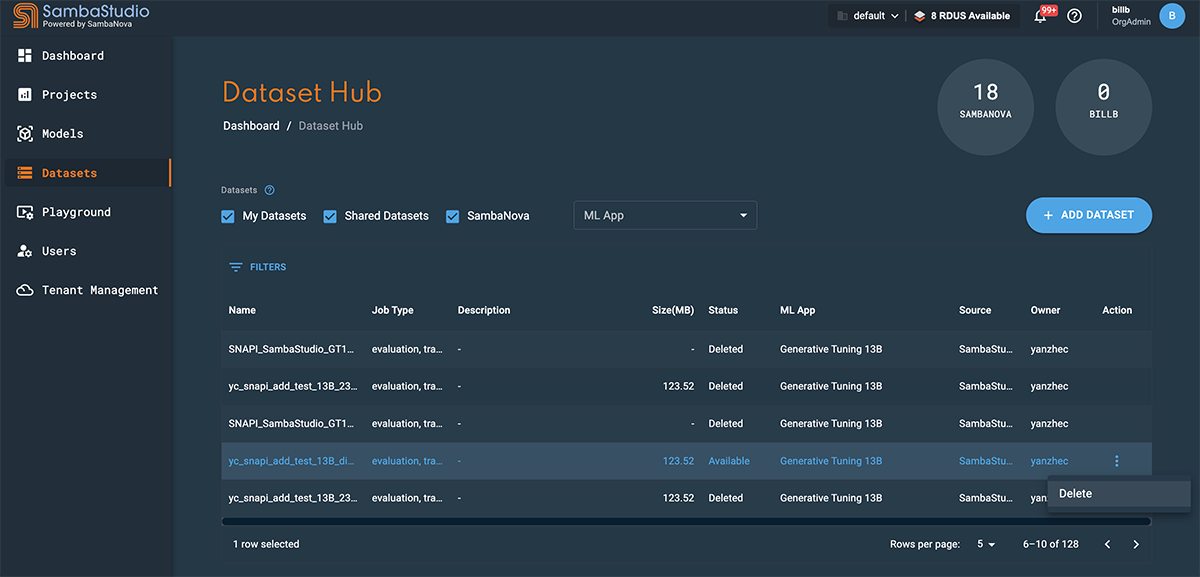 Figure 25. Delete dataset actions menu
-
The You are about to delete a dataset box will open. A warning message will display informing you that you are about to delete a dataset.
-
-
Click Yes to confirm that you want to delete the dataset.
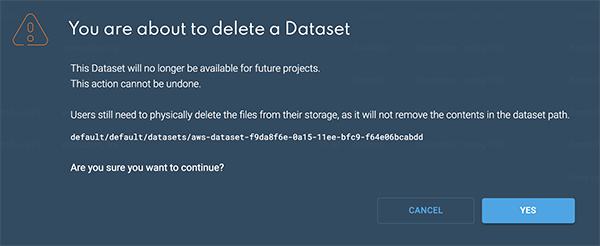 Figure 26. Delete dataset box
Delete a dataset using the CLI
The example below demonstrates how to delete a dataset using the snapi dataset remove command. You will need to specify the dataset name or dataset ID.
$ snapi dataset remove \
--dataset <your-dataset-name> OR <your-dataset-id>|
When a dataset is deleted by a user, the name of the deleted dataset cannot be used to create a new dataset by the same user. The name of the deleted dataset can be used by another user to create a dataset. |