Add checkpoints to the Model Hub
SambaStudio allows you to add checkpoints to the Model Hub.
This document describes:
Add checkpoints best practices
The information below describes best practices and recommendations for adding your own checkpoints to the SambaStudio Model Hub when using the Import a checkpoint using the CLI or Add a checkpoint from storage using the GUI workflows.
Checkpoint compatibility
The following factors are important to consider when determining which checkpoints are compatible with SambaStudio.
-
Model architecture: The model architecture of your checkpoint needs to be exact and compatible with the existing model architectures of SambaStudio. For example, if you want to upload a fine-tuned version of Meta-Llama-3.1-70B-Instruct, ensure that aspects such as the checkpoint’s parameter count, vocabulary size, hidden_size, tensor names, rope theta, hidden_act, etc. are the same as for Meta-Llama-3.1-70B-Instruct.
-
Sequence length: The sequence length of the checkpoint you are uploading needs to be greater than or equal to the max value out of the configs we support in SambaStudio for a given model architecture. This field is typically called "max_position_embeddings" in the config.json file.
-
Precision: Precision of 16 bit or higher is supported, but will get converted to Bfloat16 during upload.
-
Quantization: Quantized checkpoints with 8 bit or lower are not currently supported.
Recommendations for when to use the CLI
The Import a checkpoint using the CLI option is recommended when:
-
The model size is very large. Especially if the model size is larger than the maximum upload size of the GUI/browser. We recommend using the CLI if your file size is larger than 5GB.
-
Multiple models need to be uploaded simultaneously.
-
Checkpoints to upload are on a local machine outside of NFS.
-
There are lightweight or no VPN or firewall settings
Recommendations for when to use the GUI
The Add a checkpoint from storage using the GUI option is recommended when:
-
Checkpoints are on the smaller side.
-
NFS is accessible.
-
There are bulky VPN or firewall settings.
NFS versus local storage considerations
-
NFS uploads are typically faster thant local uploads.
-
For example, uploading a ~40GB Mistral model from a computer’s local storage to SambaStudio takes around ~4 hours using a ~100MBPS wifi connection speed. The same 40GB model takes ~20 minutes uploading from NFS.
-
-
NFS requires double the storage of the model size.
-
For example, the storage space required would be 128GB for a 64GB size model.
-
-
NFS uploads are better if the network connectivity is unstable.
-
NFS uploads are better for very large model sizes or multiple model uploads.
-
This is because checkpoints may take up a lot of space on local storage devices.
-
Connectivity and storage considerations
The most common checkpoint compatibility upload issues are described in Checkpoint error messages. However, network connections, server overloads, or NFS storage issues can also cause errors. Please review the following steps if you are experiencing issues:
-
Check network connections and retry the upload if network connectivity is causing the failure.
-
NFS storage-related issues can be diagnosed through error messages posted in the Notifications Panel of SambaStudio.
-
Retry the upload after waiting 30 seconds to 1 minute to address server overloads or brief network disconnection.
Best practices for SambaNova hosted environments
In SambaNova hosted environments the GUI/API is only accessible via https connection.There is no direct access to the SambaStudio storage. The storage is only accessible by the SambaNova IT Storage team. There are two options for SambaNova hosted systems: Using a GCP VM Machine or Using SambaNova VMs.
Starting up, onboarding, and configuring access control on a GCP VM is typically quicker than SambaNova VMs and does not come with the upfront planning, logistics, and limited access control required by SambaNova VMs. However, using GCP VMs can be slower (lower bandwidth) than using SambaNova VMs.
Best practices for on-premise hosted environments
For both on-premise standard (connected) and airgapped (disconnected) mode, SambaNova does not have access to on-premise storage. Customer IT Admins need to provide Tenants with file transfer access to the NFS Storage (typically managed by the Admin’s IT team). Tenants need to have the ability to copy their checkpoints to daasdir/custom_uploads in order to transfer any checkpoints. Once the transfer is complete models can then be imported using the snapi import model commands.
For setting up storage access for Tenants:
-
Assume SambaStudio mounts to NFS over a path:
path/to/vsanfs/samba. -
Admins can provision the ability for Tenants to mount to different folders in this storage:
path/to/vsanfs/samba/user/home. -
Tenants are provided the ability to copy from
path/to/vsanfs/samba/user/hometodaasdir/custom_uploads. They do not have any other privileges ondaasdir/custom_uploads.
Add checkpoints using the GUI
You can add checkpoints from a training job or from local storage using the GUI. From the Model Hub window, click Add checkpoint to open the Add a checkpoint to Model Hub box to start the process.

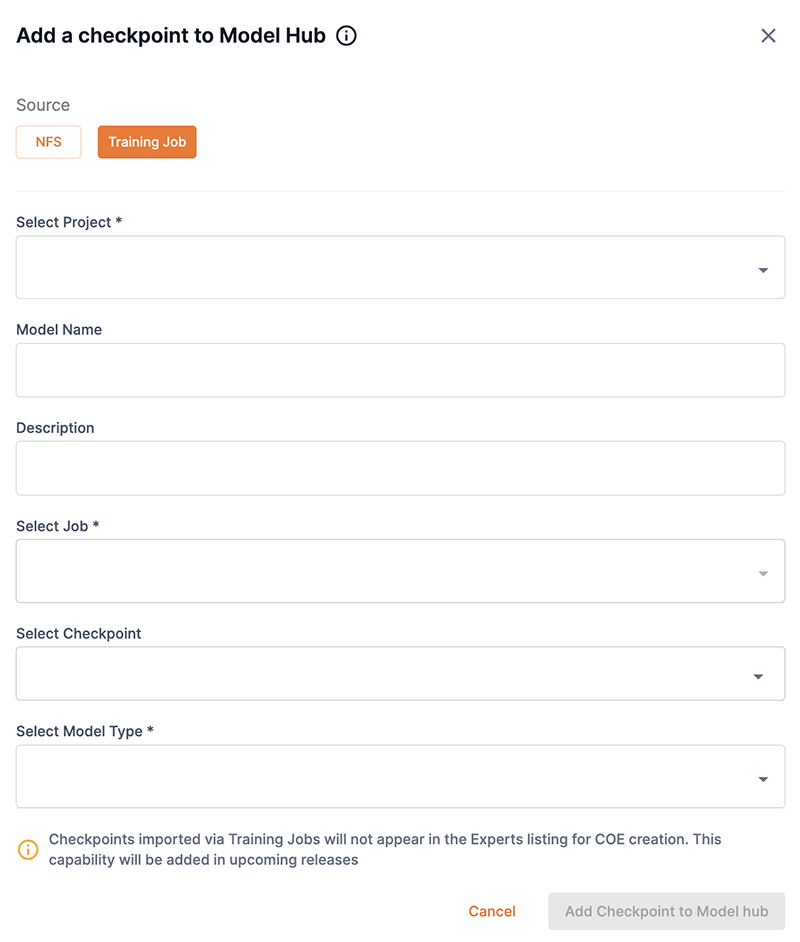
Add a checkpoint from a training job using the GUI
Follow the steps below to add a checkpoint from a training job using the SambaStudio GUI.
-
From the Model Hub window, click Add checkpoint. The Add a checkpoint to Model Hub box will open.
-
Select Training job for the Source.
-
From the Select project drop-down, select the project that contains checkpoint.
-
Enter a name for the new model-checkpoint in the Model name field.
-
From the Select job drop-down, select the job that contains the checkpoint.
-
The Select checkpoint drop-down opens a list of available checkpoints from the specified job. Select the checkpoint you wish to add from the list.
-
Select finetuned or pretrained from the Select model type drop-down.
-
Click Add checkpoint to Model Hub to confirm adding your selected checkpoint and return to the Model Hub. Click Cancel to close the box and return to the Model Hub.
Add a checkpoint from storage using the GUI
SambaStudio allows you to add a checkpoint as a new model to your SambaStudio environment. This enables you to add checkpoints to SambaStudio that are model architecture compatible, as well as being compatible with at least one supported configuration of SambaStudio. Adding a checkpoint to the Model Hub using the GUI is a four step process as described below.
|
Please be aware of the following when adding a checkpoint from storage using the GUI:
|
Step 1: Details
-
From the Add a checkpoint to Model Hub box, select NFS as the Source.
-
Append the model path, provided by your administrator, from your NFS location in the Import model path field. An example path would be
byoc/suzume-llama-3-8B-japanese. -
Enter a unique name for the new model-checkpoint in the Import model name field.
-
From the Select ML App drop-down, choose the ML App to which the model-checkpoint belongs.
-
You can bypass the transformers version error by selecting Ignore transformers version. See Issue: Transformers version for more information.
-
Click Continue to proceed.
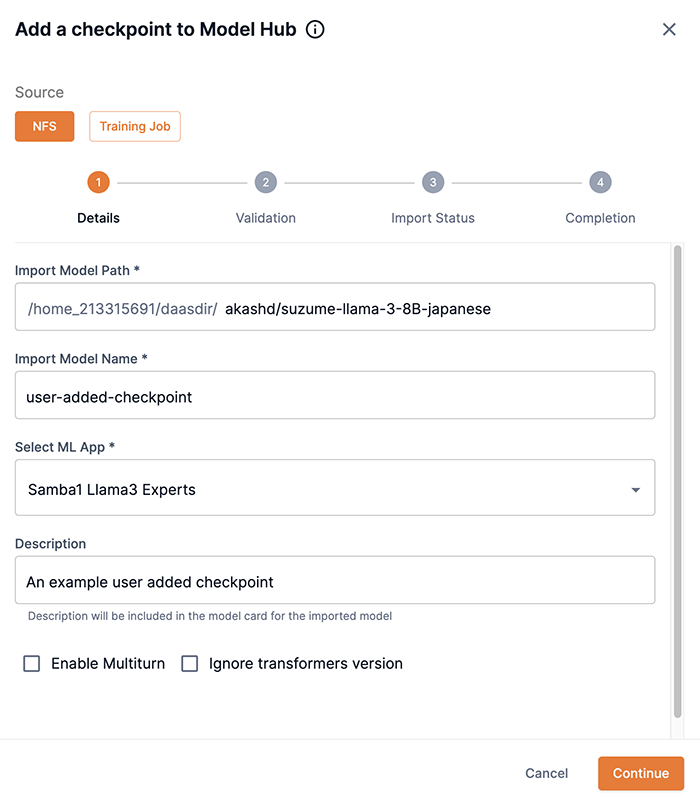 Figure 3. Step 1: Details first screen
 -
Enter the publisher’s name of the checkpoint in the Publisher name field. Unknown is provided by default.
-
Ensure the Model architecture field is correct, otherwise input the architecture of the model.
-
Click Next to proceed to Step 2: Validation.
The prompt template in
tokenizer_config.jsonwill be used if you proceed and click Next. You can edit a chat template in thetokenizer_config.jsonfile before uploading your checkpoint. To edit a chat template before uploading:-
Click Cancel.
-
View Edit chat templates, which describes how to edit a chat template.
-
Restart the Add a checkpoint to Model Hub process.
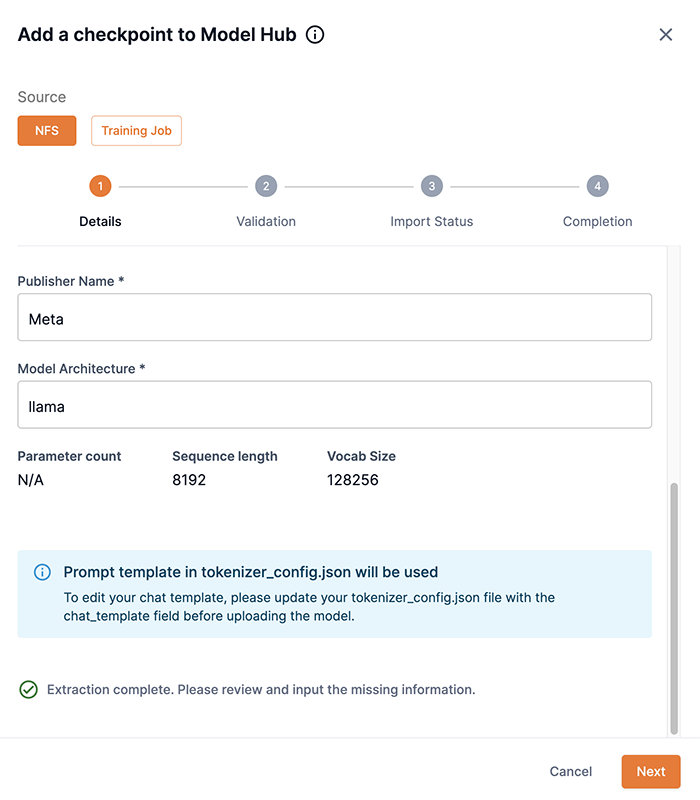 Figure 4. Step 1: Details second screen
 -
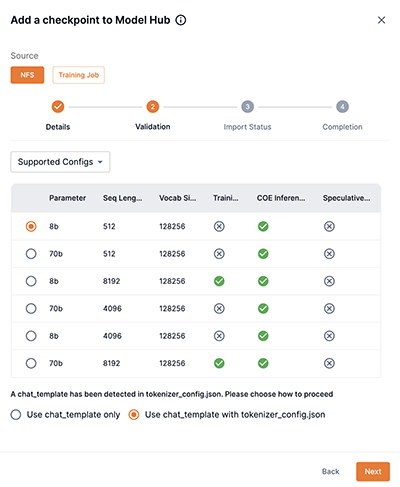
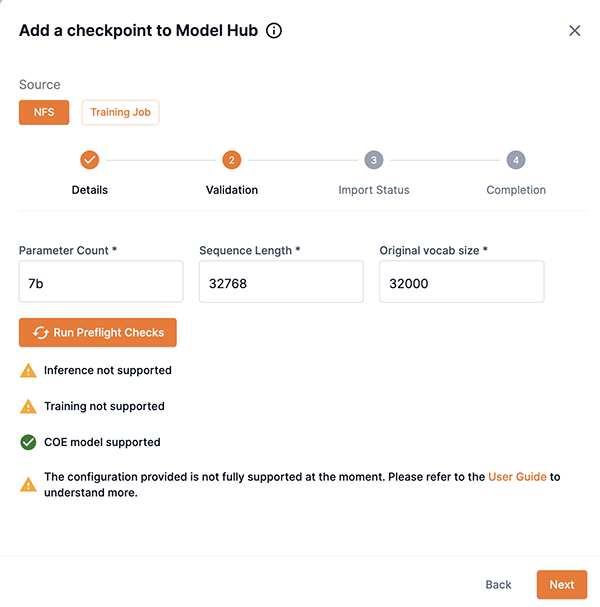
Step 2: Validation
You will be presented with different options for the Validation step depending on the checkpoint you are attempting to add. The table below describes the options.
| Description | Example Image |
|---|---|
This example image demonstrates the option of selecting one of the available configurations for your checkpoint.
|
|
This example image demonstrates the option of manually inputting configs for your checkpoint.
|
|
The chat_template field in the tokenizer_config.json determines the chat template for the checkpoint you are uploading. When prompts are tokenized at inference time and the process_prompt parameter is set to True in the request body, the apply_chat_template method is utilized with the tokenize parameter set to True, as shown in the example below.
prompt = tokenizer.apply_chat_template(messages=messages,
                                       tools=tools,
                                add_generation_prompt=True,
                                tokenize=True,
                                **tokenizer.special_tokens_map)
Because the tokenize parameter is set to True, application of the chat template and tokenization is done in a single step. Any special flags in the checkpoint’s tokenizer_config.json will be ignored and the default values for the checkpoint’s tokenizer class will be used. The tokenizer_config.json typically has a tokenizer_class parameter that contains the tokenizer class name.
For example, if the tokenizer_class is LlamaTokenizerFast, you can look at the transformers library docs for LlamaTokenizerFast ![]() to determine the default values. You can see that add_bos_token and add_eos_token in the LlamaTokenizerFast tokenizer default to True and False respectively.
to determine the default values. You can see that add_bos_token and add_eos_token in the LlamaTokenizerFast tokenizer default to True and False respectively.
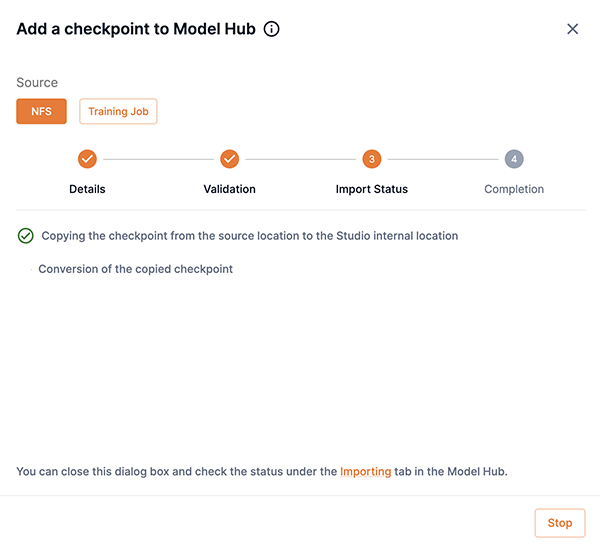
Step 3: Import status
The importing of the model will begin after you have clicked Proceed in Step 2: Validation. The Add a checkpoint to Model Hub box will display notifications describing the import process and status.
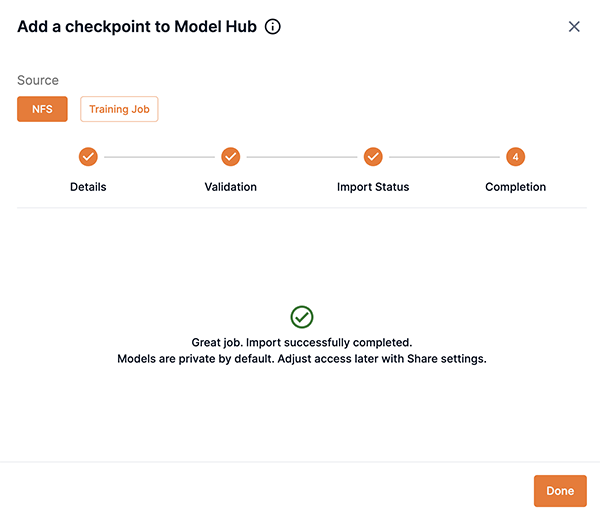
Step 4: Completion
The Completion screen will display confirming that your import was successful or will describe any issues. Note that models are private by default. Please adjust the model share settings share your model with other users and tenants.
Insufficient storage message
If the required amount of storage space is not available to add the checkpoint, the Insufficient storage message will display describing the Available space and the Required space to import the model. You will need to free up storage space or contact your administrator. Please choose one of the following options.
-
Click Cancel to stop the add a checkpoint process. Please free up storage space and then restart the add a checkpoint to the Model Hub process.
-
Click Add checkpoint to Model Hub to proceed and add the checkpoint. Please free up storage space, otherwise the add a checkpoint to the Model Hub process will fail.
|
A minimum of 10 minutes is required after sufficient storage space has been cleared before the checkpoint will start successfully saving to the Model Hub. |
Import a checkpoint using the CLI
Importing a checkpoint using the CLI allows you to add checkpoints that are stored locally or on a network. There are two modes available when importing a checkpoint using the CLI: Interactive mode and Non-interactive mode.
|
Please be aware of the following when importing a checkpoint using the CLI:
|
Interactive mode
Interactive mode is the default mode SambaStudio uses when importing a checkpoint using the CLI. It is more verbose and provides detailed feedback on each step of the process.
|
We recommend using interactive mode:
|
Step 1
The example snapi import model create command below demonstrates the first step in importing a checkpoint from the local storage of your computer. You will need to specify:
-
A unique name for the checkpoint you are importing. This name will become the name displayed in the newly created model card.
-
The app name or ID for your imported checkpoint. Run
snapi app listto view the available apps. -
The source type of your imported checkpoint. If importing a checkpoint located on the local storage of your computer, use
LOCAL. -
The path to the source of where your imported checkpoint is located.
$ snapi import model create \
  --model-name <unique-name-for-new-model> \
  --app "<app-name-for checkpoint>" OR <appID-for-checkpoint> \
  --source-type LOCAL \
  --source-path <path-to-checkpoint-on-local-storage>
Step 2
After running the command above in Step 1, the extraction process will complete. The example below demonstrates what the CLI will display about your checkpoint.
-
You will be prompted to update information, such as the Publisher, as shown below.
Example extraction complete==================================================================================================== Extraction complete. Please review and fill the missing information. ==================================================================================================== Publisher Name : Unknown Model Architecture : llama Parameter Count : Sequence Length : 8192 Vocab size : 128256 Do you want to update Publisher? [y/n] (n): -
After updating the Publisher, or leaving blank, you will be prompted to proceed, as shown below.
Example updated information==================================================================================================== Updated Information: ==================================================================================================== Publisher Name : OpenOrca Model Architecture : llama Parameter Count : Sequence Length : 8192 Vocab size : 128256 Confirm to proceed? [y/n] (n):
Step 3
After proceeding from Step 2, the CLI will either display the supported configuration for your checkpoint, or you will need to input the manual configuration.
Supported configuration
-
Choose the configuration that matches your checkpoint from the option list. Match the values in the option number displayed in the CLI with the following values.
-
Parameter Count
-
Sequence Length
-
Vocab Size
-
-
Enter the corresponding number into the CLI.
-
For our example, option
5was the correct option.Example supported configurations==================================================================================================== Supported configs ==================================================================================================== +--------+-----------------+-----------------+------------+----------+-----------+ | Option | Parameter Count | Sequence Length | Vocab Size | Training | Inference | +--------+-----------------+-----------------+------------+----------+-----------+ | 1 | 70b | 4096 | 128256 | ✖ | ✔ | | 2 | 70b | 8192 | 128256 | ✔ | ✔ | | 3 | 8b | 4096 | 128256 | ✖ | ✔ | | 4 | 8b | 512 | 128256 | ✖ | ✔ | | 5 | 8b | 8192 | 128256 | ✔ | ✔ | | 6 | 70b | 512 | 128256 | ✖ | ✔ | +--------+-----------------+-----------------+------------+----------+-----------+ Enter Option: (For Custom (Manual Override), type 7, type Q to Quit):
-
-
After selecting the corresponding configuration for your checkpoint, the CLI will verify Selected Config Information, as shown below.
Example selected configuration information==================================================================================================== Selected Config Information: ==================================================================================================== Parameter Count : 8b Sequence Length : 8192 Vocab size : 128256 Prompt template in tokenizer_config.json will be used. To edit your chat template, please update your tokenizer_config.json file with the chat_template field before uploading the model. Proceed with import model creation? [y/n] (n): y -
Enter
y(yes) to proceed to Step 4 uploading, importing, and creating the model.The prompt template in
tokenizer_config.jsonwill be used if you proceed and entery(yes) into the CLI. You can edit a chat template in thetokenizer_config.jsonfile before importing your checkpoint. To edit a chat template before importing:-
Enter
n(no) into the terminal to stop the Import a checkpoint process. -
View Edit chat temapltes, which describes how to edit a chat template.
-
Restart the Import a checkpoint using the CLI process.
-
Manual configuration
-
You can manually input configuration values for your checkpoint by entering the Parameter Count, Sequence Length, and Vocab size values when prompted into the CLI, as shown below.
Example manual configuration==================================================================================================== Custom (Manual Override) ==================================================================================================== Parameter Count: 8b Sequence Length: 8192 Vocab size: 128256 ==================================================================================================== Custom Config Information: ==================================================================================================== Parameter Count : 8b Sequence Length : 8192 Vocab size : 128256 Proceed with run check? [y/n] (n): y -
After manually entering a configuration for your checkpoint, you will be prompted to run a check on your checkpoint using the values you inputted, as shown below.
Example run check with custom configuration valuesRun check succeeded with custom config Inference supported Training supported ==================================================================================================== Selected Config Information: ==================================================================================================== Parameter Count : 8b Sequence Length : 8192 Vocab size : 128256 Prompt template in tokenizer_config.json will be used. To edit your chat template, please update your tokenizer_config.json file with the chat_template field before uploading the model. Proceed with import model creation? [y/n] (n): -
Enter
y(yes) to proceed to Step 4 uploading, importing, and creating the model.The prompt template in
tokenizer_config.jsonwill be used if you proceed and entery(yes) into the CLI. You can edit thetokenizer_config.jsonfile to add a chat template before importing your checkpoint. To add a chat template before importing:-
Enter
n(no) into the terminal to stop the import a checkpoint process. -
View the Chat templates document, which describes how to add a chat template.
-
Restart the Import a checkpoint using the CLI process.
-
Step 4
-
After proceeding with the import model creation from Step 3, the CLI will display the progress of the upload when importing a checkpoint from your local computer storage.
-
After the upload is complete, the CLI will verify that the import has started, as shown below.
Example checkpoint import startedModel user-import-snapi Import started successfully. Use command to check status: snapi import model status -m 4b7692f4-0cbe-46ad-b27e-139f436b0fc9 -
You can check the status of the import by running the snapi import model status command, as shown below.
Example snapi import model status$ studio-sjc3-tstest snapi import model status -m 4b7692f4-0cbe-46ad-b27e-139f436b0fc9 ==================================================================================================== Import Status ==================================================================================================== Model ID : 4b7692f4-0cbe-46ad-b27e-139f436b0fc9 Status : Available Progress : 100 Stage : convert
Non-interactive mode
When using non-interactive mode, you will need to provide all of the required details for the checkpoint you wish to import, including configurations:
-
--non-interactivespecifies the command to use non-interactive mode. -
A unique name for the checkpoint you are importing. This name will become the name displayed in the newly created model card.
-
The app name or ID for your imported checkpoint. Run
snapi app listto view the available apps. -
The publisher name for your imported checkpoint.
-
The parameter count value for your imported checkpoint.
-
The sequence length for your imported checkpoint.
-
The vocab size for your imported checkpoint.
-
The source type of your imported checkpoint. If importing a checkpoint located on the local storage of your computer, use
LOCAL. -
The path to the source of where your imported checkpoint is located.
$ snapi import model create \
  --non-interactive \
  --model-name <unique-name-for-new-model> \
  --app "<app-name-for checkpoint>" OR <appID-for-checkpoint> \
  --publisher "<checkpoint-publisher-name>" \
  --parameter-count "<checkpoint-parameter-count-value>" \
  --sequence-length <checkpoint-sequence-length> \
  --vocab-size <checkpoint-vocab-size> \
  --source-type LOCAL \
  --source-path <path-to-checkpoint-on-local-storage>
Checkpoint error messages
This section describes the most common issues encountered when adding a checkpoint to the Model Hub.
|
-
You can identify your issue by correlating the text in your Notifications Panel message to the Issue heading and highlighted text in the issues below.
-
If you encounter an issue that is not described below, please contact SambaNova Support.
Issue: Tensor mismatch detected
The notification indicates that the tensor names in the uploaded checkpoint are not matching up to what is expected for the supported config.
Example notification
model <Model Name> import failed - error processing app: Tensor mismatch detected. The checkpoint contains tensors not expected by the configuration, and is missing tensors required by the configuration. This may be due to differences in quantization methods or custom modifications to tensor names. Extra tensors in checkpoint: <number of extra tensors> Subset of extra tensors: <list of extra tensors> Missing tensors in checkpoint: <number of missing tensors> Subset of missing tensors: <list of missing tensors>
Code: AppProcessFailed
Steps to take
Inside the checkpoint directory, there should be a file called model.safetensors.index.json or pytorch_model.bin.index.json. These files contain a list of tensor names corresponding to the checkpoint. Errors can result from added, missing, or different tensor names.
For example, if a checkpoint is a quantized version of Meta-Llama-3.1-8B-Instruct, we can look at the model.safetensors.index.json file and see that the tensor names are mismatched between the checkpoint and the original Meta-Llama-3.1-8B-Instruct.
The examples below demonstrate the differences in the tensor names between the quantized checkpoint and the original Meta-Llama31.-8B-Instruct. Note the *_scale tensors in the quantized checkpoint (such as input_scale and weight_scale) are scaling factors typically seen in quantized models.
"weight_map": {
    "lm_head.weight": "model-00004-of-00004.safetensors",
    "model.embed_tokens.weight": "model-00001-of-00004.safetensors",
    "model.layers.0.input_layernorm.weight": "model-00001-of-00004.safetensors",
    "model.layers.0.mlp.down_proj.input_scale": "model-00001-of-00004.safetensors",
    "model.layers.0.mlp.down_proj.weight": "model-00001-of-00004.safetensors",
    "model.layers.0.mlp.down_proj.weight_scale": "model-00001-of-00004.safetensors",
    "model.layers.0.mlp.gate_proj.input_scale": "model-00001-of-00004.safetensors",
    "model.layers.0.mlp.gate_proj.weight": "model-00001-of-00004.safetensors",
"model.layers.0.mlp.gate_proj.weight_scale": "model-00001-of-00004.safetensors", "weight_map": {
"lm_head.weight": "model-00004-of-00004.safetensors",
"model.embed_tokens.weight": "model-00001-of-00004.safetensors",
"model.layers.0.input_layernorm.weight": "model-00001-of-00004.safetensors",
"model.layers.0.mlp.down_proj.weight": "model-00001-of-00004.safetensors",
"model.layers.0.mlp.gate_proj.weight": "model-00001-of-00004.safetensors",Issue: The checkpoint is missing tensors required by the configuration
This notification indicates that there are missing tensors in the checkpoint compared to what is expected for the upported config. Weight tied tensors in a checkpoint are a common cause of this.
Example notification
model <Model Name> import failed - error processing app: The checkpoint is missing tensors required by the configuration. This may be due to a lower parameter size model or forgetting to untie the LM head and embedding layer. Missing tensors in checkpoint: <number of missing tensors> Subset of missing tensors: <list of missing tensors>
Code: AppProcessFailed
Steps for weight tied tensors
Weight tying refers to the practice of using the same set of weights for multiple parts of a model. When weights are tied, checkpoints may omit explicitly saving the tied weights in model.safetensors.index.json since they are derived from the embedding layer (transformer.wte.weight).
Using PyTorch, you can check to see if the weights are tied by seeing if there are duplicates in the memory addresses of each parameter’s tensor data, as shown below.
def check_for_tied_weights(model):
    param_addresses = {}
    for name, param in model.named_parameters():
        addr = param.data_ptr()
        if addr in param_addresses:
            return True
        else:
            param_addresses[addr] = name
    return False
You can untie the weights by doing the following.
def generic_untie_weights(model):
     model.get_output_embeddings().weight = torch.nn.Parameter(model.get_input_embeddings().weight.clone())
     return model
Steps for missing tensors within checkpoint
Inside the checkpoint directory, there should be a file called model.safetensors.index.json or pytorch_model.bin.index.json. These files contain a list of tensor names corresponding to the checkpoint. Errors can result from added, missing, or different tensor names.
Issue: The checkpoint contains extra tensors not expected by the configuration
This notification indicates that there are extra tensors in the checkpoint compared to what is expected for the supported config. Quantization and Low-Rank-Adaptation (LoRA) are common causes for this.
Example notification
model <Model Name> import failed - error processing app: The checkpoint contains extra tensors not expected by the configuration. This may be due to a higher parameter size model. Extra tensors in checkpoint: <number of extra tensors> (e.g., <list of extra tensors>) Extra tensors in checkpoint: <number of extra tensors> Subset of extra <list of extra tensors>
Code: AppProcessFailed
Steps to take
Inside the checkpoint directory, there should be a file called model.safetensors.index.json or pytorch_model.bin.index.json. These files contain a list of tensor names corresponding to the checkpoint. Errors can result from added, missing, or different tensor names.
The cause for this could be attributed to several factors such as quantized checkpoints, auxiliary outputs, LoRA (Low-Rank Adaptation), or other factors that add extra tensors to a checkpoint. Since we do not support quantized checkpoints or LoRA at this time, the best solution would be to acquire the original checkpoint for a supported config (e.g. Meta-Llama-3.1-70B) and retrain, or customize it, without modifying the computational graph.
Issue: Tensor shape mismatch detected
This notification indicates that there are tensors whose shapes do not match what is expected for the supported config.
Example notification
model <Model Name> import failed - error processing app: Tensor shape mismatch detected. The checkpoint contains tensors with shapes that do not match the configuration. This may be due to differences in hidden dimension size or vocab size. Affected tensors: <number of mismatched tensors> Subset of affected tensors: <list of affected tensors>
Code: AppProcessFailed
Steps to take
This error could be due to checkpoints whose parameter size is different compared to the supported config. This could lead to different hidden dimension sizes. This can also be caused by a different vocabulary size compared to the supported config’s vocabulary size. Make sure you are using the correct parameter size model as well as the vocabulary size in your checkpoint required by the supported configuration.
Issue: Tensor data type mismatch detected
This notification indicates that there are tensors whose shapes do not match what is expected for the supported config.
Example notification
model <Model Name> import failed - error processing app: Tensor data type mismatch detected. The checkpoint contains tensors with data types that do not match the configuration. Affected tensors: <number of mismatched tensors> Subset of affected tensors: <list of affected tensors>
Code: AppProcessFailed
Steps to take
This should not happen as currently we convert the datatype for all uploaded checkpoints to bfloat16. Please contact SambaNova Support.
Issue: Transformers version
This notification indicates that your checkpoint is using a newer transformers version than the current SambaStudio’s transformer version, which may change tensor formatting and will make the checkpoint incompatible with SambaStudio. The detailed message in the Notifications Panel will display the SambaStudio transformers version and your checkpoint’s transformers version.
|
You may encounter this issue if you are adding a checkpoint from local storage that you exported from a training job in SambaStudio. |
Example notification
model <Model Name> import failed - error processing app: The transformers version of your checkpoint (<transformers version of your checkpoint>) if larger than the maximum supported transformers version (4.45.2). To fix this please save your checkpoint with a transformers environment ⇐ 4.45.2. Alternatively, you can include the --ignore-transformers-version flag, but this may lead to errors due to the transformers version compatibility issues.
Core: AppProcessFailed
Steps to take
To fix this, please save your checkpoint with a transformers version that is equal to or older than the SambaStudio transformers version. The detailed message in the Notifications Panel will display the SambaStudio transformers version and your checkpoint’s transformers version.
Additionally, you can bypass the transformers version error by doing one of the following:
-
Selecting Ignore transformers version in Step 1: Details of Add a checkpoint to the model Hub using the GUI.
-
Add the
--ignore-transformers-versionflag in Step 1 of Importing a checkpoint using the CLI. Runsnapi import model create --helpfor more information.
This will allow you to add your checkpoint, but depending on your checkpoint’s specific version,this may lead to errors due tensors of your checkpoint being formatted differently than the SambaStudio transformers version.