> ## Documentation Index
> Fetch the complete documentation index at: https://sambanova-systems.mintlify.site/docs/llms.txt
> Use this file to discover all available pages before exploring further.
# User access and permissions
This section guides SambaStack administrators in managing user permissions, configuring admin access, and setting up service tiers and Quality of Service (QoS) levels. It explains how administrators control which users can access specific models, how much they can use, and the priority assigned to their requests.
## Add an administrator
Users can be granted elevated access by adding their email to the SambaStack configuration. To add a user as an administrator:
### Step 1: Add admin email
Add their email address under the `db-admin` section in the `sambastack.yaml` file. For example:
```yaml theme={null}
db-admin:
admins:
- abc@example.com
```
Only add email addresses of authorized admins to maintain security. Must be at the same YAML level as `bundles` (root-level key in sambastack.yaml).
See the [SambaStack.yaml Reference](/en/v1.2.0/sambastack/resources/sambastack-yaml) for a full example.
### Step 2: Apply Configuration
After updating the .yaml file, apply the following configuration:
#### On-prem
```bash theme={null}
helm upgrade \
--install \
--namespace sambastack \
--version \
sambastack \
-f sambastack.yaml \
oci:///sambastack/sambastack
```
#### Airgapped
Use your local copy of the Helm chart instead of the OCI registry path:
```shellscript theme={null}
helm upgrade sambastack \
-f sambastack.yaml \
--namespace sambastack \
sambastack-.tgz
```
`sambastack-.tgz` is your local copy of the Helm chart used for the upgrade. Contact SambaNova Support if you need further assistance.
Version numbers change with new chart releases. Use the version number provided by your SambaNova representative.
### Step 1: Add admin email
Add their email address under the `db-admin` section in the `sambastack.yaml` file. For example:
```yaml theme={null}
data:
sambastack.yaml: |
db-admin:
admins:
- abc@example.com
```
Only add email addresses of authorized admins to maintain security.
See the [SambaStack.yaml Reference](/en/v1.2.0/sambastack/resources/sambastack-yaml) for a full example.
### Step 2: Apply Configuration
After updating the .yaml file, apply the following configuration:
```bash theme={null}
kubectl apply -f sambastack.yaml
```
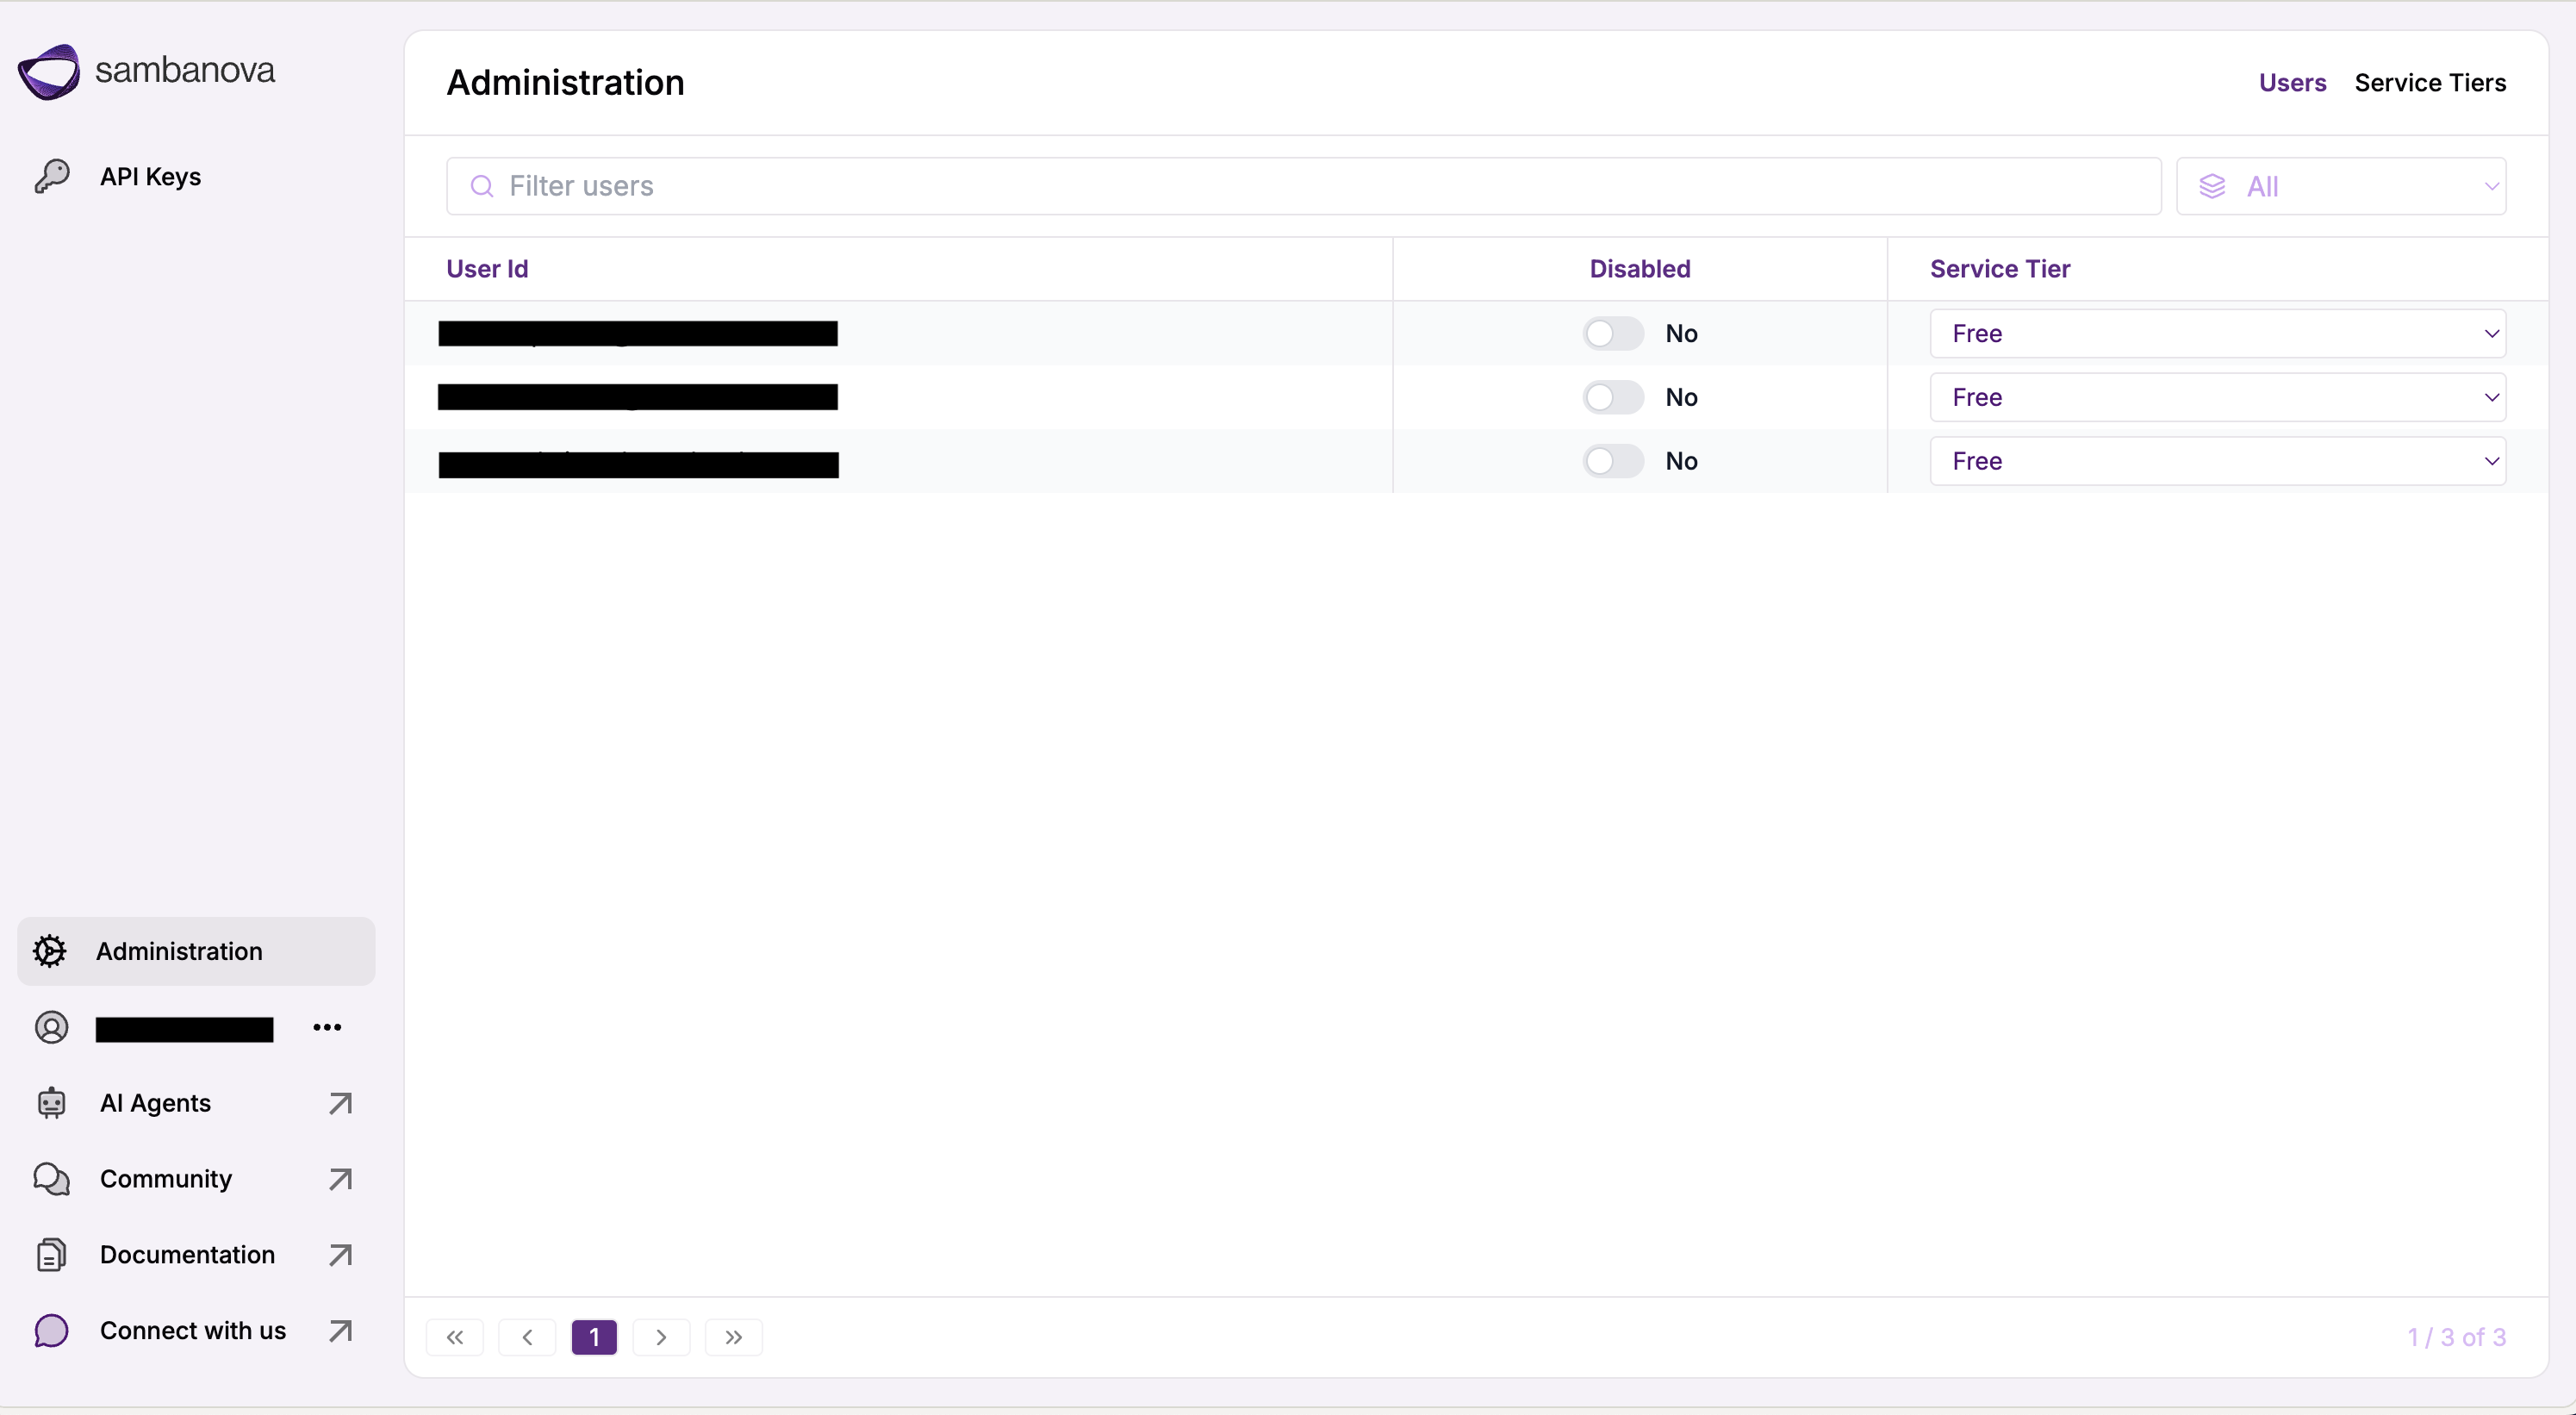
### Step 3: ensure admin panel access
Open a browser (Chrome recommended) and navigate to the admin url:
```text theme={null}
/admin
```
Or select the `Administration` tab on the left panel.
 ***
## Service tiers
Service tiers define what models users can access, their usage limits, and permissions.
### Key concepts
Service tiers offer powerful controls to tailor user access, usage limits, and permissions:
* **Control access**: Decide which models each user or group can use.
* **Set usage limits**: Define how many requests or tokens a user can make in a set period.
Service tiers are structured lists of model-group objects that define access controls and operational limits. Each model-group block sets parameters such as queue depth and per-user rate limits.
The `inherits` attribute allows a tier to extend another base tier's configuration. When inheriting, only specified fields in the `overrides` section are modified, enabling precise and maintainable customization.
### Configuration fields
The following table outlines the key fields used to define service tiers, along with descriptions and example values for each.
| Field | Description | Example |
| :---------------- | :------------------------------------------------------------------------------------------------------------------------ | :------------------------------------------------------------------------------------------------------------------------------------------------------------------- |
| `qos` | Quality of Service level assigned to requests from this tier. Usually matches the service tier name. | `enterprise-group-1`, `customer-demo` |
| `models` | List of models accessible to users within the tier. A model must be included in at least one tier for users to access it. | `[Llama-3.3-Swallow-70B-Instruct-v0.4]` |
| `queueDepth` | Maximum number of queries to queue before returning a busy response. | `100` |
| `allowedRequests` | Defines how many requests are allowed per period in seconds, may be combined with allowedTokens. | `{ allowedRequests: 10, periodSeconds: 60 }` |
| `allowedTokens` | Defines how many tokens are allowed per period in seconds, may be combined with allowedRequests. | `{ allowedTokens: 300000, periodSeconds: 60 }` |
| `periodSeconds` | Defines the interval for setting rate limits, used with `allowedRequests` and/or `allowedTokens`. | `{ allowedRequests: 10, periodSeconds: 60 }`, `{ allowedTokens: 300000, periodSeconds: 60 }`, `{ allowedRequests: 20, allowedTokens: 200000, periodSeconds: 86400 }` |
| `inherits` | Allows a tier to inherit settings from a base tier and override specific fields. | `inherits: previously defined tier name`, `overrides: mentions which properties to override` |
For specific formatting, see [SambaStack yaml reference](/en/v1.2.0/sambastack/resources/sambastack-yaml)
### System-managed tiers
Some tiers are **pre-configured and system-managed**. Do not remove or disable these tiers – misconfiguring them can interrupt critical workflows.
| Tier | Purpose | HTTP Response |
| :------------- | :----------------------------- | :------------ |
| `free` / `web` | Default baseline access tiers | Standard |
| `deprecated` | Models permanently removed | 410 (Gone) |
| `maintenance` | Models temporarily unavailable | 503 |
| `restricted` | Models with limited access | 403 |
If a tier is removed from `sambastack.yaml`, it reverts to SambaNova defaults.
### Sample configuration
Add a `serviceTiers` section at the same YAML level as `bundles` (root-level key).
```yaml theme={null}
serviceTiers:
: # Custom service tier name
- models:
- Llama-4-Maverick-17B-128E-Instruct
queueDepth: 25 # Queries to queue before returning busy
qos: "free" # Usually matches service tier name
rates:
- allowedRequests: 0
periodSeconds: 30
: # Tier that inherits from another
inherits:
overrides:
- models:
- Llama-4-Maverick-17B-128E-Instruct
queueDepth: 25
qos: "free"
rates:
- allowedRequests: 2
periodSeconds: 30
```
See the [SambaStack.yaml Reference](/en/v1.2.0/sambastack/resources/sambastack-yaml) for a full example.
Apply changes:
#### On-prem
```bash theme={null}
helm upgrade \
--install \
--namespace sambastack \
--version \
sambastack \
-f sambastack.yaml \
oci:///sambastack/sambastack
```
#### Airgapped
Use your local copy of the Helm chart instead of the OCI registry path:
```shellscript theme={null}
helm upgrade sambastack \
-f sambastack.yaml \
--namespace sambastack \
sambastack-.tgz
```
`sambastack-.tgz` is your local copy of the Helm chart used for the upgrade. Contact SambaNova Support if you need further assistance.
Version numbers change with new chart releases. Use the version number provided by your SambaNova representative.
Add a `serviceTiers` section under `data` in sambastack.yaml.
```yaml theme={null}
data:
sambastack.yaml: |
serviceTiers:
: # Custom service tier name
- models:
- Llama-4-Maverick-17B-128E-Instruct
queueDepth: 25 # Queries to queue before returning busy
qos: "free" # Usually matches service tier name
rates:
- allowedRequests: 0
periodSeconds: 30
: # Tier that inherits from another
inherits:
overrides:
- models:
- Llama-4-Maverick-17B-128E-Instruct
queueDepth: 25
qos: "free"
rates:
- allowedRequests: 2
periodSeconds: 30
```
See the [SambaStack.yaml Reference](/en/v1.2.0/sambastack/resources/sambastack-yaml) for a full example.
Apply changes:
```bash theme={null}
kubectl apply -f sambastack.yaml
```
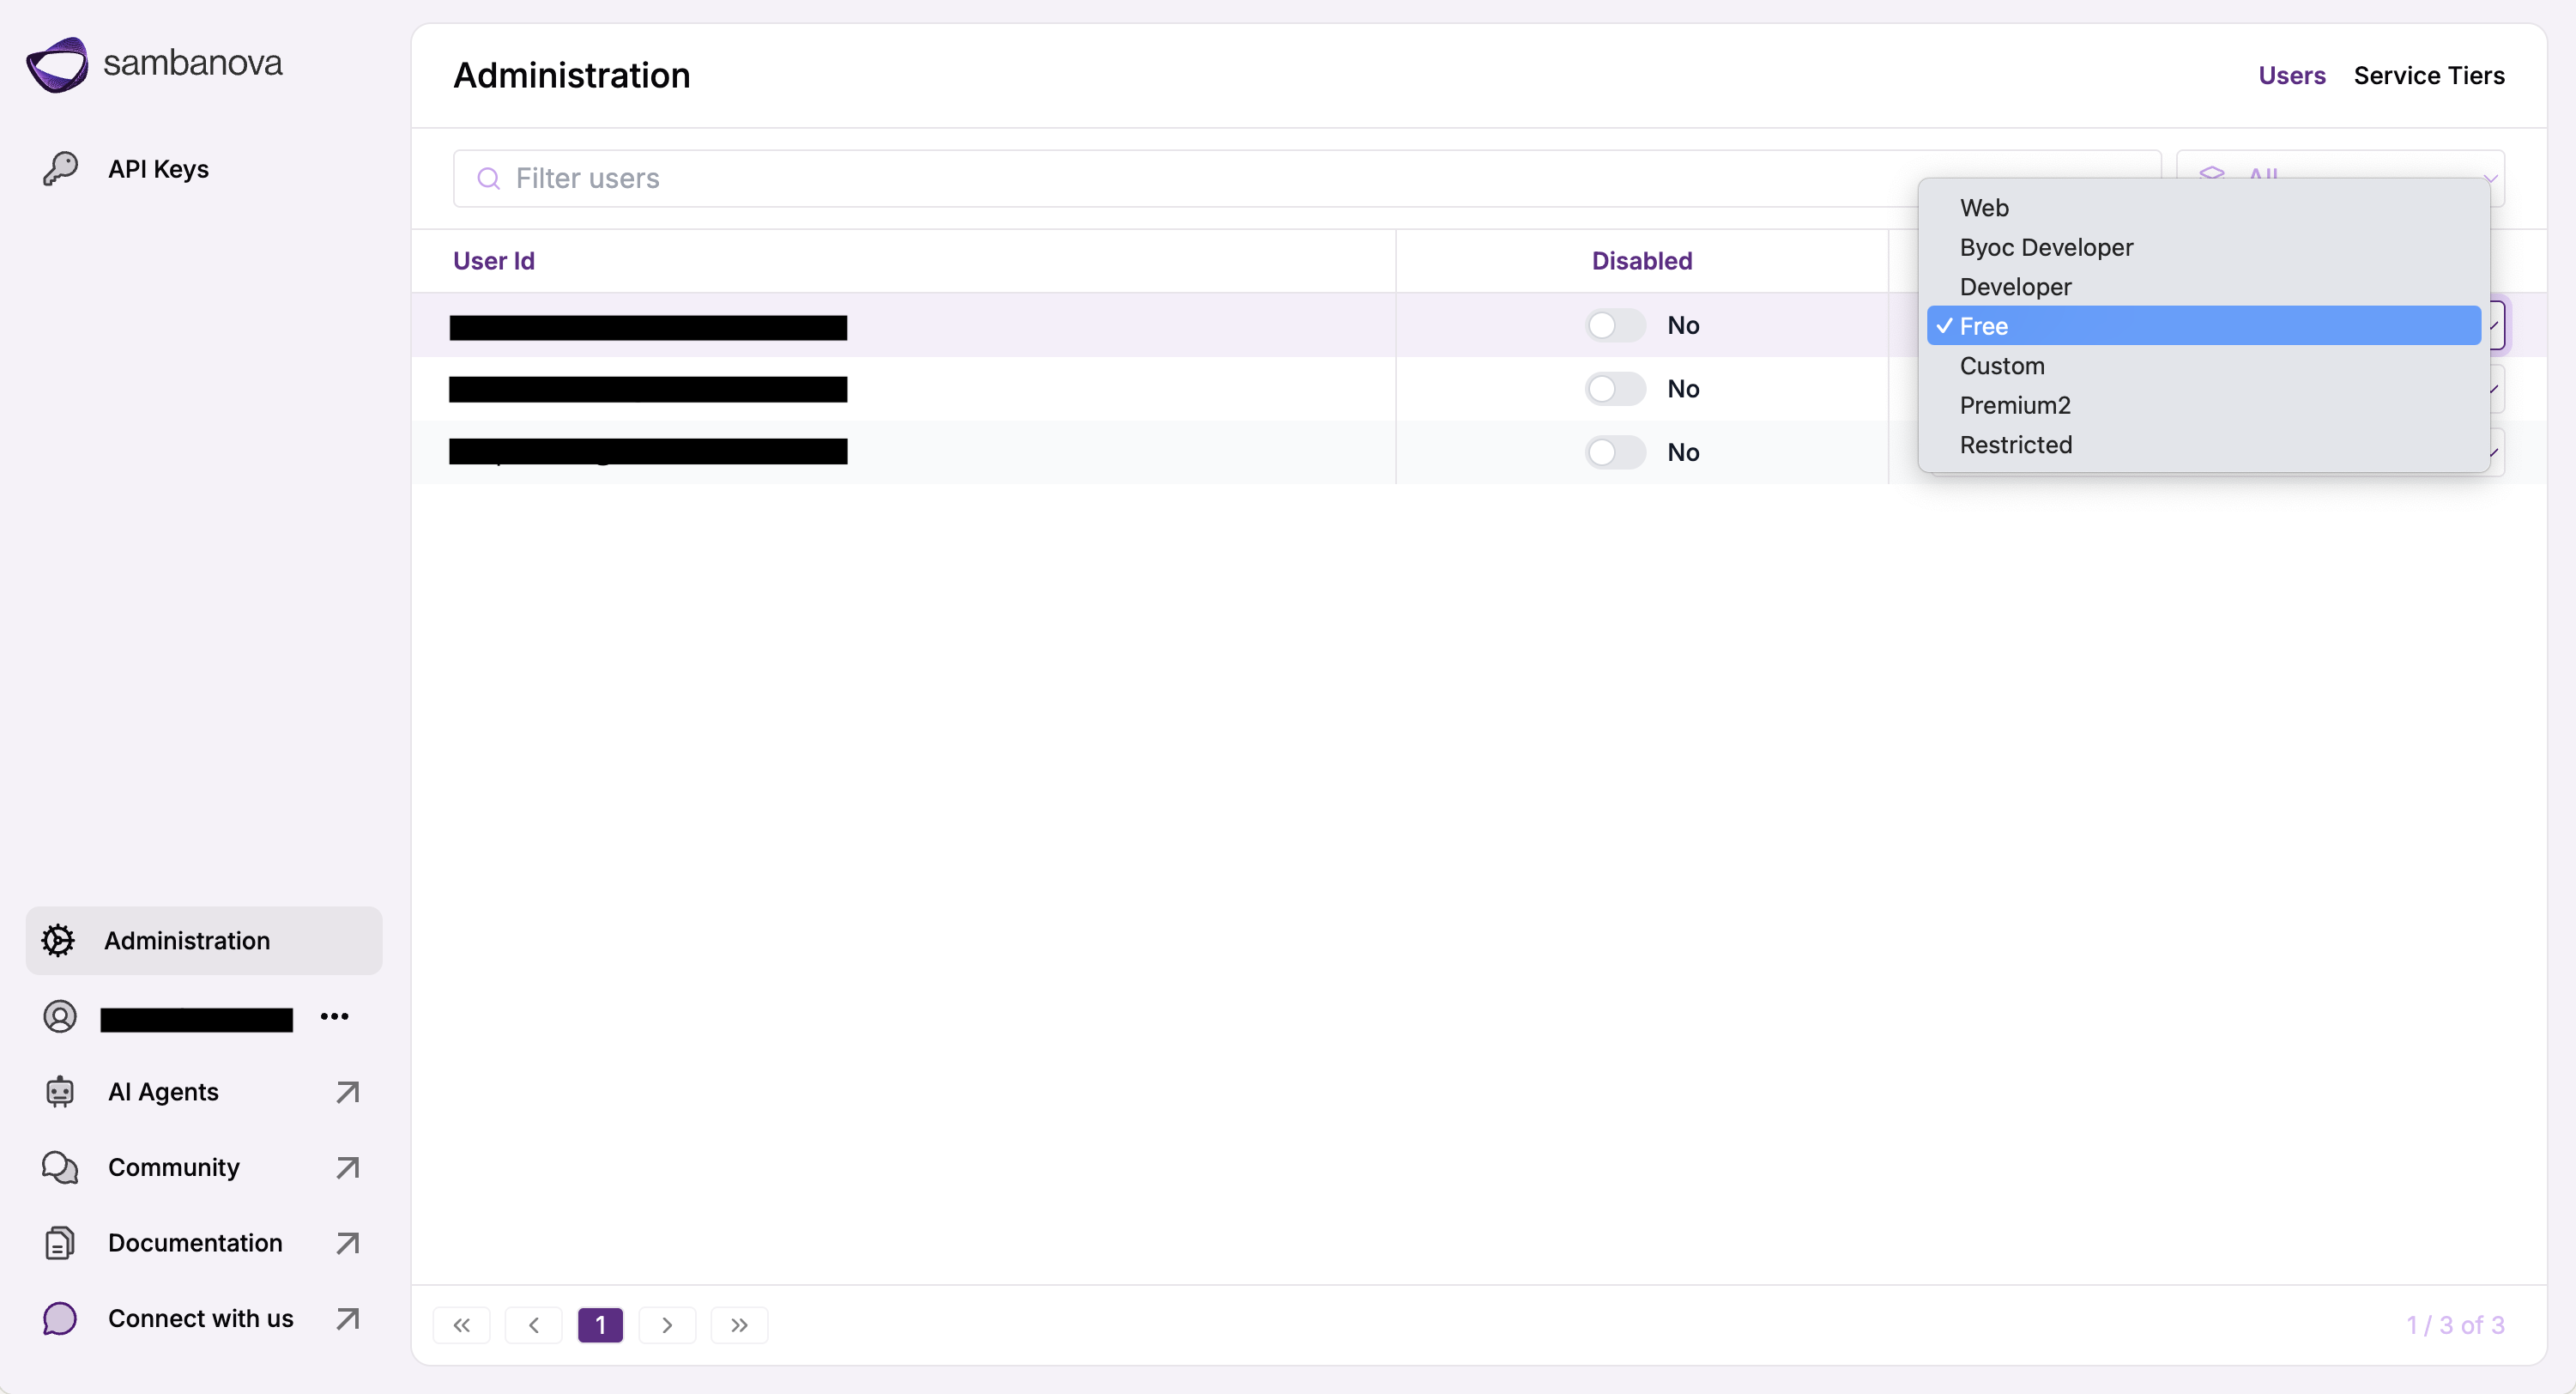
The tier named **\/\, for example in the screenshot below "Premium2"** will appear as a Usage Plan on the Admin page and can be assigned to users.
***
## Service tiers
Service tiers define what models users can access, their usage limits, and permissions.
### Key concepts
Service tiers offer powerful controls to tailor user access, usage limits, and permissions:
* **Control access**: Decide which models each user or group can use.
* **Set usage limits**: Define how many requests or tokens a user can make in a set period.
Service tiers are structured lists of model-group objects that define access controls and operational limits. Each model-group block sets parameters such as queue depth and per-user rate limits.
The `inherits` attribute allows a tier to extend another base tier's configuration. When inheriting, only specified fields in the `overrides` section are modified, enabling precise and maintainable customization.
### Configuration fields
The following table outlines the key fields used to define service tiers, along with descriptions and example values for each.
| Field | Description | Example |
| :---------------- | :------------------------------------------------------------------------------------------------------------------------ | :------------------------------------------------------------------------------------------------------------------------------------------------------------------- |
| `qos` | Quality of Service level assigned to requests from this tier. Usually matches the service tier name. | `enterprise-group-1`, `customer-demo` |
| `models` | List of models accessible to users within the tier. A model must be included in at least one tier for users to access it. | `[Llama-3.3-Swallow-70B-Instruct-v0.4]` |
| `queueDepth` | Maximum number of queries to queue before returning a busy response. | `100` |
| `allowedRequests` | Defines how many requests are allowed per period in seconds, may be combined with allowedTokens. | `{ allowedRequests: 10, periodSeconds: 60 }` |
| `allowedTokens` | Defines how many tokens are allowed per period in seconds, may be combined with allowedRequests. | `{ allowedTokens: 300000, periodSeconds: 60 }` |
| `periodSeconds` | Defines the interval for setting rate limits, used with `allowedRequests` and/or `allowedTokens`. | `{ allowedRequests: 10, periodSeconds: 60 }`, `{ allowedTokens: 300000, periodSeconds: 60 }`, `{ allowedRequests: 20, allowedTokens: 200000, periodSeconds: 86400 }` |
| `inherits` | Allows a tier to inherit settings from a base tier and override specific fields. | `inherits: previously defined tier name`, `overrides: mentions which properties to override` |
For specific formatting, see [SambaStack yaml reference](/en/v1.2.0/sambastack/resources/sambastack-yaml)
### System-managed tiers
Some tiers are **pre-configured and system-managed**. Do not remove or disable these tiers – misconfiguring them can interrupt critical workflows.
| Tier | Purpose | HTTP Response |
| :------------- | :----------------------------- | :------------ |
| `free` / `web` | Default baseline access tiers | Standard |
| `deprecated` | Models permanently removed | 410 (Gone) |
| `maintenance` | Models temporarily unavailable | 503 |
| `restricted` | Models with limited access | 403 |
If a tier is removed from `sambastack.yaml`, it reverts to SambaNova defaults.
### Sample configuration
Add a `serviceTiers` section at the same YAML level as `bundles` (root-level key).
```yaml theme={null}
serviceTiers:
: # Custom service tier name
- models:
- Llama-4-Maverick-17B-128E-Instruct
queueDepth: 25 # Queries to queue before returning busy
qos: "free" # Usually matches service tier name
rates:
- allowedRequests: 0
periodSeconds: 30
: # Tier that inherits from another
inherits:
overrides:
- models:
- Llama-4-Maverick-17B-128E-Instruct
queueDepth: 25
qos: "free"
rates:
- allowedRequests: 2
periodSeconds: 30
```
See the [SambaStack.yaml Reference](/en/v1.2.0/sambastack/resources/sambastack-yaml) for a full example.
Apply changes:
#### On-prem
```bash theme={null}
helm upgrade \
--install \
--namespace sambastack \
--version \
sambastack \
-f sambastack.yaml \
oci:///sambastack/sambastack
```
#### Airgapped
Use your local copy of the Helm chart instead of the OCI registry path:
```shellscript theme={null}
helm upgrade sambastack \
-f sambastack.yaml \
--namespace sambastack \
sambastack-.tgz
```
`sambastack-.tgz` is your local copy of the Helm chart used for the upgrade. Contact SambaNova Support if you need further assistance.
Version numbers change with new chart releases. Use the version number provided by your SambaNova representative.
Add a `serviceTiers` section under `data` in sambastack.yaml.
```yaml theme={null}
data:
sambastack.yaml: |
serviceTiers:
: # Custom service tier name
- models:
- Llama-4-Maverick-17B-128E-Instruct
queueDepth: 25 # Queries to queue before returning busy
qos: "free" # Usually matches service tier name
rates:
- allowedRequests: 0
periodSeconds: 30
: # Tier that inherits from another
inherits:
overrides:
- models:
- Llama-4-Maverick-17B-128E-Instruct
queueDepth: 25
qos: "free"
rates:
- allowedRequests: 2
periodSeconds: 30
```
See the [SambaStack.yaml Reference](/en/v1.2.0/sambastack/resources/sambastack-yaml) for a full example.
Apply changes:
```bash theme={null}
kubectl apply -f sambastack.yaml
```
The tier named **\/\, for example in the screenshot below "Premium2"** will appear as a Usage Plan on the Admin page and can be assigned to users.
 ### Using inheritance
You can define base tiers and create derived tiers using inheritance for reuse and consistency.
**Base tier example:**
```yaml theme={null}
serviceTiers:
free:
- models:
- Llama-3.1-Swallow-8B-Instruct-v0.3
- Meta-Llama-3.1-8B-Instruct
queueDepth: 25
qos: "free"
rates:
- allowedRequests: 20
periodSeconds: 60
```
**Derived tier example:**
```yaml theme={null}
premium2:
inherits: free
overrides:
- models:
- Meta-Llama-3.1-70B-Instruct
batchSize: 2
queueDepth: 50
qos: "premium2"
rates:
- allowedRequests: 100
periodSeconds: 60
```
After updating the configuration, apply the changes:
#### On-prem
```bash theme={null}
helm upgrade \
--install \
--namespace sambastack \
--version \
sambastack \
-f sambastack.yaml \
oci:///sambastack/sambastack
```
#### Airgapped
Use your local copy of the Helm chart instead of the OCI registry path:
```shellscript theme={null}
helm upgrade sambastack \
-f sambastack.yaml \
--namespace sambastack \
sambastack-.tgz
```
`sambastack-.tgz` is your local copy of the Helm chart used for the upgrade. Contact SambaNova Support if you need further assistance.
Version numbers change with new chart releases. Use the version number provided by your SambaNova representative.
After updating the configuration, apply the changes:
```bash theme={null}
kubectl apply -f sambastack.yaml
```
### Best practices
When creating and managing service tiers, consider the following best practices to ensure stability, security, and flexibility:
**1. Preserve system-managed and default tiers**
Some tiers are **pre-configured and system-managed and should not be removed or disabled**. These tiers provide baseline access and enforce model lifecycle and access controls. Removing or misconfiguring them can interrupt critical workflows.
This includes:
* **free / web** – Default baseline access tiers.
* **deprecated** – Models permanently removed (HTTP 410).
* **maintenance** – Models temporarily unavailable (HTTP 503).
* **restricted** – Models with limited access (HTTP 403).
These tiers are managed by the system and should be accounted for in service tier planning, not customized.
**2. Modify with caution**
You may adjust rate limits or model lists in default tiers, but changes should align with user needs. Overwriting a tier replaces its full configuration.
**3. Use custom tiers for flexibility**
Create custom tiers by inheriting from base tiers (such as `free` or `web`) to tailor access while preserving the underlying structure.
### Complete example
Example of System-managed, Required, and Custom Tiers in `sambastack.yaml`. Must be at the same YAML level as `bundles` (root-level key in sambastack.yaml).
```yaml theme={null}
serviceTiers:
# SYSTEM-MANAGED TIERS
deprecated:
- models:
- Old-Model-v1
queueDepth: 0
rates:
- allowedRequests: 0
periodSeconds: 3600
restricted:
- models:
- Restricted-Model
queueDepth: 1
rates:
- allowedRequests: 0
periodSeconds: 60
# REQUIRED TIERS
free:
- models:
- Meta-Llama-3.1-8B-Instruct
queueDepth: 100
qos: "free"
rates:
- allowedRequests: 20
periodSeconds: 60
web:
- models:
- Meta-Llama-3.1-8B-Instruct
queueDepth: 100
qos: "web"
rates:
- allowedRequests: 20
periodSeconds: 60
# CUSTOM TIERS
developer:
inherits: free
overrides:
- models:
- Meta-Llama-3.1-8B-Instruct
queueDepth: 100
qos: "developer"
rates:
- allowedRequests: 60
periodSeconds: 60
enterprise:
inherits: developer
overrides:
- models:
- Meta-Llama-3.3-70B-Instruct
queueDepth: 100
qos: "enterprise"
rates:
- allowedRequests: 200
periodSeconds: 60
```
Example of System-managed, Required, and Custom Tiers in sambastack.yaml:
```yaml theme={null}
apiVersion: v1
kind: ConfigMap
metadata:
name: sambastack
labels:
sambastack-installer: "true"
data:
sambastack.yaml: |
version:
serviceTiers:
# SYSTEM-MANAGED TIERS
deprecated:
- models:
- Old-Model-v1
queueDepth: 0
rates:
- allowedRequests: 0
periodSeconds: 3600
restricted:
- models:
- Restricted-Model
queueDepth: 1
rates:
- allowedRequests: 0
periodSeconds: 60
# REQUIRED TIERS
free:
- models:
- Meta-Llama-3.1-8B-Instruct
queueDepth: 100
qos: "free"
rates:
- allowedRequests: 20
periodSeconds: 60
web:
- models:
- Meta-Llama-3.1-8B-Instruct
queueDepth: 100
qos: "web"
rates:
- allowedRequests: 20
periodSeconds: 60
# CUSTOM TIERS
developer:
inherits: free
overrides:
- models:
- Meta-Llama-3.1-8B-Instruct
queueDepth: 100
qos: "developer"
rates:
- allowedRequests: 60
periodSeconds: 60
enterprise:
inherits: developer
overrides:
- models:
- Meta-Llama-3.3-70B-Instruct
queueDepth: 100
qos: "enterprise"
rates:
- allowedRequests: 200
periodSeconds: 60
```
Update the version field to match the version provided by your SambaNova representative.
***
## Rate limiting
Rate limiting controls the number of API or UI requests accepted per minute to protect the cluster from overload and abuse.
In SambaStack on-prem, rate limiting can be applied at two layers:
| Layer | Description | Configuration Source | Status |
| ------------------------------------- | ---------------------------------------------------------------------------- | ------------------------------------------ | ------------------------------------------------------------------------------------------------------------------------ |
| **Ingress Layer (NGINX)** | Enforces limits at the Kubernetes ingress controller using NGINX annotations | NGINX ingress controller configuration | Optional (Recommended) |
| **Application Layer (Service Tiers)** | Enforces limits at the gateway level using Helm chart parameters | `sambastack.yaml` (`serviceTiers` section) | Required. See [Service tier management](/en/v1.2.0/sambastack/service-administration/usergroup-management#service-tiers) |
Application layer rate limits are **mandatory** and configured via service tiers. See [Service tier management](/en/v1.2.0/sambastack/service-administration/usergroup-management#service-tiers) for details.
### Overview
* **Ingress-layer rate limits** are optional but recommended for customers using the NGINX ingress controller.
* The Helm chart does not ship with default rate-limit annotations; customers can enable them manually.
* **Application layer rate limits** remain mandatory and are configured in the `serviceTiers` block of `sambastack.yaml`.
* If you bring your own Kubernetes cluster and ingress controller, you can use equivalent annotations or omit ingress-level limits entirely.
### Ingress-layer rate limiting (optional, recommended)
If your cluster uses RKE2's built-in NGINX ingress controller, you can define global rate-limit zones at the cluster level and reference them in the API and UI ingress annotations.
**Step 1: Define Global Rate-Limit Zones**
Apply the following `HelmChartConfig` to configure global rate-limit zones for the ingress controller.
Save the below as `rke2-ingress-nginx.yaml`:
```yaml theme={null}
apiVersion: helm.cattle.io/v1
kind: HelmChartConfig
metadata:
name: rke2-ingress-nginx
namespace: kube-system
spec:
valuesContent: |-
controller:
config:
limit-req-status-code: "429"
allow-snippet-annotations: "true"
http-snippet: |
limit_req_zone $binary_remote_addr zone=240_req_min_ip:50m rate=240r/m;
limit_req_zone $http_authorization zone=240_req_min_header:50m rate=240r/m;
```
Apply it:
```bash theme={null}
kubectl apply -f rke2-ingress-nginx.yaml
```
**Zone Definitions:**
* `_req_min_ip` zones are used for the **UI** (IP-based limits)
* `_req_min_header` zones are used for the **API/Gateway** (Authorization header-based limits)
Rate limit values should scale with cluster size. For larger deployments (e.g., 10-node clusters), consider higher limits such as 5000 or 8000 requests per minute.
**Step 2: Apply Ingress Annotations in sambastack.yaml**
Once zones are defined, reference them in your `sambastack.yaml` under the `cloud-ui.ingress` and `gateway.ingress` sections:
```yaml theme={null}
cloud-ui:
ingress:
annotations:
nginx.ingress.kubernetes.io/backend-protocol: HTTP
nginx.ingress.kubernetes.io/force-ssl-redirect: 'true'
nginx.ingress.kubernetes.io/proxy-body-size: 21m
nginx.ingress.kubernetes.io/configuration-snippet: |
proxy_set_header Authorization $http_authorization;
limit_req zone=120_req_min_ip burst=240 nodelay;
limit_req_status 429;
gateway:
ingress:
annotations:
nginx.ingress.kubernetes.io/backend-protocol: HTTP
nginx.ingress.kubernetes.io/force-ssl-redirect: 'true'
nginx.ingress.kubernetes.io/proxy-read-timeout: '600'
nginx.ingress.kubernetes.io/proxy-body-size: 25m
nginx.ingress.kubernetes.io/enable-cors: 'true'
nginx.ingress.kubernetes.io/configuration-snippet: |
proxy_set_header Authorization $http_authorization;
limit_req zone=240_req_min_header burst=360 nodelay;
limit_req_status 429;
```
See the [SambaStack.yaml Reference](/en/v1.2.0/sambastack/resources/sambastack-yaml) for a full example.
**Configuration Details:**
* These snippets tell NGINX which rate-limit zone to apply
* You can adjust the `burst` and `rate` values as needed
* Ingress-based rate limiting is **per ingress-controller pod**, not cluster-wide
* Total effective rate = configured rate × number of ingress pods
**Step 3: Apply the Updated Configuration**
#### On-prem
```bash theme={null}
helm upgrade sambastack \
-f sambastack.yaml \
--namespace sambastack \
oci:///sambastack/sambastack
```
#### Airgapped
Use your local copy of the Helm chart instead of the OCI registry path:
```shellscript theme={null}
helm upgrade sambastack \
-f sambastack.yaml \
--namespace sambastack \
sambastack-.tgz
```
`sambastack-.tgz` is your local copy of the Helm chart used for the upgrade. Contact SambaNova Support if you need further assistance.
SambaNova provides the full registry URL and version number during handover. Contact your SambaNova representative for access credentials.
### Key recommendations
* **Use ingress-layer limits** for infrastructure-level protection (e.g., DDoS or abusive burst prevention)
* **Use service-tier limits** for application-level throttling and user-specific rate control
* Ingress configuration is **optional**, but SambaNova recommends enabling it when using RKE2's built-in NGINX ingress controller
* For customers using other ingress controllers (e.g., Istio, AWS ALB, or NGINX Plus), equivalent configurations can be applied at their discretion
* Default Helm chart values will not include any rate-limit annotations; these can be overridden by customers at deployment time
Always configure application-layer rate limits via service tiers. Ingress-layer rate limiting alone is insufficient for proper request management.
***
## Quality of service (QoS)
Quality of Service (QoS) defines priority levels that determine how requests are processed across deployments when competing for resources. It ensures that higher-priority traffic receives precedence over lower-priority traffic, optimizing resource allocation during periods of contention.
### How QoS works
* Each service tier is assigned a `qos` label.
* Deployments define the priority order using `qosList` in their specifications.
* Requests are processed in priority order: the first QoS level in the list is served first.
**Example configuration:**
```yaml theme={null}
serviceTiers:
:
- models:
-
qos:
queueDepth:
rates:
- allowedRequests:
periodSeconds:
bundleDeploymentSpecs:
- name:
groups:
- name:
minReplicas:
qosList:
- "web"
- "free"
```
See the [SambaStack.yaml Reference](/en/v1.2.0/sambastack/resources/sambastack-yaml) for a full example.
In this example, the deployment serves `web` tier requests first, then `free` tier requests when no `web` traffic is queued.
### Purpose of QoS
QoS prioritizes requests so that higher-tier traffic is served before lower-tier traffic, ensuring predictable and fair resource sharing.
* Example: A deployment listing `qosList: ["free", "web"]` serves free tier requests first, falling back to web tier requests only when no free traffic is queued.
### QoS vs. service tiers
| Concept | Purpose | Defined In |
| :--------------- | :------------------------------------------------------------------- | :----------------------------------- |
| **Service Tier** | Defines *who* can access *what* and *how much* (models, rate limits) | `sambastack.yaml` or Admin UI |
| **QoS** | Defines *when* requests are processed (priority order) | `qosList` in `bundleDeploymentSpecs` |
This means that:
* Service tiers define who can access what and how much.
* QoS defines when requests are processed based on priority.
### Important notes
* The `free` tier is automatically assigned to all new users.
* Deployments can support multiple QoS levels to handle different traffic types concurrently.
## Request handling workflow
The following outlines the step-by-step processing of a user request, illustrating how service tiers and QoS priorities interact to manage and route traffic efficiently.
1. A user sends an API request using their credentials.
2. SambaStack identifies the user's assigned service tier (usage plan).
3. The request is checked against that tier's allowed models, batch size, rate limits, and associated QoS.
4. The deployment selects requests to process according to its `qosList` priority.
5. If the request exceeds the user's rate limit, it is rejected with a `429 Too Many Requests` response.
6. If the QoS queue for the request's priority level is full, the system returns a busy response.
7. Otherwise, the request is placed in the QoS queue awaiting processing.
Administrators can adjust service tiers or quotas via the admin UI. Any changes to tiers, rate limits, or QoS settings apply cluster-wide and should be made by editing and deploying the YAML configuration, preferably under version control.
### Using inheritance
You can define base tiers and create derived tiers using inheritance for reuse and consistency.
**Base tier example:**
```yaml theme={null}
serviceTiers:
free:
- models:
- Llama-3.1-Swallow-8B-Instruct-v0.3
- Meta-Llama-3.1-8B-Instruct
queueDepth: 25
qos: "free"
rates:
- allowedRequests: 20
periodSeconds: 60
```
**Derived tier example:**
```yaml theme={null}
premium2:
inherits: free
overrides:
- models:
- Meta-Llama-3.1-70B-Instruct
batchSize: 2
queueDepth: 50
qos: "premium2"
rates:
- allowedRequests: 100
periodSeconds: 60
```
After updating the configuration, apply the changes:
#### On-prem
```bash theme={null}
helm upgrade \
--install \
--namespace sambastack \
--version \
sambastack \
-f sambastack.yaml \
oci:///sambastack/sambastack
```
#### Airgapped
Use your local copy of the Helm chart instead of the OCI registry path:
```shellscript theme={null}
helm upgrade sambastack \
-f sambastack.yaml \
--namespace sambastack \
sambastack-.tgz
```
`sambastack-.tgz` is your local copy of the Helm chart used for the upgrade. Contact SambaNova Support if you need further assistance.
Version numbers change with new chart releases. Use the version number provided by your SambaNova representative.
After updating the configuration, apply the changes:
```bash theme={null}
kubectl apply -f sambastack.yaml
```
### Best practices
When creating and managing service tiers, consider the following best practices to ensure stability, security, and flexibility:
**1. Preserve system-managed and default tiers**
Some tiers are **pre-configured and system-managed and should not be removed or disabled**. These tiers provide baseline access and enforce model lifecycle and access controls. Removing or misconfiguring them can interrupt critical workflows.
This includes:
* **free / web** – Default baseline access tiers.
* **deprecated** – Models permanently removed (HTTP 410).
* **maintenance** – Models temporarily unavailable (HTTP 503).
* **restricted** – Models with limited access (HTTP 403).
These tiers are managed by the system and should be accounted for in service tier planning, not customized.
**2. Modify with caution**
You may adjust rate limits or model lists in default tiers, but changes should align with user needs. Overwriting a tier replaces its full configuration.
**3. Use custom tiers for flexibility**
Create custom tiers by inheriting from base tiers (such as `free` or `web`) to tailor access while preserving the underlying structure.
### Complete example
Example of System-managed, Required, and Custom Tiers in `sambastack.yaml`. Must be at the same YAML level as `bundles` (root-level key in sambastack.yaml).
```yaml theme={null}
serviceTiers:
# SYSTEM-MANAGED TIERS
deprecated:
- models:
- Old-Model-v1
queueDepth: 0
rates:
- allowedRequests: 0
periodSeconds: 3600
restricted:
- models:
- Restricted-Model
queueDepth: 1
rates:
- allowedRequests: 0
periodSeconds: 60
# REQUIRED TIERS
free:
- models:
- Meta-Llama-3.1-8B-Instruct
queueDepth: 100
qos: "free"
rates:
- allowedRequests: 20
periodSeconds: 60
web:
- models:
- Meta-Llama-3.1-8B-Instruct
queueDepth: 100
qos: "web"
rates:
- allowedRequests: 20
periodSeconds: 60
# CUSTOM TIERS
developer:
inherits: free
overrides:
- models:
- Meta-Llama-3.1-8B-Instruct
queueDepth: 100
qos: "developer"
rates:
- allowedRequests: 60
periodSeconds: 60
enterprise:
inherits: developer
overrides:
- models:
- Meta-Llama-3.3-70B-Instruct
queueDepth: 100
qos: "enterprise"
rates:
- allowedRequests: 200
periodSeconds: 60
```
Example of System-managed, Required, and Custom Tiers in sambastack.yaml:
```yaml theme={null}
apiVersion: v1
kind: ConfigMap
metadata:
name: sambastack
labels:
sambastack-installer: "true"
data:
sambastack.yaml: |
version:
serviceTiers:
# SYSTEM-MANAGED TIERS
deprecated:
- models:
- Old-Model-v1
queueDepth: 0
rates:
- allowedRequests: 0
periodSeconds: 3600
restricted:
- models:
- Restricted-Model
queueDepth: 1
rates:
- allowedRequests: 0
periodSeconds: 60
# REQUIRED TIERS
free:
- models:
- Meta-Llama-3.1-8B-Instruct
queueDepth: 100
qos: "free"
rates:
- allowedRequests: 20
periodSeconds: 60
web:
- models:
- Meta-Llama-3.1-8B-Instruct
queueDepth: 100
qos: "web"
rates:
- allowedRequests: 20
periodSeconds: 60
# CUSTOM TIERS
developer:
inherits: free
overrides:
- models:
- Meta-Llama-3.1-8B-Instruct
queueDepth: 100
qos: "developer"
rates:
- allowedRequests: 60
periodSeconds: 60
enterprise:
inherits: developer
overrides:
- models:
- Meta-Llama-3.3-70B-Instruct
queueDepth: 100
qos: "enterprise"
rates:
- allowedRequests: 200
periodSeconds: 60
```
Update the version field to match the version provided by your SambaNova representative.
***
## Rate limiting
Rate limiting controls the number of API or UI requests accepted per minute to protect the cluster from overload and abuse.
In SambaStack on-prem, rate limiting can be applied at two layers:
| Layer | Description | Configuration Source | Status |
| ------------------------------------- | ---------------------------------------------------------------------------- | ------------------------------------------ | ------------------------------------------------------------------------------------------------------------------------ |
| **Ingress Layer (NGINX)** | Enforces limits at the Kubernetes ingress controller using NGINX annotations | NGINX ingress controller configuration | Optional (Recommended) |
| **Application Layer (Service Tiers)** | Enforces limits at the gateway level using Helm chart parameters | `sambastack.yaml` (`serviceTiers` section) | Required. See [Service tier management](/en/v1.2.0/sambastack/service-administration/usergroup-management#service-tiers) |
Application layer rate limits are **mandatory** and configured via service tiers. See [Service tier management](/en/v1.2.0/sambastack/service-administration/usergroup-management#service-tiers) for details.
### Overview
* **Ingress-layer rate limits** are optional but recommended for customers using the NGINX ingress controller.
* The Helm chart does not ship with default rate-limit annotations; customers can enable them manually.
* **Application layer rate limits** remain mandatory and are configured in the `serviceTiers` block of `sambastack.yaml`.
* If you bring your own Kubernetes cluster and ingress controller, you can use equivalent annotations or omit ingress-level limits entirely.
### Ingress-layer rate limiting (optional, recommended)
If your cluster uses RKE2's built-in NGINX ingress controller, you can define global rate-limit zones at the cluster level and reference them in the API and UI ingress annotations.
**Step 1: Define Global Rate-Limit Zones**
Apply the following `HelmChartConfig` to configure global rate-limit zones for the ingress controller.
Save the below as `rke2-ingress-nginx.yaml`:
```yaml theme={null}
apiVersion: helm.cattle.io/v1
kind: HelmChartConfig
metadata:
name: rke2-ingress-nginx
namespace: kube-system
spec:
valuesContent: |-
controller:
config:
limit-req-status-code: "429"
allow-snippet-annotations: "true"
http-snippet: |
limit_req_zone $binary_remote_addr zone=240_req_min_ip:50m rate=240r/m;
limit_req_zone $http_authorization zone=240_req_min_header:50m rate=240r/m;
```
Apply it:
```bash theme={null}
kubectl apply -f rke2-ingress-nginx.yaml
```
**Zone Definitions:**
* `_req_min_ip` zones are used for the **UI** (IP-based limits)
* `_req_min_header` zones are used for the **API/Gateway** (Authorization header-based limits)
Rate limit values should scale with cluster size. For larger deployments (e.g., 10-node clusters), consider higher limits such as 5000 or 8000 requests per minute.
**Step 2: Apply Ingress Annotations in sambastack.yaml**
Once zones are defined, reference them in your `sambastack.yaml` under the `cloud-ui.ingress` and `gateway.ingress` sections:
```yaml theme={null}
cloud-ui:
ingress:
annotations:
nginx.ingress.kubernetes.io/backend-protocol: HTTP
nginx.ingress.kubernetes.io/force-ssl-redirect: 'true'
nginx.ingress.kubernetes.io/proxy-body-size: 21m
nginx.ingress.kubernetes.io/configuration-snippet: |
proxy_set_header Authorization $http_authorization;
limit_req zone=120_req_min_ip burst=240 nodelay;
limit_req_status 429;
gateway:
ingress:
annotations:
nginx.ingress.kubernetes.io/backend-protocol: HTTP
nginx.ingress.kubernetes.io/force-ssl-redirect: 'true'
nginx.ingress.kubernetes.io/proxy-read-timeout: '600'
nginx.ingress.kubernetes.io/proxy-body-size: 25m
nginx.ingress.kubernetes.io/enable-cors: 'true'
nginx.ingress.kubernetes.io/configuration-snippet: |
proxy_set_header Authorization $http_authorization;
limit_req zone=240_req_min_header burst=360 nodelay;
limit_req_status 429;
```
See the [SambaStack.yaml Reference](/en/v1.2.0/sambastack/resources/sambastack-yaml) for a full example.
**Configuration Details:**
* These snippets tell NGINX which rate-limit zone to apply
* You can adjust the `burst` and `rate` values as needed
* Ingress-based rate limiting is **per ingress-controller pod**, not cluster-wide
* Total effective rate = configured rate × number of ingress pods
**Step 3: Apply the Updated Configuration**
#### On-prem
```bash theme={null}
helm upgrade sambastack \
-f sambastack.yaml \
--namespace sambastack \
oci:///sambastack/sambastack
```
#### Airgapped
Use your local copy of the Helm chart instead of the OCI registry path:
```shellscript theme={null}
helm upgrade sambastack \
-f sambastack.yaml \
--namespace sambastack \
sambastack-.tgz
```
`sambastack-.tgz` is your local copy of the Helm chart used for the upgrade. Contact SambaNova Support if you need further assistance.
SambaNova provides the full registry URL and version number during handover. Contact your SambaNova representative for access credentials.
### Key recommendations
* **Use ingress-layer limits** for infrastructure-level protection (e.g., DDoS or abusive burst prevention)
* **Use service-tier limits** for application-level throttling and user-specific rate control
* Ingress configuration is **optional**, but SambaNova recommends enabling it when using RKE2's built-in NGINX ingress controller
* For customers using other ingress controllers (e.g., Istio, AWS ALB, or NGINX Plus), equivalent configurations can be applied at their discretion
* Default Helm chart values will not include any rate-limit annotations; these can be overridden by customers at deployment time
Always configure application-layer rate limits via service tiers. Ingress-layer rate limiting alone is insufficient for proper request management.
***
## Quality of service (QoS)
Quality of Service (QoS) defines priority levels that determine how requests are processed across deployments when competing for resources. It ensures that higher-priority traffic receives precedence over lower-priority traffic, optimizing resource allocation during periods of contention.
### How QoS works
* Each service tier is assigned a `qos` label.
* Deployments define the priority order using `qosList` in their specifications.
* Requests are processed in priority order: the first QoS level in the list is served first.
**Example configuration:**
```yaml theme={null}
serviceTiers:
:
- models:
-
qos:
queueDepth:
rates:
- allowedRequests:
periodSeconds:
bundleDeploymentSpecs:
- name:
groups:
- name:
minReplicas:
qosList:
- "web"
- "free"
```
See the [SambaStack.yaml Reference](/en/v1.2.0/sambastack/resources/sambastack-yaml) for a full example.
In this example, the deployment serves `web` tier requests first, then `free` tier requests when no `web` traffic is queued.
### Purpose of QoS
QoS prioritizes requests so that higher-tier traffic is served before lower-tier traffic, ensuring predictable and fair resource sharing.
* Example: A deployment listing `qosList: ["free", "web"]` serves free tier requests first, falling back to web tier requests only when no free traffic is queued.
### QoS vs. service tiers
| Concept | Purpose | Defined In |
| :--------------- | :------------------------------------------------------------------- | :----------------------------------- |
| **Service Tier** | Defines *who* can access *what* and *how much* (models, rate limits) | `sambastack.yaml` or Admin UI |
| **QoS** | Defines *when* requests are processed (priority order) | `qosList` in `bundleDeploymentSpecs` |
This means that:
* Service tiers define who can access what and how much.
* QoS defines when requests are processed based on priority.
### Important notes
* The `free` tier is automatically assigned to all new users.
* Deployments can support multiple QoS levels to handle different traffic types concurrently.
## Request handling workflow
The following outlines the step-by-step processing of a user request, illustrating how service tiers and QoS priorities interact to manage and route traffic efficiently.
1. A user sends an API request using their credentials.
2. SambaStack identifies the user's assigned service tier (usage plan).
3. The request is checked against that tier's allowed models, batch size, rate limits, and associated QoS.
4. The deployment selects requests to process according to its `qosList` priority.
5. If the request exceeds the user's rate limit, it is rejected with a `429 Too Many Requests` response.
6. If the QoS queue for the request's priority level is full, the system returns a busy response.
7. Otherwise, the request is placed in the QoS queue awaiting processing.
Administrators can adjust service tiers or quotas via the admin UI. Any changes to tiers, rate limits, or QoS settings apply cluster-wide and should be made by editing and deploying the YAML configuration, preferably under version control.