> ## Documentation Index
> Fetch the complete documentation index at: https://sambanova-systems.mintlify.site/docs/llms.txt
> Use this file to discover all available pages before exploring further.
# Integration with LiteLLM
LiteLLM is a third-party proxy service. SambaNova doesn't endorse, maintain, or audit LiteLLM's security or functionality. This guide is provided for informational purposes and may become outdated. Use at your own discretion.
LiteLLM provides a gateway layer that sits in front of SambaStack's OpenAI-compatible inference APIs, adding enterprise-grade controls.
| Capability | Description |
| :------------------------- | :--------------------------------------------------- |
| Centralized authentication | Single point for API key management and rotation |
| Usage tracking | Monitor usage across teams, projects, and keys |
| Cost controls | Implement budgets, quotas, and rate limits |
| Audit logging | Record model interactions for compliance and reviews |
| Model routing | Switch deployments/providers without code changes |
**Target audience:** Engineers integrating a control layer (rate limits, key management, routing) on top of SambaStack's OpenAI-compatible inference APIs.
## Architecture
SambaStack runs your model deployments on dedicated RDU nodes and exposes them behind an OpenAI-compatible HTTPS API. LiteLLM sits in front of those endpoints as a proxy gateway.
 | Layer | SambaStack | LiteLLM | Your App |
| :----------------------- | :----------------------------------------------------------- | :------------------------------------------------------ | :--------------------------------------- |
| **Hardware & runtime** | Runs models on RDU nodes; manages kernels, batching, queuing | – | – |
| **Inference API** | Provides OpenAI-compatible endpoints | Proxies endpoints behind a single gateway URL | Calls SambaStack directly or via LiteLLM |
| **Traffic controls** | Platform-level limits | Per-key, user, model, team rate limits, quotas, budgets | Optional safeguard logic |
| **API key management** | Issues/validates platform API keys | Rotate, scope, revoke app keys; map app→platform keys | Store app-level secrets |
| **Model access control** | Platform API keys grant access to deployments | Per-app-key allow/deny by model alias | Select allowed aliases per role/policy |
## Prerequisites
Before starting, ensure you have:
* Python 3.11 or above with pip
* PostgreSQL database (local, self-hosted, or managed)
* SambaStack API key and base URL
You'll also need to configure these environment variables:
| Variable | Description |
| :-------------------- | :------------------------------------------------------------------------------------- |
| `SAMBASTACK_BASE_URL` | Base URL for SambaStack's OpenAI-compatible API |
| `SAMBASTACK_API_KEY` | Platform API key used by LiteLLM to call SambaStack |
| `DATABASE_URL` | PostgreSQL connection string (format: `postgresql://user:password@host:port/database`) |
| `LITELLM_MASTER_KEY` | Admin key for the LiteLLM proxy and API |
| `LITELLM_SALT_KEY` | Salt for encrypting credentials in DB (cannot be changed once set) |
| `PORT` | Port for the LiteLLM HTTP server (default: `4000`) |
| `STORE_MODEL_IN_DB` | Set to `True` to store model definitions in DB |
## Getting started
For additional installation options, refer to the [official LiteLLM documentation](https://docs.litellm.ai/).
### Step 1: Set up virtual environment
```bash theme={null}
python3 -m venv litellm-env
source litellm-env/bin/activate
pip install "litellm[proxy]" prisma
```
### Step 2: Configure environment variables
```bash theme={null}
export SAMBASTACK_BASE_URL="https://your-sambastack-instance.example.com/v1"
export SAMBASTACK_API_KEY="your-sambastack-api-key"
export DATABASE_URL="postgresql://litellm_admin:YOUR_PASSWORD@localhost:5432/sambastack_litellm"
export LITELLM_MASTER_KEY="sk-admin-your-master-key"
export LITELLM_SALT_KEY="sk-salt-your-salt-key"
export PORT=4000
export STORE_MODEL_IN_DB=True
```
### Step 3: Set up database
Connect to PostgreSQL as a superuser:
```bash theme={null}
psql -U -d postgres
```
Create the database and user:
```sql theme={null}
CREATE USER litellm_admin WITH PASSWORD 'YOUR_PASSWORD';
CREATE DATABASE sambastack_litellm OWNER litellm_admin;
GRANT ALL PRIVILEGES ON DATABASE sambastack_litellm TO litellm_admin;
\c sambastack_litellm
ALTER SCHEMA public OWNER TO litellm_admin;
```
### Step 4: Initialize database schema
```bash theme={null}
# Find the schema path dynamically
SCHEMA_PATH=$(python -c "import litellm_proxy_extras; print(litellm_proxy_extras.__path__[0])")/schema.prisma
# Generate client and create tables
prisma generate --schema "$SCHEMA_PATH"
prisma db push --schema "$SCHEMA_PATH"
```
### Step 5: Create configuration file
Create `litellm_config.yaml`:
```yaml theme={null}
model_list:
- model_name: ""
litellm_params:
model: "sambanova/"
api_base: "os.environ/SAMBASTACK_BASE_URL"
api_key: "os.environ/SAMBASTACK_API_KEY"
rpm: 5
- model_name: ""
litellm_params:
model: "sambanova/"
api_base: "os.environ/SAMBASTACK_BASE_URL"
api_key: "os.environ/SAMBASTACK_API_KEY"
rpm: 5
general_settings:
database_url: "os.environ/DATABASE_URL"
database_connection_pool_limit: 100
database_connection_timeout: 60
```
Replace `` and `` with your actual model names from SambaStack.
### Step 6: Run LiteLLM proxy
```bash theme={null}
litellm --config ./litellm_config.yaml --detailed_debug
```
### Step 7: Verify installation
Navigate to `http://localhost:4000/`. Use `admin` as the username and your master key as the password.
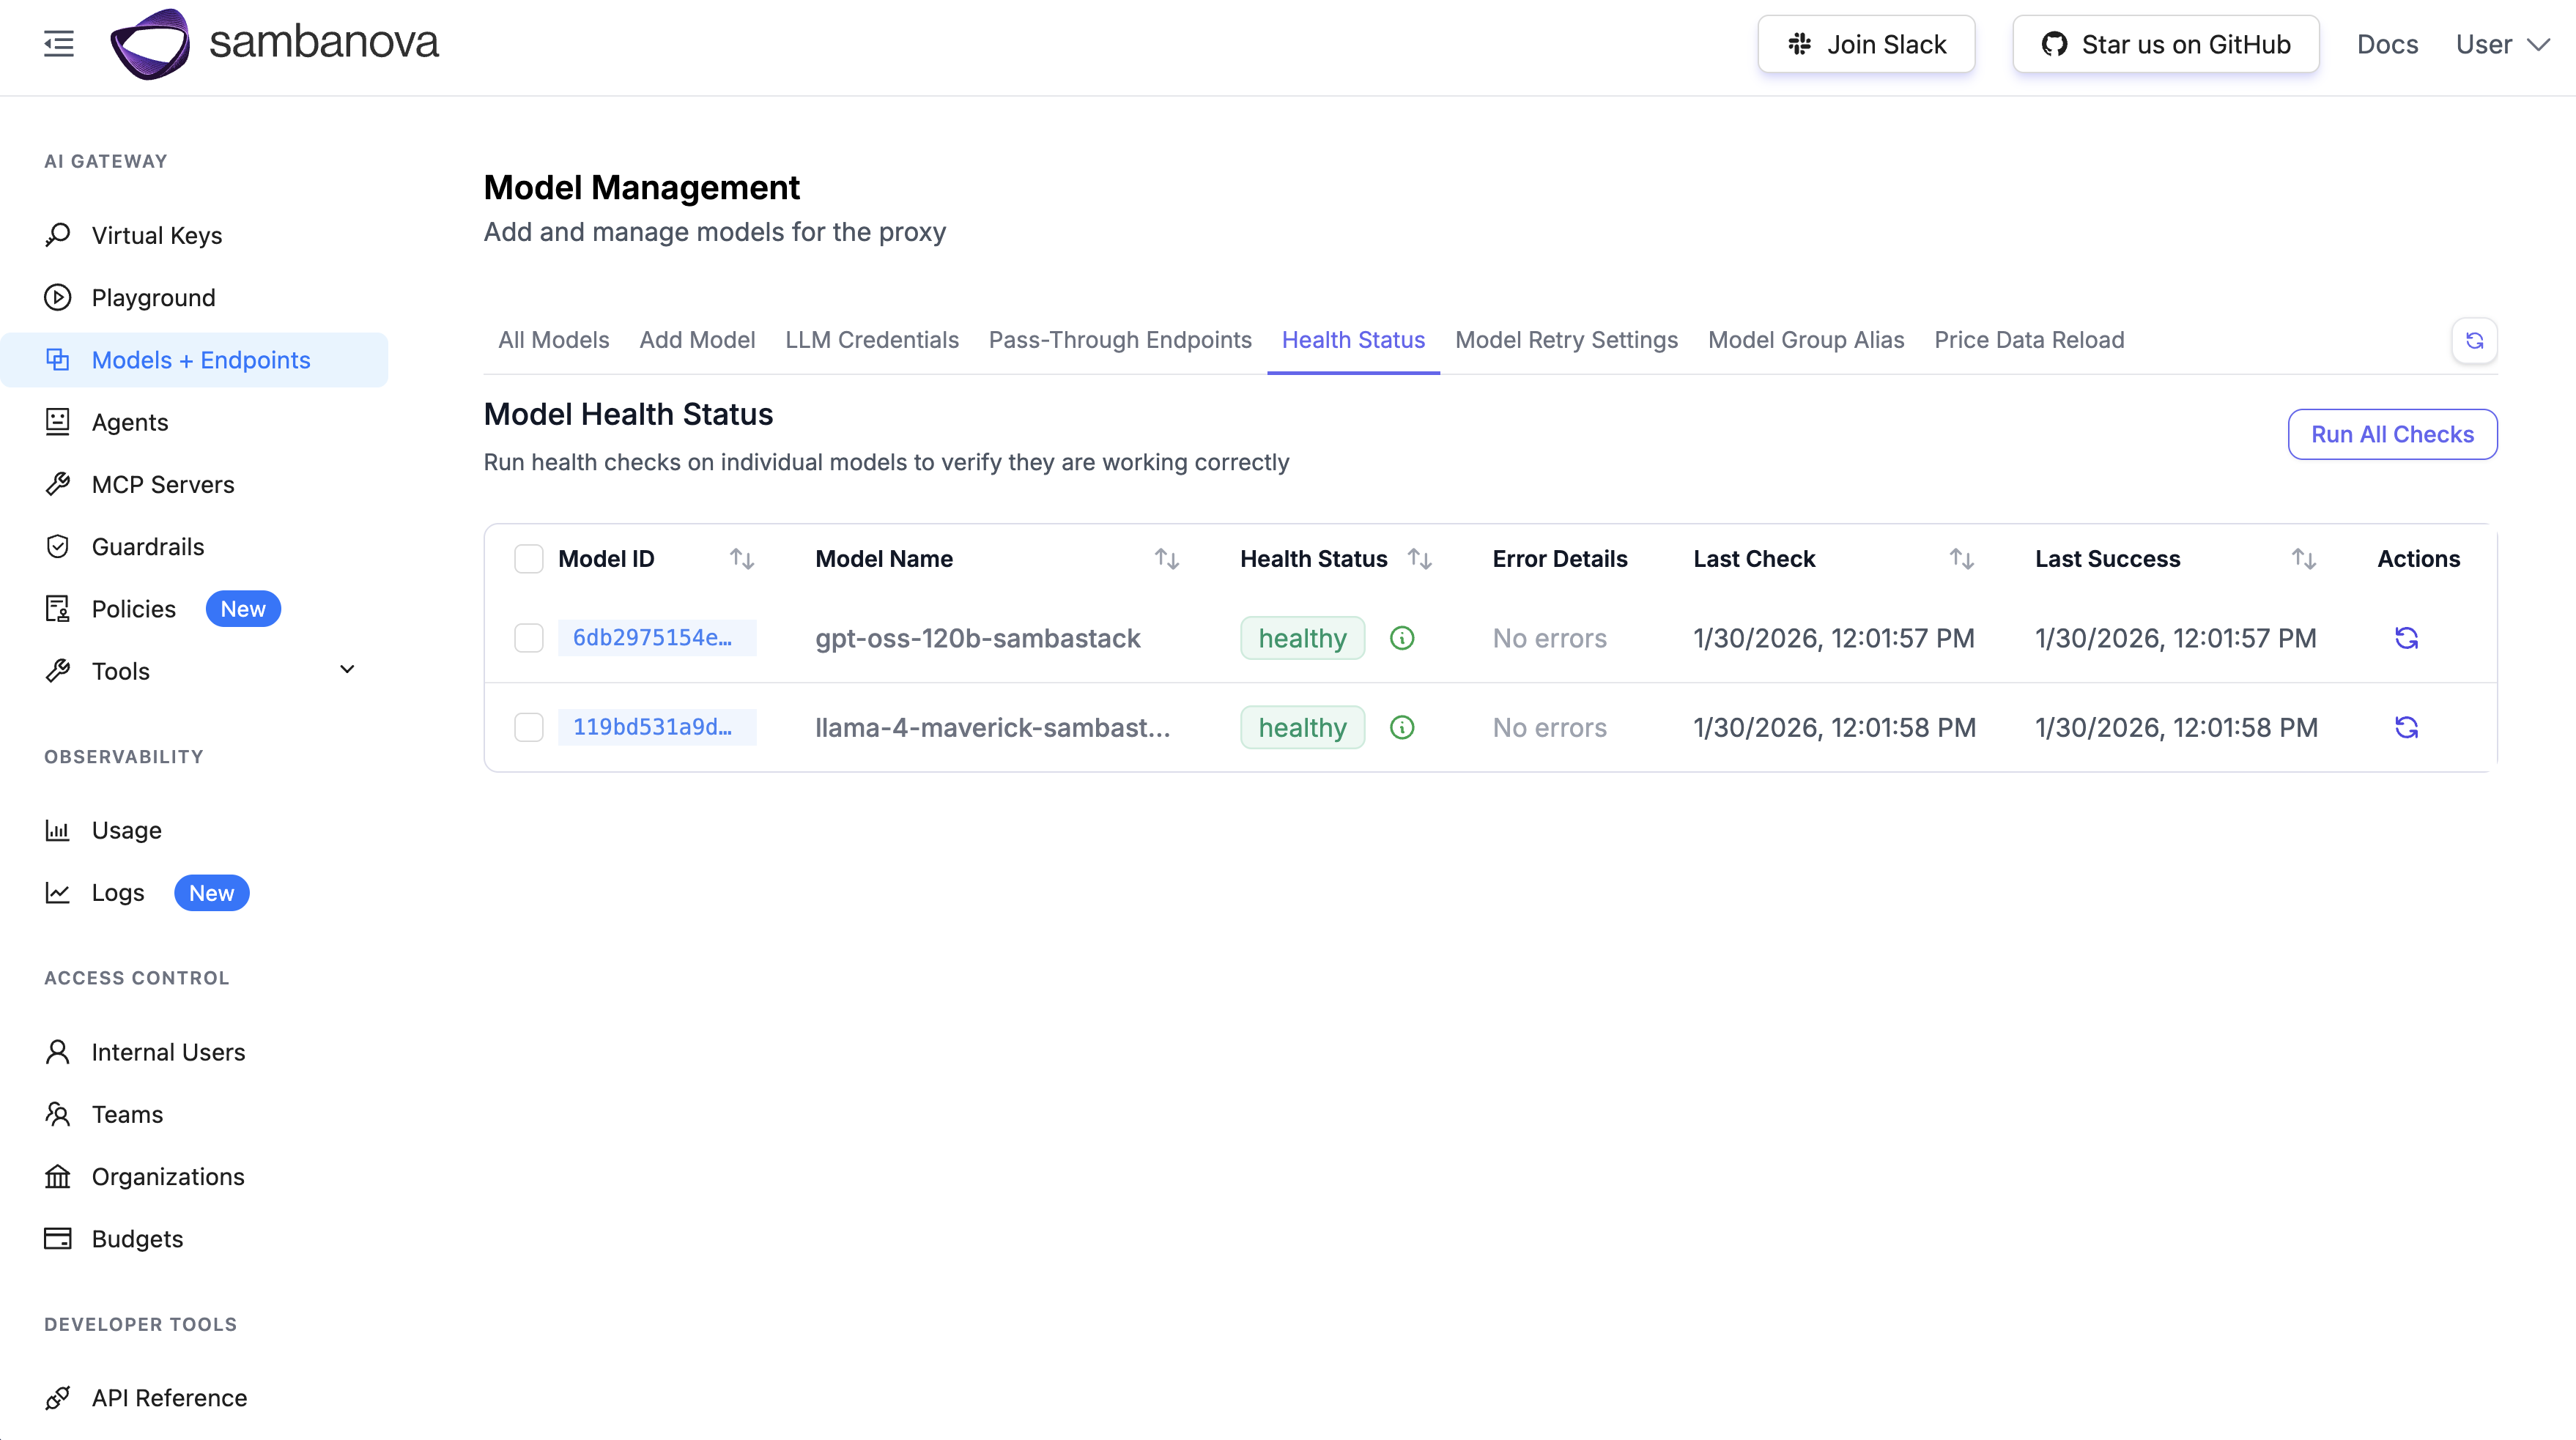
Go to **Model Management → Health Status**. Your model should appear as connected to SambaStack.
Click Health Check to confirm connectivity.
| Layer | SambaStack | LiteLLM | Your App |
| :----------------------- | :----------------------------------------------------------- | :------------------------------------------------------ | :--------------------------------------- |
| **Hardware & runtime** | Runs models on RDU nodes; manages kernels, batching, queuing | – | – |
| **Inference API** | Provides OpenAI-compatible endpoints | Proxies endpoints behind a single gateway URL | Calls SambaStack directly or via LiteLLM |
| **Traffic controls** | Platform-level limits | Per-key, user, model, team rate limits, quotas, budgets | Optional safeguard logic |
| **API key management** | Issues/validates platform API keys | Rotate, scope, revoke app keys; map app→platform keys | Store app-level secrets |
| **Model access control** | Platform API keys grant access to deployments | Per-app-key allow/deny by model alias | Select allowed aliases per role/policy |
## Prerequisites
Before starting, ensure you have:
* Python 3.11 or above with pip
* PostgreSQL database (local, self-hosted, or managed)
* SambaStack API key and base URL
You'll also need to configure these environment variables:
| Variable | Description |
| :-------------------- | :------------------------------------------------------------------------------------- |
| `SAMBASTACK_BASE_URL` | Base URL for SambaStack's OpenAI-compatible API |
| `SAMBASTACK_API_KEY` | Platform API key used by LiteLLM to call SambaStack |
| `DATABASE_URL` | PostgreSQL connection string (format: `postgresql://user:password@host:port/database`) |
| `LITELLM_MASTER_KEY` | Admin key for the LiteLLM proxy and API |
| `LITELLM_SALT_KEY` | Salt for encrypting credentials in DB (cannot be changed once set) |
| `PORT` | Port for the LiteLLM HTTP server (default: `4000`) |
| `STORE_MODEL_IN_DB` | Set to `True` to store model definitions in DB |
## Getting started
For additional installation options, refer to the [official LiteLLM documentation](https://docs.litellm.ai/).
### Step 1: Set up virtual environment
```bash theme={null}
python3 -m venv litellm-env
source litellm-env/bin/activate
pip install "litellm[proxy]" prisma
```
### Step 2: Configure environment variables
```bash theme={null}
export SAMBASTACK_BASE_URL="https://your-sambastack-instance.example.com/v1"
export SAMBASTACK_API_KEY="your-sambastack-api-key"
export DATABASE_URL="postgresql://litellm_admin:YOUR_PASSWORD@localhost:5432/sambastack_litellm"
export LITELLM_MASTER_KEY="sk-admin-your-master-key"
export LITELLM_SALT_KEY="sk-salt-your-salt-key"
export PORT=4000
export STORE_MODEL_IN_DB=True
```
### Step 3: Set up database
Connect to PostgreSQL as a superuser:
```bash theme={null}
psql -U -d postgres
```
Create the database and user:
```sql theme={null}
CREATE USER litellm_admin WITH PASSWORD 'YOUR_PASSWORD';
CREATE DATABASE sambastack_litellm OWNER litellm_admin;
GRANT ALL PRIVILEGES ON DATABASE sambastack_litellm TO litellm_admin;
\c sambastack_litellm
ALTER SCHEMA public OWNER TO litellm_admin;
```
### Step 4: Initialize database schema
```bash theme={null}
# Find the schema path dynamically
SCHEMA_PATH=$(python -c "import litellm_proxy_extras; print(litellm_proxy_extras.__path__[0])")/schema.prisma
# Generate client and create tables
prisma generate --schema "$SCHEMA_PATH"
prisma db push --schema "$SCHEMA_PATH"
```
### Step 5: Create configuration file
Create `litellm_config.yaml`:
```yaml theme={null}
model_list:
- model_name: ""
litellm_params:
model: "sambanova/"
api_base: "os.environ/SAMBASTACK_BASE_URL"
api_key: "os.environ/SAMBASTACK_API_KEY"
rpm: 5
- model_name: ""
litellm_params:
model: "sambanova/"
api_base: "os.environ/SAMBASTACK_BASE_URL"
api_key: "os.environ/SAMBASTACK_API_KEY"
rpm: 5
general_settings:
database_url: "os.environ/DATABASE_URL"
database_connection_pool_limit: 100
database_connection_timeout: 60
```
Replace `` and `` with your actual model names from SambaStack.
### Step 6: Run LiteLLM proxy
```bash theme={null}
litellm --config ./litellm_config.yaml --detailed_debug
```
### Step 7: Verify installation
Navigate to `http://localhost:4000/`. Use `admin` as the username and your master key as the password.
Go to **Model Management → Health Status**. Your model should appear as connected to SambaStack.
Click Health Check to confirm connectivity.
 ## Teams, keys, and rate limits
For the full feature set, refer to the [official LiteLLM documentation](https://docs.litellm.ai/).
### Create a team
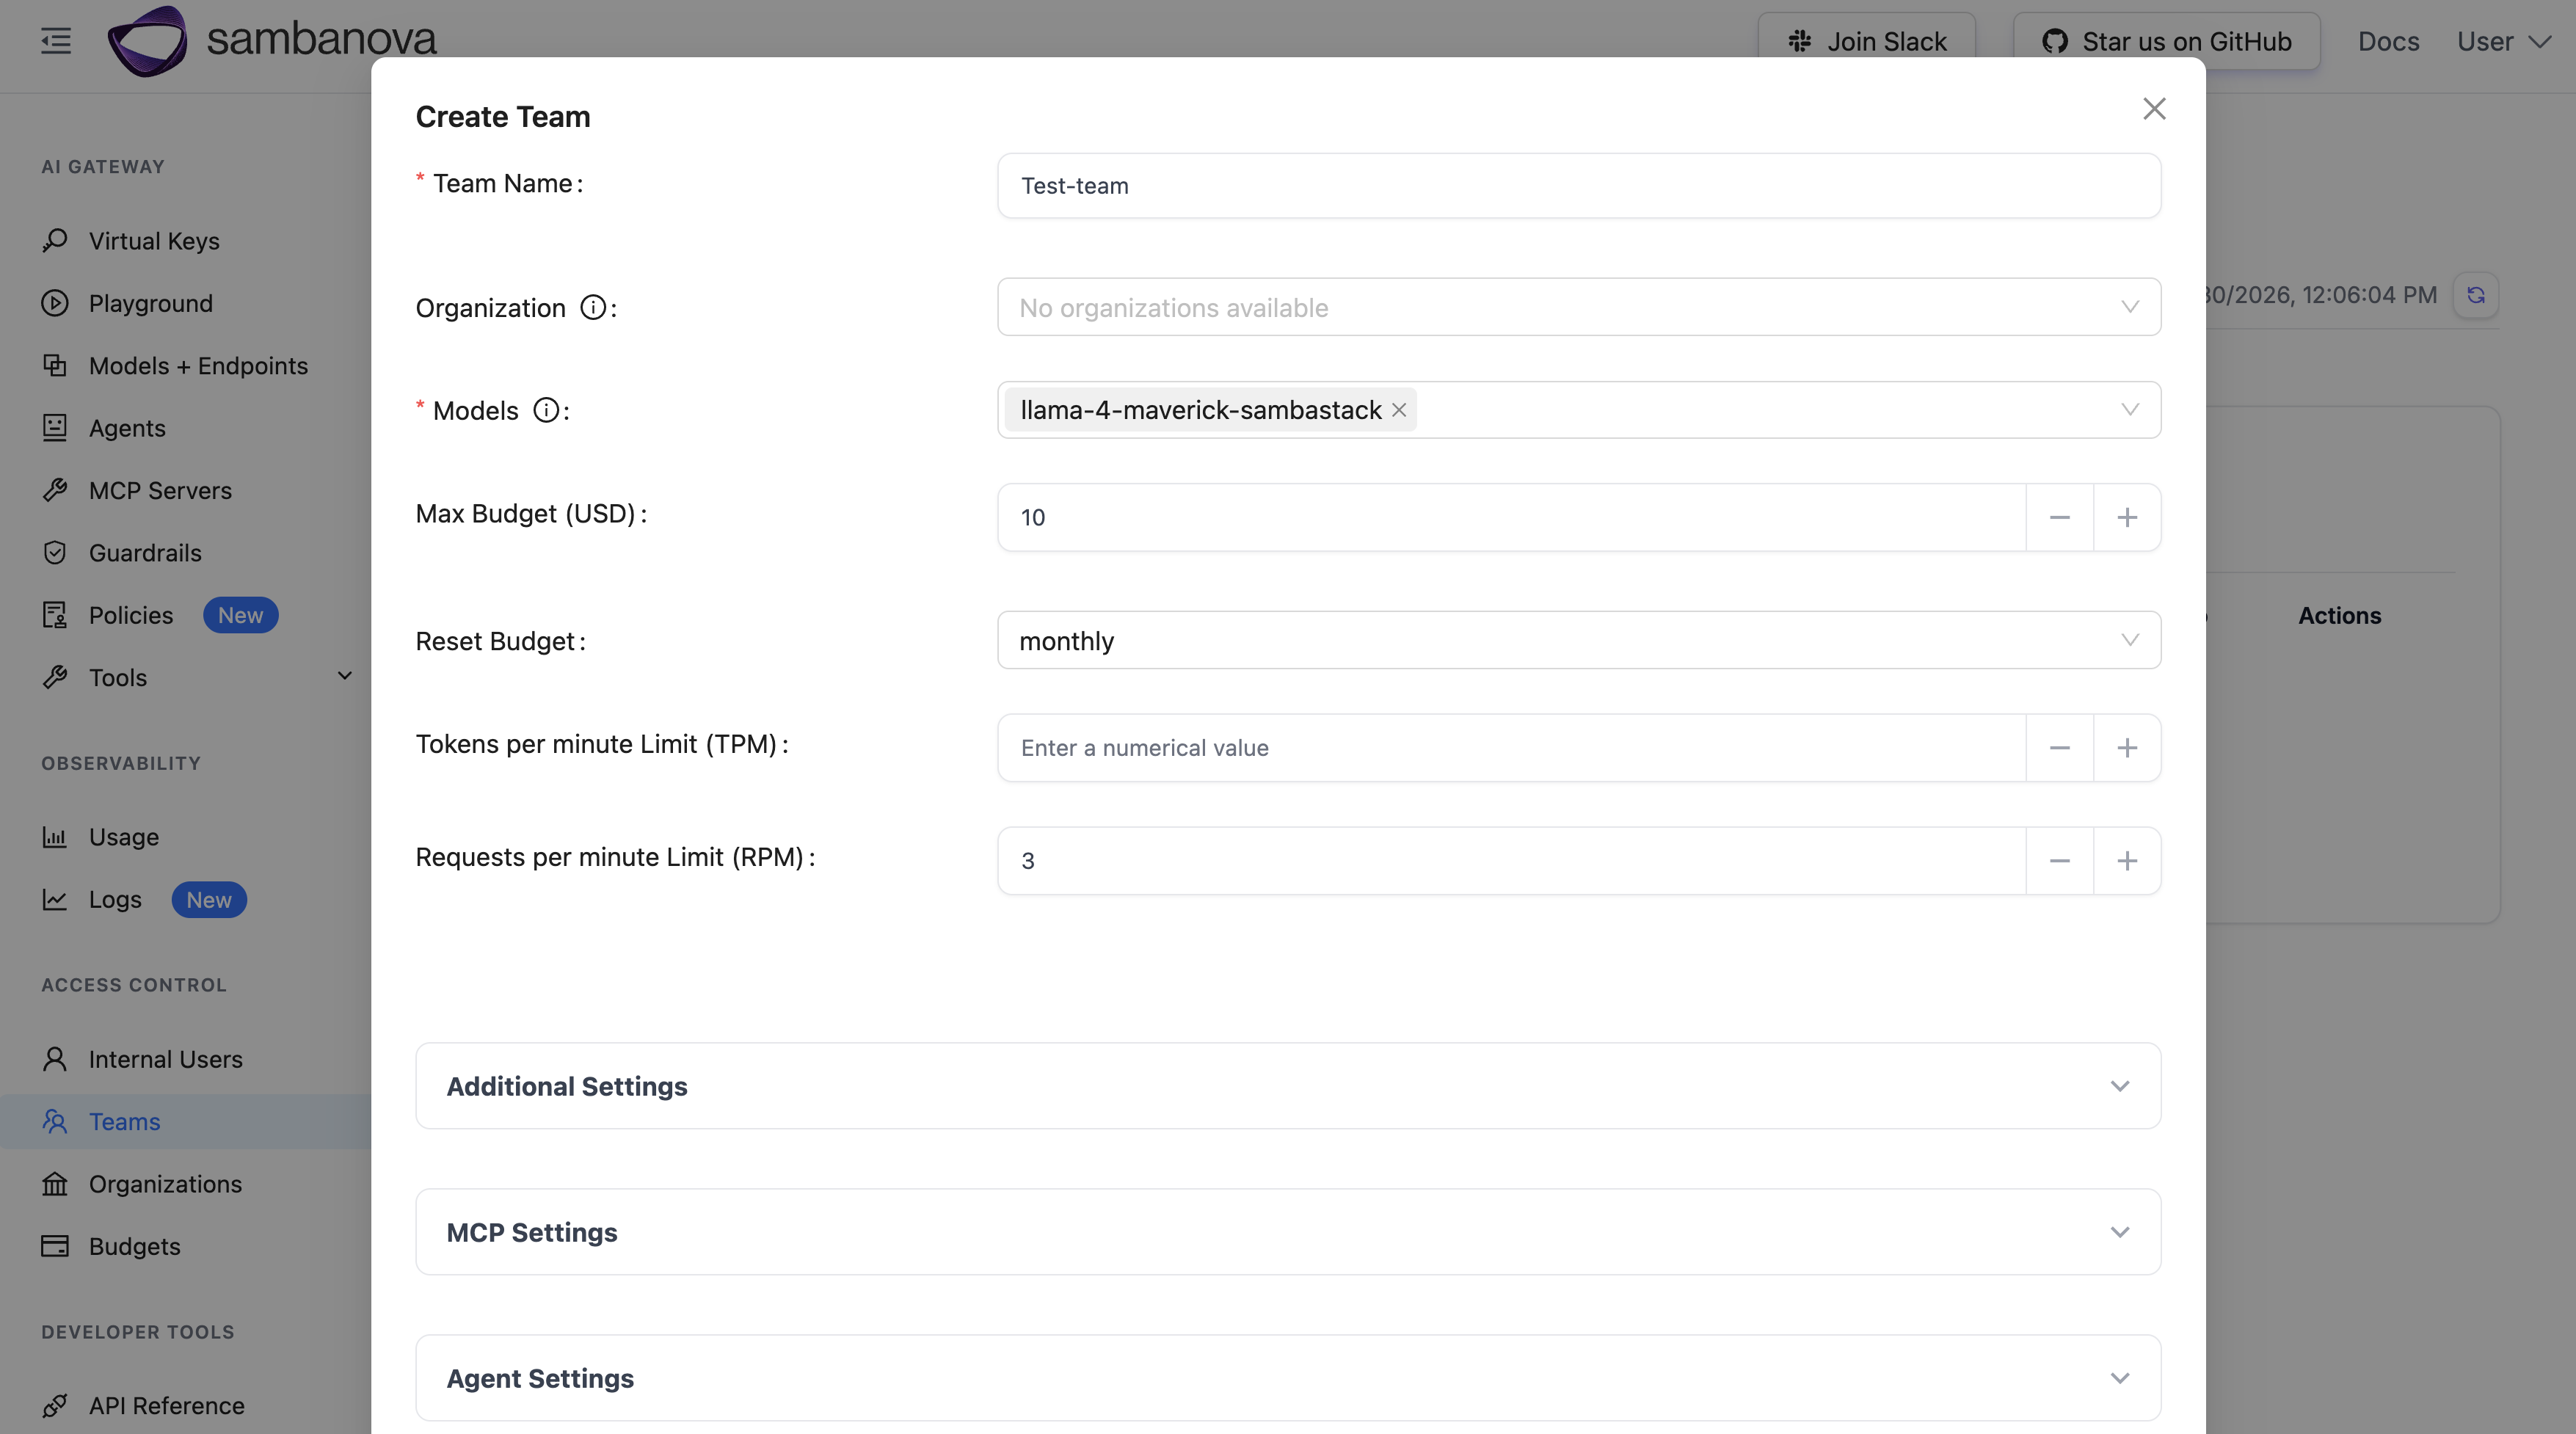
Go to **Teams → Create New Team**
* **Team name:** e.g., `Test-team`
* **Models:** Select your SambaStack model
* **Max Budget (USD):** e.g., `10`
* **Reset Budget:** e.g., `monthly`
* **RPM limit:** e.g., `3`
## Teams, keys, and rate limits
For the full feature set, refer to the [official LiteLLM documentation](https://docs.litellm.ai/).
### Create a team
Go to **Teams → Create New Team**
* **Team name:** e.g., `Test-team`
* **Models:** Select your SambaStack model
* **Max Budget (USD):** e.g., `10`
* **Reset Budget:** e.g., `monthly`
* **RPM limit:** e.g., `3`
 Click **Save** to create the team.
### Invite a user
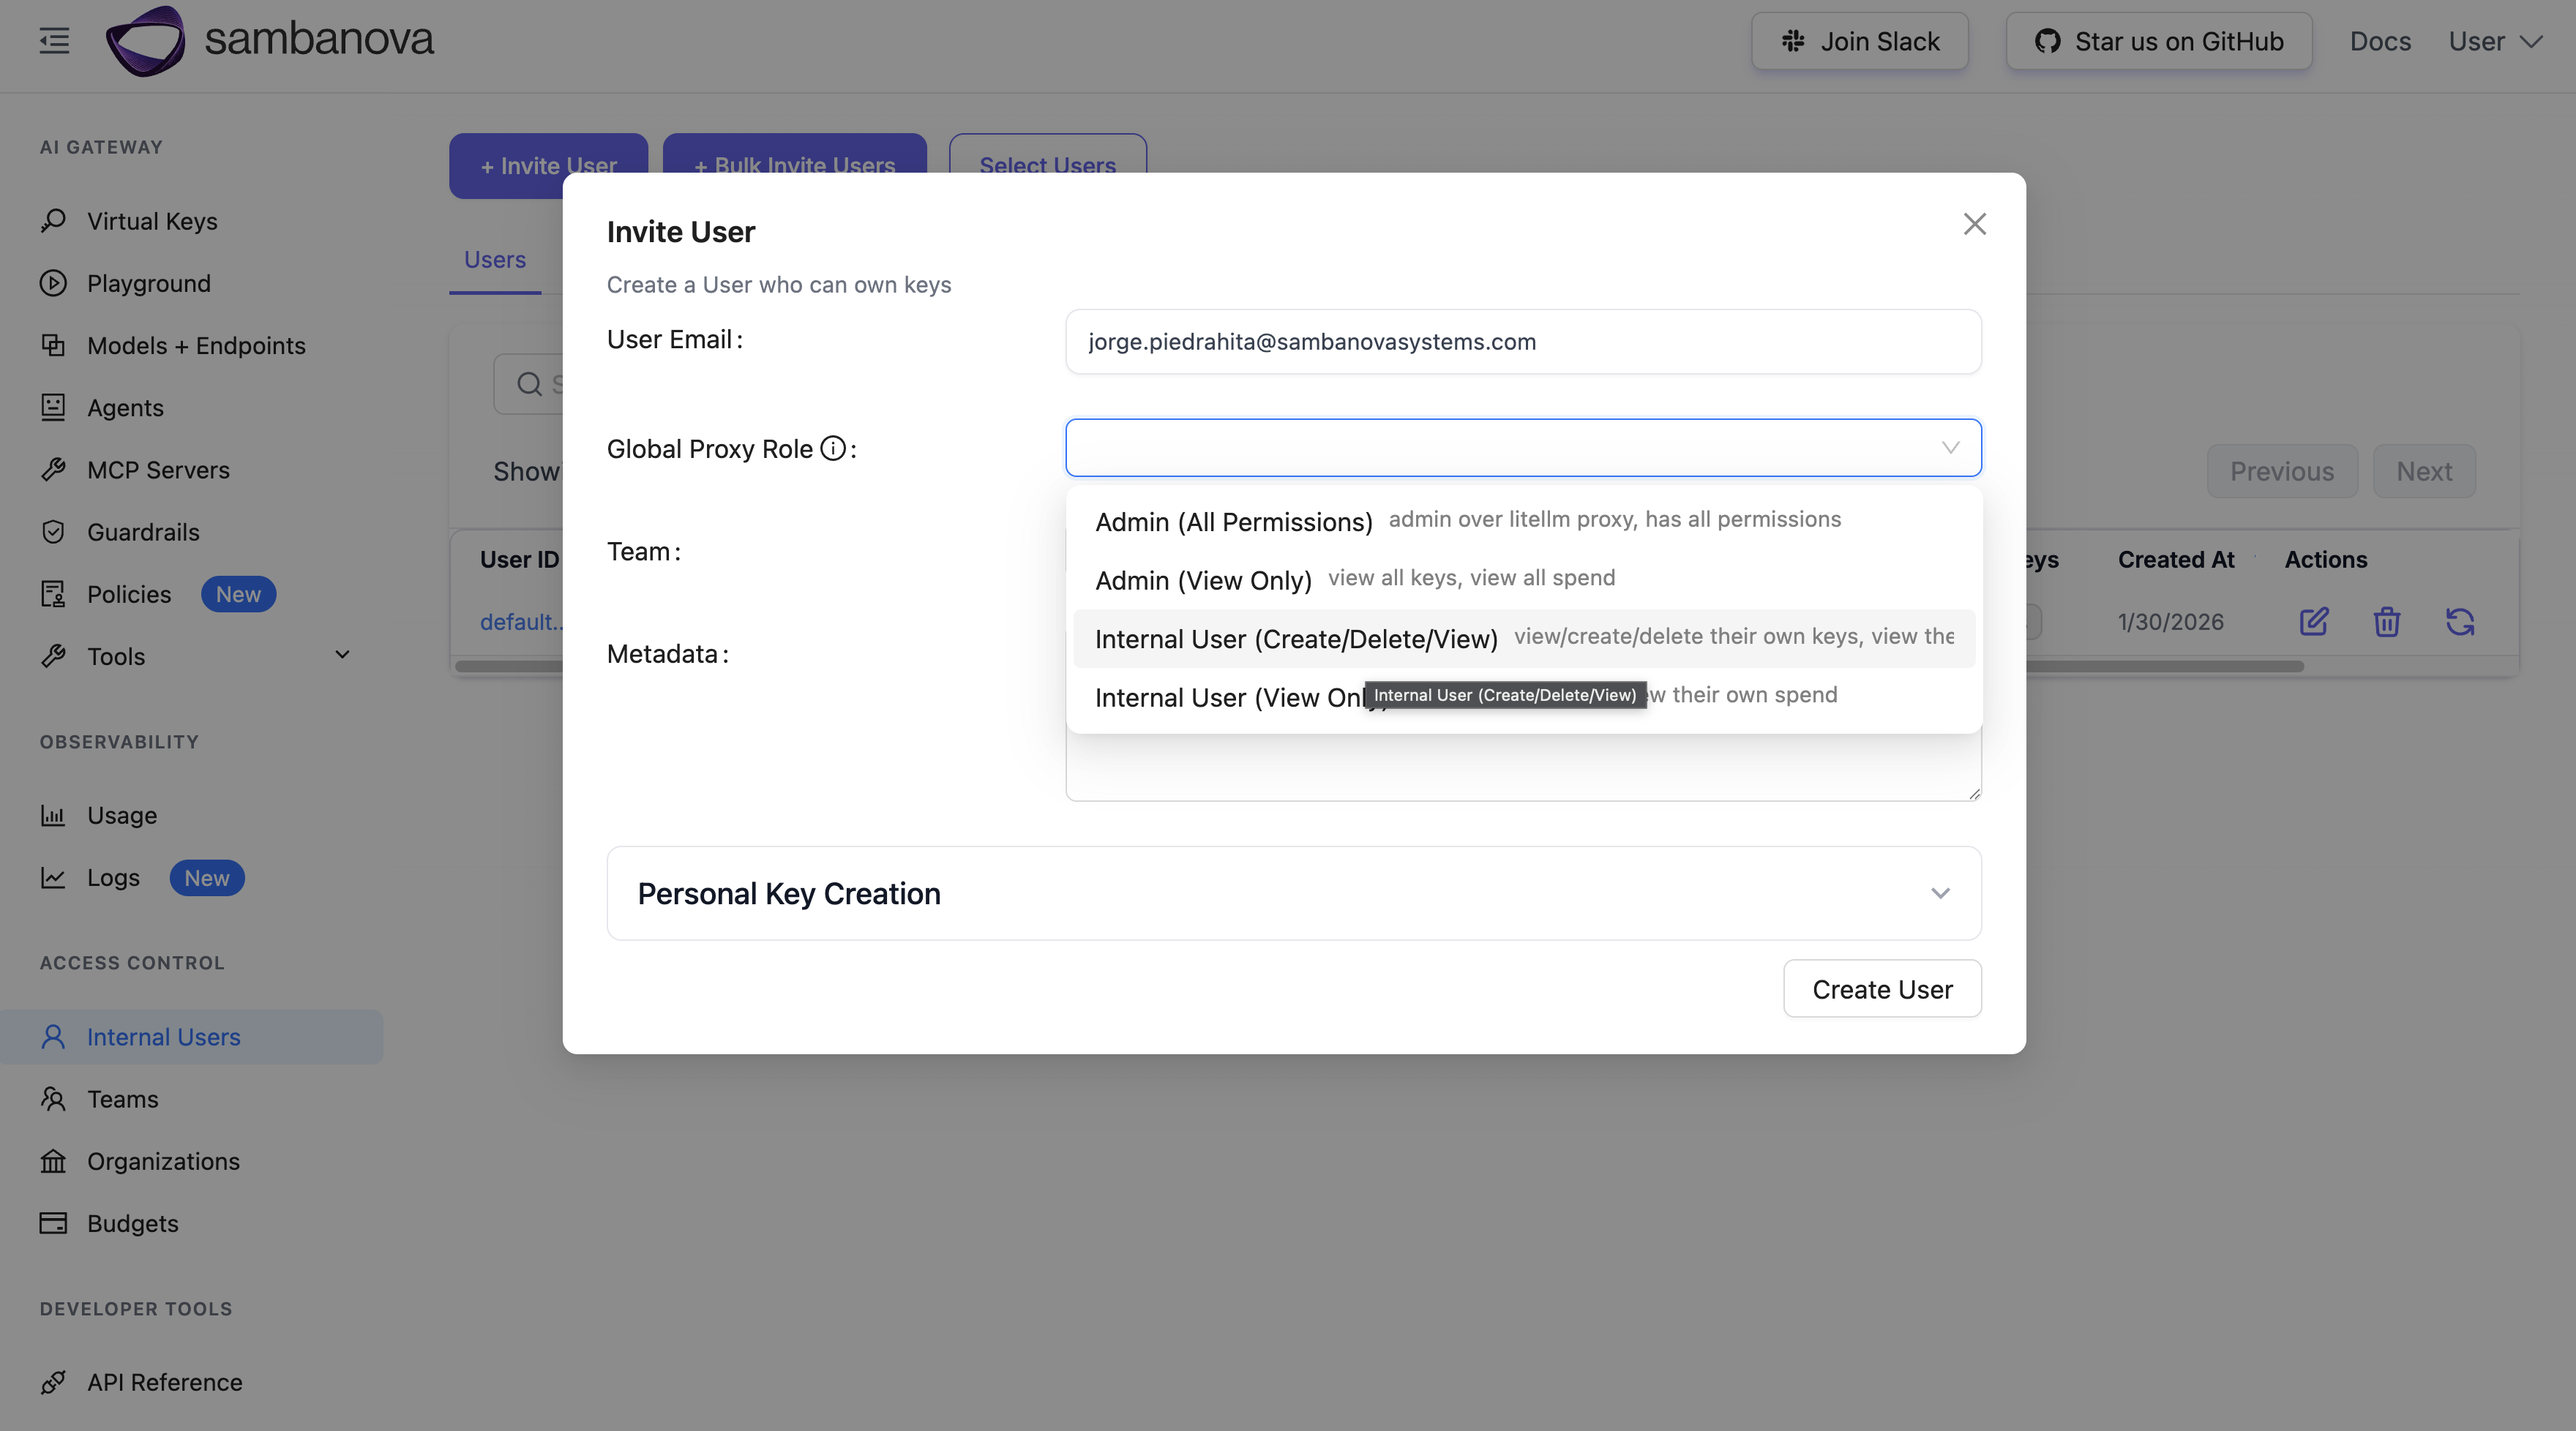
Go to **Internal Users → Invite User**
Enter email, choose a role, and assign to your team.
Click **Save** to create the team.
### Invite a user
Go to **Internal Users → Invite User**
Enter email, choose a role, and assign to your team.
 Copy the invitation link and share it with the user.
### Create virtual API keys
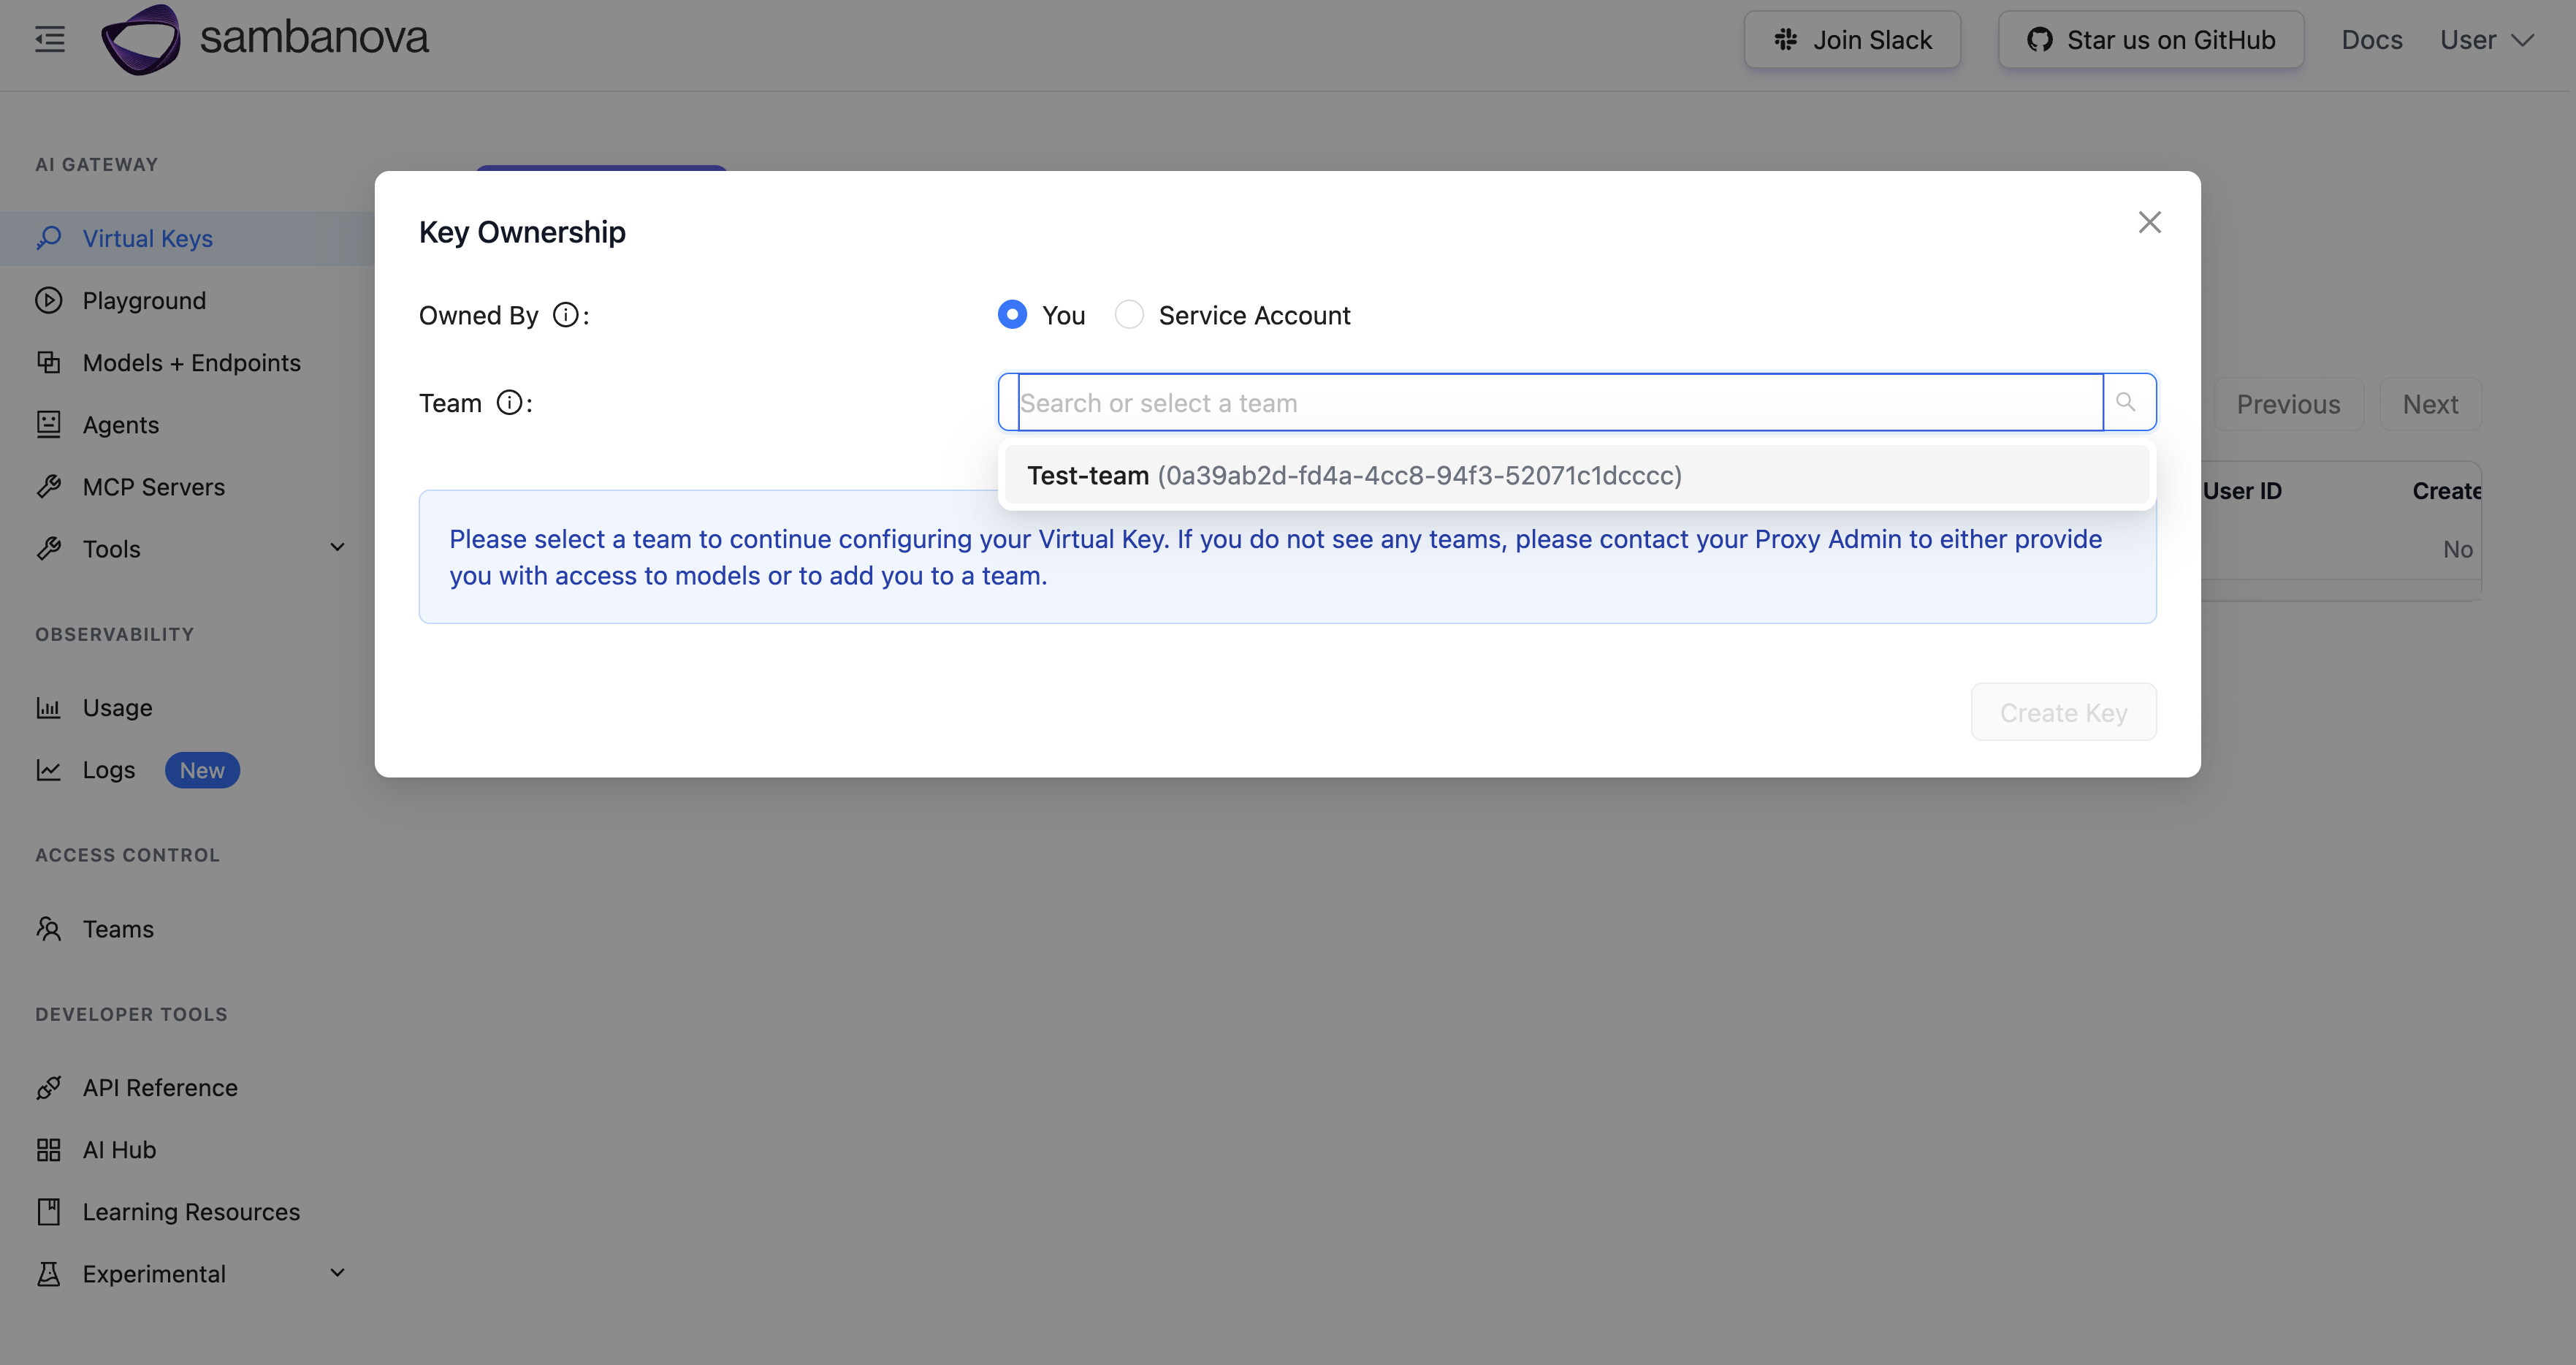
Go to **Virtual Keys → Create New Key**
* **Team:** Select your team
* **Key Name:** e.g., `limited-key`
* **Models:** Choose All Team Models or specific model
Copy the invitation link and share it with the user.
### Create virtual API keys
Go to **Virtual Keys → Create New Key**
* **Team:** Select your team
* **Key Name:** e.g., `limited-key`
* **Models:** Choose All Team Models or specific model
 Click **Create Key** and copy immediately. This is shown only once.
### Test the virtual API key
```bash theme={null}
curl -X POST http://localhost:4000/v1/chat/completions \
-H "Content-Type: application/json" \
-H "Authorization: Bearer " \
-d '{
"model": "",
"messages": [{"role": "user", "content": "Hello!"}]
}'
```
### Monitor usage and logs
* **Usage:** View spend, requests, and tokens by time range and team at **Usage** tab
* **Logs:** Review request outcomes including rate-limit failures at **Logs** tab
By default, request/response bodies aren't stored. Enable storage in the proxy configuration if required for compliance.
## In-cluster installation
For production, install LiteLLM in the same Kubernetes cluster as SambaStack for optimal performance. See the [LiteLLM Kubernetes deployment guide](https://docs.litellm.ai/docs/proxy/deploy).
## Troubleshooting
### Health check fails
**Symptom:** Model health check returns connection error.
**Solutions:**
* Verify `SAMBASTACK_BASE_URL` is correct and accessible
* Confirm `SAMBASTACK_API_KEY` is valid
* Check network connectivity between LiteLLM and SambaStack
### Database connection errors
**Symptom:** LiteLLM fails to start with database errors.
**Solutions:**
* Verify `DATABASE_URL` format is correct
* Confirm PostgreSQL is running and accessible
* Check that database and user exist with correct permissions
### Prisma schema not found
**Symptom:** `prisma generate` fails with "schema not found" error.
**Solution:** Ensure virtual environment is activated and `litellm[proxy]` is installed. Use the dynamic path detection shown in Step 4.
## Additional resources
* [LiteLLM Documentation](https://docs.litellm.ai/)
* [LiteLLM Kubernetes Deployment](https://docs.litellm.ai/docs/proxy/deploy)
* [LiteLLM API Reference](https://docs.litellm.ai/docs/proxy/api_reference)
Click **Create Key** and copy immediately. This is shown only once.
### Test the virtual API key
```bash theme={null}
curl -X POST http://localhost:4000/v1/chat/completions \
-H "Content-Type: application/json" \
-H "Authorization: Bearer " \
-d '{
"model": "",
"messages": [{"role": "user", "content": "Hello!"}]
}'
```
### Monitor usage and logs
* **Usage:** View spend, requests, and tokens by time range and team at **Usage** tab
* **Logs:** Review request outcomes including rate-limit failures at **Logs** tab
By default, request/response bodies aren't stored. Enable storage in the proxy configuration if required for compliance.
## In-cluster installation
For production, install LiteLLM in the same Kubernetes cluster as SambaStack for optimal performance. See the [LiteLLM Kubernetes deployment guide](https://docs.litellm.ai/docs/proxy/deploy).
## Troubleshooting
### Health check fails
**Symptom:** Model health check returns connection error.
**Solutions:**
* Verify `SAMBASTACK_BASE_URL` is correct and accessible
* Confirm `SAMBASTACK_API_KEY` is valid
* Check network connectivity between LiteLLM and SambaStack
### Database connection errors
**Symptom:** LiteLLM fails to start with database errors.
**Solutions:**
* Verify `DATABASE_URL` format is correct
* Confirm PostgreSQL is running and accessible
* Check that database and user exist with correct permissions
### Prisma schema not found
**Symptom:** `prisma generate` fails with "schema not found" error.
**Solution:** Ensure virtual environment is activated and `litellm[proxy]` is installed. Use the dynamic path detection shown in Step 4.
## Additional resources
* [LiteLLM Documentation](https://docs.litellm.ai/)
* [LiteLLM Kubernetes Deployment](https://docs.litellm.ai/docs/proxy/deploy)
* [LiteLLM API Reference](https://docs.litellm.ai/docs/proxy/api_reference)